A year or so ago, I wrote up an Instructable about installing a bunch of LEDs in a Lego Mini Cooper. The innovation, such as it was, was that the LEDs could be controlled with a smartphone (or through any web browser, for that matter).

As I laboriously described in that Instructable, most of the effort back then related to wiring up the Mini without the whole thing falling apart. Somewhat to my surprise, the Mini subsequently survived a trip from Connecticut to Toronto and has worked, more or less, ever since.
“If it wasn’t broken, he fixed it until it was” will be my epitaph, at best, so when the Mini returned home for Christmas, it was time for Lego Mini 2.0. After all, if Tesla can push software updates to its cars, how difficult could it be?
I had a few ideas:
- Improve the rather clunky user interface
- Add a horn!
- Improve the “auto lights” feature; and, most important
- Add a game function (even I recognized that the novelty of turning the Mini’s lights on and off with your phone was going to pall sooner or later)
The game function was the biggest task, not least because it wasn’t immediately obvious to me what sort of game it could be. The Mini is far too fragile to sustain a game involving it being handled (except possibly a depressing variant of Jenga). Another hurdle was that I’ve never programmed a game in my life.
After a year of fruitless pondering, I stumbled across a project on Hackster, in which an Arduino Uno is used to emulate a memory game toy dating from the 1970s called Simon. In a nutshell, the Simon device played a sequence of lights that the player then had to remember and play back by pressing buttons. After every successful round the sequence was increased in length.
Despite being of the requisite vintage, I’d actually never heard of this game, and I have to say it is amazing what passed for amusement back in the day. Even more amazing is that the Simon game is still on sale, and garnering rave reviews, on Amazon. Clearly, this had to be the prime candidate to adapt for my purposes. After all, the Mini already had the lights, so all I’d need to do was ditch the physical buttons and have user input provided via a smartphone. On the software side, therefore, it seemed this would just be largely a cut-and-paste-job.
But first, I needed to make some minor modifications to the hardware.
Step 1: Components, Tools & Resources

If you are replicating this project with a Lego Mini, you’ll need all the stuff listed in my earlier Instructable. The only extra thing you’ll need is a passive buzzer, which is used for the horn and to make a bunch of annoying noises during the game (which can be disabled).
As will become clear when discussing the software, there is no real need to use a Lego Mini for the game. You could use another Lego kit, or indeed a bunch of LEDs on a breadboard hooked up to any ESP8266 development board. With some relays, you could even use your home’s room lighting. Kids, ask your parents first on that one though.
Similarly, no additional tools or resources are needed beyond those listed for the original project.
If you are among the handful of people who read the original project description, you will know that the Lego Mini was originally purchased as a gift to my grown-up daughter, who has an almost identical “real” Mini, or as nearly identical as it could be given it is a New Mini, not a “Classic”. The lack of any meaningful additional components made this new project all the more attractive since it would enable me to effectively re-gift Lego Mini 2.0 as a new Christmas present without costing hardly a dime. Genius!
Step 2: Hardware Modification
The original project had individually controllable RGB interior LEDs. These consumed three pins on the NodeMCU, which I was using as the development board. After discrete consultation with the Lego Mini owner, it was determined the RGB LEDs were an underused feature. This was important intelligence because I needed to free up a pin for the buzzer/horn.
The above circuit diagram is from the original project. The only change needed for this project was to remove the RGB LEDs and use the three freed-up pins as follows:
- D1 for the buzzer control signal (which is also wired directly to the 5VDC power supply)
- D7 for a white interior LED
- D8 for one of those flashing colored LEDS, which I have dubbed a “disco” light
The buzzer itself tucks away neatly under the engine compartment so running the wires back to the NodeMCU was a snap.
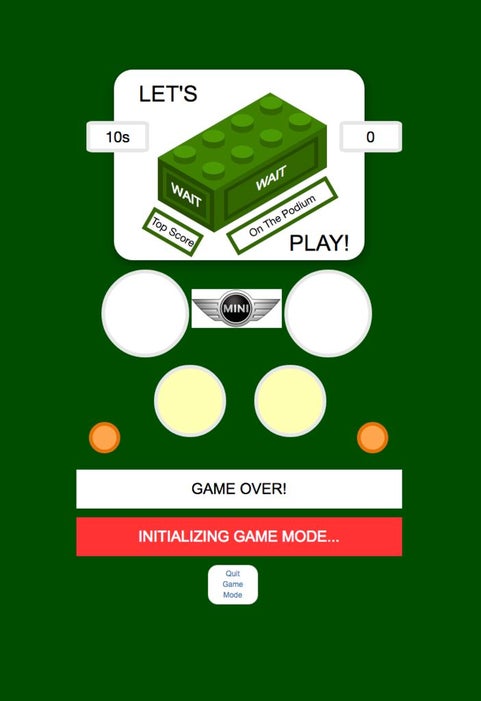
Step 3: Updating the GUI

The first step in updating the GUI was to create four separate web pages:
- A “splash screen” which launches via a custom icon on your smartphone and links to the other pages
- The “Controls” page which, well, controls the lights (and now, of course, the horn)
- The “Game” page
- A Set-Up page which contains configuration options such as:
- Turning the sound on and off
- Setting the time zone (the Mini gets time from the internet so it can flash its lights on the hour with the appropriate time)
- Adjusting when the “auto lights” will turn the headlights on and off based on ambient light level
- Resetting the High Score and High Scorer name (stored in EEPROM)
Separating out the functions in this way makes for a much more app-like experience.
Getting the NodeMCU to serve multiple pages was one of the challenges for this project. After trying a couple of different approaches I came across the code you see in lines 232 through 236 of the main Arduino sketch. This works great – simply create your index file then name subsequent pages page1, page2 etc. I did find I had to put all the resource files (CSS and images) in the root data folder but this isn’t really an issue for sites of this size.
Next, I had to get to work with CSS and Javascript to make something that looked like it belonged to a Lego Mini. Since I know next-to-nothing about either subject there was a lot of Googling here before getting something I was happy with. I started by shamelessly copying a CSS-styled lego brick on CodePen here. I also wanted to move away from labelling the buttons with text and ending up using simple graphics from Icons8, which were perfect for my purposes. The rest sort of fell in place from there. The pages render pretty well on all iPhones I’ve tested them on. Hopefully the same is true for Android phones too (looks OK on a desktop Chrome browser).
Step 4: The Game Code
Communication between the NodeMCU server and the smartphone browser is via Websockets. After a button is pressed by the user, the browser sends a text character to the NodeMCU that corresponds to one or more of the Mini’s lights. Additional characters are sent to control the game flow. The Arduino code then takes action based on the character received. Websocket communication can only handle binary and text characters so some conversion is needed for integers (e.g. the time zone).
As I mentioned, I had originally anticipated using the code from the linked Hackster project for the core game functions. What I anticipated would happen is that, after a player pressed a button, the corresponding LED would light up and the code would do a digitalRead on all the LEDs to see if the right one was lit (the Hackster project checks the physical button inputs but it is the same idea). This did work, sort of, but for reasons that are still unclear to me, not perfectly. About 10% of the time the Mini would say an incorrect button was pressed when, in fact, the correct one had been. Everything seemed OK based on what I could see in the serial monitor and in the browser console so I’ve no idea why it didn’t work.
After a lot of faffing with trying to introduce some error checking, I ditched the whole idea of reading the LED states and created an “answer” array that checks whether the Websocket text received corresponds to the correct pin stored in the “sequence” array that plays the light sequence to remember. This seems to be 100% reliable even if the way I’ve implemented it is a bit plodding. After coming up with this method, I happened upon this, which is an interesting exploration of the way some digital locks work and analogous to the approach used in the game.
Timing of button inputs is now handled with Javascript on the browser side (I allow a very generous 10 seconds between button inputs) and the flow of the game is now entirely controlled by the player rather than hard-coded. The display includes windows showing time remaining to make the next button press and the number of inputs remaining before the sequence is correctly submitted by the player.
High score is stored in EEPROM (or what passes for EEPROM in the ESP8266 world) and if a player hits a new high score a pop-up box allows them to enter a name of their choosing, which is also stored in EEPROM. These values can be reset via the Set-Up page (I’m sure there could be legitimate reasons for this).
With all that said, I did re-use a decent chunk of the Hackster game code which speeded things up a lot.
Source: Lego Mini Memory Game