Summary of “HiFi” Online Radio: Internet Streaming With ESP32 and VS1053
This project builds an Internet radio streamer using an ESP32 and VS1053 MP3 decoder, featuring WiFi multi-SSID support, TFT display with scrolling metadata, multi-function buttons, IR remote control, preset saving to internal memory, deep-sleep shutdown, and serial debugging. The author describes hardware planning, wiring, use of proto PCBs and JST plugs, and key firmware features like multi-network connection, robust text scrolling, button press-length behaviors, and WiFi reconnection logic.
Parts used in the HiFi Online Radio:
- ESP32 (ESP32-WROOM-32U recommended)
- VS1053 MP3 Module
- 1.8 inch 128x160 TFT
- Buttons (6 total: forward, backward, 4 presets)
- WiFi Antenna with PCI U.FL IPX connector
- IR Receiver
- Cables
- Soldering iron
- Proto PCBs (optional but useful)
- JST plugs (optional)
- Glue gun (optional)
- Materials/skills for a case (wood, metal, plastic) (optional)
Instructions on creating an Internet Radio Streamer with the ESP32 and the MP3 decoder “VS1053”. Numerous tutorials exist for a device like this online (many of which provided the information and ideas I needed), but I decided to share my own version as I had to find unique solutions to meet the requirements of my project. I wish to combine those solutions into a single project for sharing. Some of them are likely beginner mistakes and my code could definitely be improved, but for beginners like myself reading this, I hope to clarify many doubts about programming certain things.
The reason I included “HiFi” in my title is because I planned to use this Streamer for playing internet music on my stereo system. I always wanted to add a streamer to my setup, but the prices of popular brands were too expensive for something I believed could be easily created. Additionally, I always had the option to link a xCast device for streaming from my phone or directly connect a laptop. However, none of those options were the ultimate and reliable setup I desired for my “desk.”
Because of COVID, I was able to find time to begin tinkering with Arduino and later, with ESP for various DIY projects… and then I had a realization about creating my desired streamer!
The solutions I came across online were either too simple or included features I didn’t need, such as amplification stages, speakers, and batteries. I was looking for a product that could seamlessly integrate into my current audio setup, allowing me to use it with my existing amplifier and speakers on a permanent basis. Here it is, finally!
In conclusion, this project will provide you with:
- An internet radio streamer that uses WiFi, which can be connected to any amplifier, active speaker or even headphones using any 5V power source.
- A way to preset more than one WiFi, so you can connect this device in different places without having to compile again
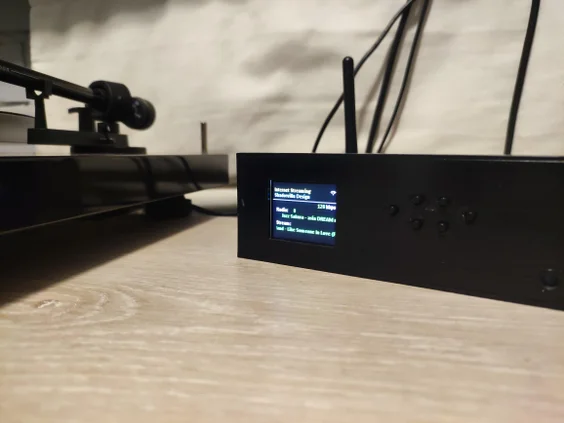
- A streamer that shows complete info about the source and what is playing, using text scrolling
- Buttons with different functions depending of the length of the press
- A way to save radios on internal memory
- A way to shut down the device (deep sleep)
- Using a remote control through IR
- Debugging through Serial Monitor
Supplies
- ESP32 (I used ESP32-WROOM-32U so I could connect an external WiFi antenna to it)
- VS1053 MP3 Module
- TFT (for this project I used 1.8 inch 128×160 TFT)
- Buttons
- WiFi Antenna (with PCI U.FL IPX connector to attach to ESP 32U model)
- IR Receiver
- Cables
- Solder iron
Optionals (but really useful):
- Proto PCBs (to mount ESP and buttons)
- JST plugs (to avoid some soldering and ease connection/interchange of components)
- Glue gun
- Some skills (wood, metal, plastic) for the case
Step 1: Plan Ahead (the Hardware)
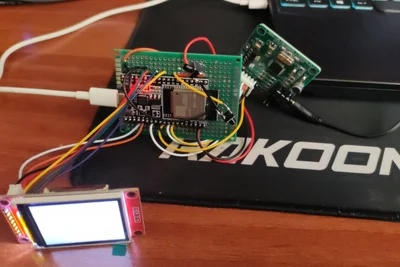
This was simultaneously the most challenging and simplest aspect of the whole procedure for me. Challenging due to my “knowledge” as I chose pins that did not fulfill the intended purpose. Initially, I experimented and made mistakes, then I turned to the ESP32 documentation to study the function of each pin in order to improve my understanding. Following that, it was extremely simple to organize, solder, and install everything in position!!
To begin with, I strongly suggest that you thoroughly plan out all the items you will need and the relationships you aim to establish. I expect you will create a version of this design, so I urge you to carefully review the compatibility of the various pins on the ESP32 to avoid any potential issues (as I encountered in some cases, not all pins are suitable for every purpose).
Firstly, I created a PCB layout on a spreadsheet, positioned the ESP32 on top, assigned a specific color to each square for components, and designated a font color for each cable to be used.
I utilized a Proto PCB to install the ESP32 and simplify the soldering of each individual pin, especially beneficial when pins are shared (5V or ground).
Instead of soldering the TFT, MP3 decoder, and IR receiver, I opted to use JST plugs for each of them, leaving the other end of the cables open for soldering onto the Proto PCB.
The PCI U.FL IPX plug directly connects the antenna to the ESP32 board.
Lastly, regarding the buttons: I affixed them to a separate Proto PCB board not just to simplify soldering, but also to keep them securely in place for potential case installation in the future.
After going through all of that and examining my diagram with pins, parts, and wire hues, the soldering turned out to be quite simple.
I suggest connecting the ESP32 and utilizing the example libraries for each component (TFT, IR Receiver, MP3 Decoder, Buttons) to verify proper functionality at this stage. If that’s the case, then the soldering is satisfactory. If something doesn’t work, re-examine the soldering before replacing parts (I had to desolder and resolder multiple times before everything functioned correctly). I suggest using a glue gun on the soldering joints to prevent accidental disconnection when moving components and cables, especially when everything is working well.
A last caution: ensure that there are no pins touching each other before turning it on. I discarded 2 ESP modules due to improper soldering causing a short-circuit with certain pins.
Step 2: The Code
Here I’ll explain some parts of the code that were my special requirements. I won’t get into details of everything (since most of it is basic coding or is commented in the file), but I’ll focus on the things that I wanted to add and didn’t found in other projects of this type (or at least not in the way I wanted).
SETUP:
In the setup() function, this code does more than just initialize pins and utilities.
Activates the “ON” switch, which essentially involves utilizing a button as a signal to exit deep sleep mode (in this instance, pin 26, my ‘forward’ button). You have the freedom to establish anything of your choice in this place. Initially, I attempted to operate the streamer with a remote control that had a PIN for the IR receiver. However, the issue was that the streamer would respond to any IR input, even from remotes that were not intended for use with it. If I switched the TV channel, the streamer would activate. I had to make a compromise and allow for a “manual” button to activate this.
I also avoid a dark screen after waking up from deep sleep, keeping the LED backlight (pin 17) in its previous state. Even if I set the pin to HIGH, the screen always remained OFF whenever I turned on the streamer.
esp_sleep_enable_ext0_wakeup(GPIO_NUM_26,0);
gpio_hold_dis(GPIO_NUM_17);
– Uses the Preferences library and start the “storage space” for saving data to the EEPROM. The “false” argument serves to indicate that we will use this for read and write.
preferences.begin("Save/Load", false);
–
Invokes the setScreen() function to render all elements that will remain constant on the screen. By examining the code, you will observe that it adjusts the screen orientation, fills the background with color, adds text, and more.
Additionally, I desired to utilize a “dignified” typeface as this streamer would be placed near my HiFi setup. The TFT library permits the use of personalized fonts, so I added mine but feel free to switch to a different one. In order to accomplish this, you will need to modify certain parameters in the code (such as heights, positions, etc. for the texts) and in the library (indicate the designated font).
In this function, I ultimately set up the two sprites that will be used for the scrolling texts. Here is a demonstration of the text that will display the adjusted station.
    scrolltxt_station.setFreeFont(OWNFONT1);
    scrolltxt_station.setColorDepth(8);
    scrolltxt_station.createSprite(750, 11);
    scrolltxt_station.fillSprite(TFT_BLACK);
    scrolltxt_station.setTextColor(tft.color565(0,255,0),TFT_BLACK);
– Calls the function connectToWiFinStreamer() which first connects to a WiFi. Here I added some extra functions to the standard initialization of WiFi which are very useful when needed.
The first one allows to connect to different WiFi networks already preset in an array at the beginning of the code. So, if the streamer cannot connect to one, it will try with the next one.
while (WiFi.status() != WL_CONNECTED)
    {
        Serial.print(".");
        delay(500);
        currentMillisWiFi2 = millis();
        if (currentMillisWiFi2 - previousMillisWiFi2 >= 5000)  // If 5 secconds pass, connect to next network
        {
            previousMillisWiFi2 = currentMillisWiFi2;
            wifi_index += 1;
            if (wifi_index >= key_qty)
            {
                wifi_index = 0;
                break;
            }
            WiFi.begin(ssid[wifi_index], password[wifi_index]);
            Serial.println();
            Serial.print("Connecting to new network: ");
            Serial.println(ssid[wifi_index]);
        }
    }
If it can’t connect to ANY of the preset SSIDs, it’ll show a little icon made by me on screen and will stay as “Not connected”, then the loop() will take charge (details on this later).
If it can’t connect after 4 attempts, the Streamer will shut down.
If it can connect, it draws another icon on screen to show the connected status, and starts the Radio. Also, it sets the wifi_index to the previous position. This will be useful if internet goes down and it tries to reconnect. This way, it’ll connect to the same working SSID.
But, why I don’t leave the same index? For some reason I still don’t know, whenever I connect to a SSID from the array, the first one is discarded, always. That’s why I leave the first SSID and Password empty on the arrays.
The Radio starts by calling another function: connectiontoRadio() which contains the standard calling from the Radio library.
With all these explained, let’s move to the next part of the code:
LOOP
– The first thing the loop does is play constantly through the Radio player.
player.loop();
– Although they are outside of the loop per se, I use the functions of the MP3 decoder library I wanted for my streamer (it has more than this) which names are very self explainatory: SHOWSTATION, SHOWSTREAMTITLE and BITRATE. They are constantly updating their status as soon as they change.
Here is where I wasted a lot of time: the worst case scenario were long strings of texts, where I had many troubles that have been worked around: text scrolling on top of the older text making everything unreadable, text that didn’t reset when the string changed, etc. So I had to put some code inside the functions of the Radio library, and others inside the loop. The final result is a clean scrolling, that changes when it has to change and stay fixed when it has to.
So, inside the functions from the Radio library, I added some code to:
- Get the size of the info to show
- Prepare the “Scrolling spaces” with the required info
- If no data from the stream, show a message and don’t scroll
- If data is short (considering the size of the screen and the size of the font) show the text and don’t scroll
Here’s an example inside the Radio functions for the text that shows the songs playing on the station:
stream_text = String(info);
    length_stream = stream_text.length();
    scrolltxt_stream.fillSprite(TFT_BLACK);
    tft.fillRect(0,100,160,11, TFT_BLACK);
    tft.setCursor(10,108);
    tcount2=0;
    if        (length_stream < 2)                            {tft.print("No data");}    // If no text, show "No data"
    else if    (length_stream >=2 && length_stream <= 23)    {tft.print(stream_text);}    // If there's text and is short, don't scroll
Scrolling occurs in the loop if the stream data exceeds a specific length. To prevent variation in speed due to inconsistent looping speeds, I standardized the scrolling time to 30ms. Next, it places the text in the “Sprite space” and every 30ms it updates the position of the characters. Here is an illustration for the identical text but now enclosed within the loop:
if(length_stream > 23)
   {
      currentMillis2 = millis();
      if (currentMillis2 - previousMillis2 >= 30)
      {
         previousMillis2 = currentMillis2;
         scrolltxt_stream.pushSprite(10,100); // Sets Sprite on screen (x,y)
         scrolltxt_stream.scroll(-1); // Scroll direction
         tcount2--;
         if (tcount2 <= 0)
         {
            tcount2 = length_stream*7.5; // 7.5 factor was the best for this size of screen in terms of spacing between sprites
            scrolltxt_stream.drawString(stream_text, 160, 0); // Draws word in position (x,y)
         }
      }
   }
Regarding the 7.5 factor, this is the number that allows spacing between the end of the stream text and the start of the same (or a new) text again. I tried with short texts and very very long text and for this screen and font, is was the sweet spot to not overlap texts, or have too much spacing between them. If you have problems of this sort, change this number.
– Then, the loop manages the buttons (for my project I used 6 in total: 1 as “backward”, 1 as “forward”, and 4 for radio presets).
The first thing that the loop does on each iteration is read the current status of a button, then calls a function that checks “what to do” with that status:
checkXXButton(current status, previous status)
comparing the status of the current loop vs the previous loop. After that saves the current status of that button as the last status for the next iteration of the loop.
For this project I’m using 3 types of buttons:
Backward
- Short press (less than 0.5s): Goes back 1 radio station
- Semilong press (between 0.5s and 2s): Goes back 5 radio stations
- Long press (more than 2s): Calls Off Routine to turn off the Streamer
Forward
- Short press (less than 0.5s): Goes forward 1 radio station
- Long press (more than 0.5s): Goes forward 5 radio stations
- If the streamer is turned off, one short press of this button turns it on
Preset n° X
- Short press (less than 0.5s): Goes to saved radio on preset X
- Long press (more than 0.5s): Saves current radio to preset X
– Then the loop checks for IR inputs. This is pretty straightforward. Using the IR example library, I was able to check the HEX codes of each one of my remote control buttons (I wanted to use the remote control from my amplifier). With that data, I use my remote to “push” the buttons ‘backward’, ‘forward’; and if I change the “source” on it, to turn off the Streamer. Any other button that I press and didn’t include it here, does nothing.
– After the IR, the loop checks for Serial inputs. Besides using the Serial Monitor for debugging, I added some extra options:
- I can put a direct link of a radio and will play it
- I can put a radio number and it will go right to it
– Finally, the loop checks for the status of WiFi every 1 minute. Here calls a function checkWiFi() that in case WiFi is disconnected, calls again the function that connects to WiFi (the same used in setup).
- What microcontroller is used in the project?
The project uses an ESP32, specifically ESP32-WROOM-32U in the example. - Can the streamer save radio presets?
Yes, the streamer can save radios to internal memory using the Preferences library. - How does the project handle multiple WiFi networks?
The code stores preset SSIDs and passwords in arrays and cycles through them until a connection is made; if none connect it shows a not connected icon and can shut down after attempts. - Does the streamer support remote control?
Yes, it supports an IR remote via an IR receiver and uses HEX codes to map remote buttons to functions. - How are long metadata strings handled on the display?
Long strings are placed into sprites and scrolled at a fixed 30ms interval with spacing controlled by a factor (7.5) to avoid overlap. - What button behaviors are implemented?
Buttons have multiple actions based on press length: short, semilong, and long presses trigger different station navigation, preset save/load, or shut down. - Can the device enter low power mode?
Yes, the streamer can shut down using deep sleep and uses a button to wake via ext0 wakeup. - Is serial debugging available?
Yes, Serial Monitor debugging is supported and accepts commands to play a direct radio link or jump to a radio number.