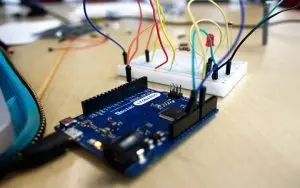
The Arduino UNO, powered by ATmega328P, stands as a microcontroller equipped with 14 digital I/O pins, among which 6 facilitate PWM output. Additionally, it features 6 analog inputs, a 16 MHz quartz crystal, a USB connection, a power jack, an ICSP header, and a reset button. This Uno serves as a user-friendly plug-and-play device. To initiate usage, one simply connects it to a computer via USB or powers it with an AC-DC adapter or battery.
Programming the Arduino Uno necessitates the Arduino IDE, which must be installed on a computer for coding purposes. The ATmega328P comes preprogrammed with a bootloader, enabling users to upload new code without an external programmer. This article compiles Arduino Uno projects ideal for beginners and engineering students.
Simple Arduino Uno Projects for Beginners
Below are a few thrilling Arduino projects suitable for beginners. After installing the Arduino software IDE, establish a connection between the computer and the Arduino UNO board using a USB connection. Within the IDE, navigate to “TOOLS” and then “BOARD” to select the appropriate board from the dropdown menu. Next, proceed to “TOOLS,” and under “PORT,” choose the port labeled as “ARDUINO.”

Blink an LED
The necessary hardware components include:
Arduino UNO board.
Breadboard.
Jumper Wires.
LED.
220Ω Resistor.
USB cable.
Step 1: Connect the ground pin on the Arduino to row 15 on the breadboard using a black jumper wire.
Step 2: Attach the red jumper wire from pin 13 on the Arduino to column F, 7th row on the breadboard.
Step 3: Insert the longer end of the LED into row 7 of column H on the breadboard.
Step 4: Place the shorter leg of the LED into row 4 of column H on the breadboard.
Step 5: Position one end of the resistor into row 4 of the Ground rail on the breadboard and connect the other end to column I, row 4 on the breadboard. Then, establish the connection between the Arduino and the computer using a USB cable.
Once all connections are made, proceed to program the Uno. Open the Arduino IDE, which includes various pre-built programs. For instance, to execute a blinking LED program, navigate to FILE, choose EXAMPLES, then access the BASICS section, and finally select BLINK. This action will display the Blink LED program for use.
Utilize the “verify” button located at the top left of the IDE box to compile the program and check for errors. Once it displays “Done Compiling,” indicating error-free code, the program is set for use. Proceed by clicking the “upload” button to transfer the program onto the Arduino board.
Upon successful uploading, the board’s built-in LED will flash rapidly for a brief period, initiating the program’s execution. If there are no errors, the LED connected to the breadboard will alternate between turning on for a second and then off for a second, continuing this cycle.
Similarly, following the previously outlined process, selecting different code and adjusting the necessary hardware enables hassle-free operation with the Uno.
Arduino Uno Test
This serves as a straightforward and fundamental electronic project. It involves using an Arduino Uno to assess the Uno board’s functionality by employing a flashing LED directly connected to the Uno board.
Designing a Push Button to Turn ON and OFF a LED
Using an Arduino Uno, you can construct this uncomplicated project involving a push-button switch. The push button serves the purpose of toggling an LED on and off.
Designing a Potentiometer to Change the Resistance Values of an LED
You can create this potentiometer circuit using an Arduino Uno on a breadboard. This uncomplicated project serves the purpose of regulating LED resistance. By adjusting the knob, you can control the frequency of the LED.
LED Scrolling
This uncomplicated LED scrolling project involves the blinking of six LEDs simultaneously or in a backward and forward sequence. Such a circuit design was inspired by the Knight Rider show, where a vehicle showcased looping LEDs.
Arduino to Increase or Decrease the Intensity of the LED
The Arduino Uno board is employed for this straightforward LED fade project. It utilizes a PWM pin, allowing for the manipulation of LED brightness by adjusting its intensity, thereby enabling both increase and decrease in brightness levels.
Arduino Uno LCD Display Project
The Arduino Uno board is the foundation for this LCD (liquid crystal display) screen project. This display is capable of presenting text on its screen. With this project, it becomes possible to showcase phrases such as “Hello World” on the LCD. Additionally, a potentiometer is employed to regulate the display’s contrast.
DC Motor Control
Within this project for DC motor speed control, an Arduino Uno is employed to regulate the motor’s speed using a switching transistor. Accurate connections on the breadboard ensure successful motor rotation.
Arduino Uno Projects for Engineering Students
Below are a variety of Arduino project ideas intended for engineering students to explore and experiment with.
Below are the Arduino Uno projects tailored for engineering students.
Arduino Uno GPS Tracker Project
Utilizing an Arduino Uno and GPS, this project is designed to facilitate vehicle tracking. A GSM modem equipped with a SIM card is incorporated for communication purposes. The system can be installed within a vehicle, allowing for easy tracking in case of theft using a mobile phone. Furthermore, this application serves as an efficient solution for tracking college or school buses.
Driverless Metro Train Using Arduino-Uno
Historically, metro train accidents have occurred due to various factors, including driver errors, signal malfunctions, and challenges associated with manual operation. In response to this issue, an Arduino Uno-based driverless metro train has been developed. This innovation aims to enhance railway network management, mitigating human errors and ensuring improved safety and comfort for passengers during travel while consuming less power.
Arduino Uno Project Smart Dustbin
This particular project involves creating an intelligent trash bin utilizing the Arduino Uno board. Its purpose is to mitigate roadside garbage overflow effectively. By implementing this project, it contributes to maintaining clean and eco-friendly surroundings. The project utilizes a routing algorithm to optimize the vehicles’ paths, reducing their number while efficiently collecting garbage through the shortest routes possible.
Arduino Uno IR Sensor Project
The purpose of this project is to manage light-emitting diodes (LEDs) via an infrared sensor and remote control. When a button on the remote is pressed, an infrared signal is transmitted to the infrared sensor as a code. Subsequently, the sensor receives this signal and forwards it to the Arduino for processing.
Arduino Uno Project using Vending Machine
The objective of this project involves constructing a vending machine employing Arduino Uno, incorporating an RFID system. Upon swiping an RFID tag across the reader, a specified quantity of liquid is dispensed. An alphanumeric LCD display provides instructions and guidance throughout the liquid dispensing process. This machine finds application in various institutions such as colleges and hospitals, offering automated service to customers without requiring human intervention.
Door Lock based on Fingerprint and Arduino Uno
This project establishes a fingerprint-based door lock system enabling door unlocking via fingerprints. Its primary purpose is to enhance security by eliminating the use of keys, which are considered less secure. In this setup, the door unlocks upon a fingerprint being scanned or tapped on the door lock mechanism.
Robot Car
The aim of this project is to create a robot car using Arduino Uno. The robot car utilizes a DC motor, and its control is facilitated by Arduino Uno in conjunction with a Motor Driver IC.
Home Automation using Arduino Uno
The focus of this project is on creating a home automation system for convenient control of household appliances. By utilizing an Android app, along with Arduino Uno and a few modules, users can effectively manage their electrical devices. This system enables the control of household appliances through voice commands facilitated by Bluetooth connectivity.
Arduino Uno Projects with Sensors
Below, we delve into Arduino Uno projects that incorporate sensors.
Thermometer using LM35 Sensor & Arduino Uno
Monitoring temperature in a particular environment holds significant importance. This measured parameter enables temperature control in industries, computer CPUs, incubators, and various other applications. Thus, a properly configured temperature sensor is employed to trigger other devices when the ambient temperature surpasses or falls below a predetermined value. Consequently, the Didactic Thermometer is designed using the LM35 temperature sensor.
Arduino Uno & IR Sensor-based Automatic Gate Opener
Currently, there has been a rise in the utilization of automation systems. Likewise, an automated gate for opening and closing has been developed. When an individual approaches the gate, it automatically opens upon detecting their presence and closes on its own. This system is versatile and can be applied to main gates or car garages.
Mini Weather Station
The purpose of this project is to create a compact weather station utilizing Arduino Uno. This setup employs a WiFi connection to transmit data online, utilizing the ThingSpeak platform. The station is primarily focused on gathering data such as temperature, light intensity, atmospheric pressure, and humidity by utilizing various sensors.
Soil Moisture Sensor using Arduino Uno
Within this project, the soil moisture sensor interfaces with the Arduino Uno board. Operating within a 2 to 5-volt supply range, this sensor has a detection length of 38mm. Resembling a fork, it can be effortlessly inserted into the soil. The primary function of this sensor is to ascertain the moisture level within the soil. As soil moisture rises, the analog output voltage also increases accordingly.
Window Alarm Annunciator
This project aims to create a window alarm annunciator utilizing Arduino Uno. The primary purpose of the annunciator is to signal operators in power plants and industries about irregularities or variations in parameters.
Audio Meter using Arduino Uno
The aim of this project is to create an audiometer utilizing an Arduino Uno along with an LCD. The SVI (Standard Volume Indicator) or VU meter, commonly utilized to exhibit signal levels in audio devices, serves as the core feature. Within this system, the Uno board processes the intensity of two audio signal channels—right and left—and showcases them as bars on the display. This project primarily utilizes the Arduino Uno’s analog input pins to gauge the audio signal levels.
Alarm Clock using Arduino Uno
This project introduces an alarm clock created using an Arduino Uno. It involves a straightforward setup utilizing an LCD and a real-time clock (RTC) module. To construct this project, a prototyping shield along with a power supply can be employed. The piezoelectric buzzer serves the purpose of producing sound during set intervals.
Wi-Fi Controlled Robot
The project showcases a robot controllable via WiFi, facilitated by the ARMA IoT shield and the Blynk App, offering remote access from any location. The Uno board establishes a WiFi connection using the ARMA IoT shield, enabling control via the Blynk app, compatible with both Android and iOS platforms.
GPS Clock using Arduino Uno
Creating a clock utilizing GPS and Arduino Uno is the purpose of this project. These GPS-enabled clocks provide precise timekeeping and are commonly employed in public spaces such as airports, bus stations, and railway terminals. They also find extensive use within military contexts due to their accuracy and reliability.
Additionally, here are more project ideas suitable for engineering students using Arduino Uno. These ideas serve as valuable resources for students working on project development.
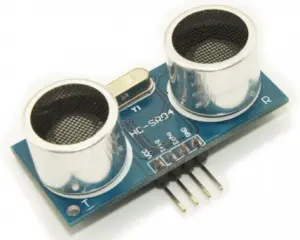
Arduino UNO Projects using Ultrasonic Sensor
An Arduino Uno projects list with an ultrasonic sensor is discussed below.
4WD Smart Robot Car
This project involves crafting a Smart Robot Car capable of navigating around obstacles and adhering to provided directions to reach a destination. It offers the flexibility of both automatic and manual control via a Bluetooth module. The hardware components utilized include an Arduino UNO, Dual H bridge motor driver, Ultrasonic sensor, Bluetooth module, Contact avoidance sensor, Line Tracking sensor, and Li-Ion battery.
Door Alarm using an Ultrasonic Sensor & Arduino Uno
This project aims to create a door alarm system utilizing an ultrasonic sensor employed as a distance measurement tool. The sensor’s primary role is to detect an object’s proximity to a predefined target. Upon someone approaching within a specific range, the system triggers a door alarm. The buzzer activation is automatically controlled based on the detected distance value.
Ultrasonic Range Detector
This project involves employing an Ultrasonic sensor in tandem with Arduino to measure distance without the need for a physical ruler. Similar to how bats gauge distance using echolocation, ultrasonic transmitters emit sound waves and measure distance by calculating the time taken for these waves to hit an object and return to the Ultrasonic receiver.
Here’s a list of notable Arduino Uno projects:
1. Arduino motion detector camera utilizing Arduino UNO.
2. Integrated smart belt aiding the mobility of the blind.
3. Trash talker system implemented with bolt IoT.
4. Door alarm system employing the ultrasonic sensor.
5. Mini Acoustic Levitation project.
6. Geiger counter simulator built with Arduino.
7. Arduino HC-04 and 8×8 matrix MAX7219 collaboration.
8. Water level alert system.
9. Automated clothes and shoe donation machine.
10. Auto ultrasonic car project.
11. Arduino Soliton radar experiment.
12. Blind runner alarm – speed measuring device.
These projects showcase the versatility of Arduino Uno, utilizing both hardware and software capabilities. The adaptable nature of Arduino boards makes them highly favorable for projects, appealing to both students and professional engineers. As an open-source platform, Arduino serves as an instrumental tool for learning and implementing emerging technologies such as IoT. How has Arduino assisted you in transforming your ideas into reality?