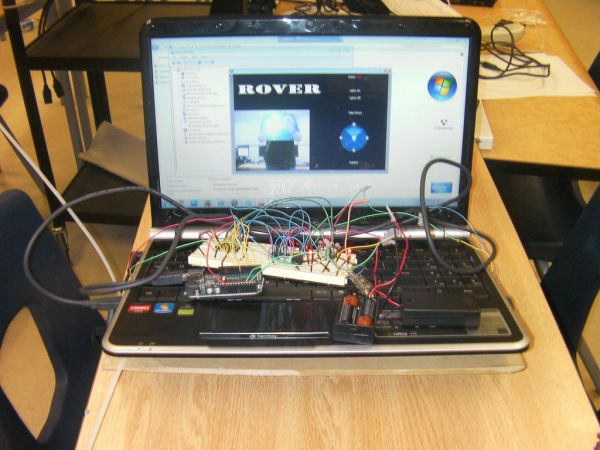
In this Instructable I will be giving you step-by-step instructions on how to interface The Arduino, A Motor Controller (L293D), and a laptop to make a Wifi controlled rover you can drive around your house or work from anywhere in the world.
I started and made this project for my Gr.11 Computer Engineering class, it took approx. 5.5 hours including design, testing and implementation.
I will Provide all the necessary files to open the program in Game Maker and change it around. However at the end i will provide you will a .exe that will work with no changes.
**Disclamer**
I am NOT responsible for any Damage caused by wrong wireing, unforseen problems, faulty software or damage the Rover does to itself or others.
Step 1: Parts
Bought online
390ohm Resistor x 1
150ohm Resistor x 1
220ohm Resistor x 1
Screw Terminals x 2
L293D x 1
Red Led x 2 (ebay)
White Ultra Brights x 5 (ebay)
Found
2AA Battery Holder x 2
Mercury Tilt Switch x 1 (out of old thermostat)
Laptop (long Battery Life Preferred)
Bread Board
Arduino (uno)
Misc. Wires
DM74LS245N
Motors (GM2 from Solarbotics )
A great Place to buy these Parts is from Mouser .
Step 2: Get the Software
1) Game Maker PRO 8 (or higher)
You can buy it for about $25 or there are alot of cracked versions if you want to take a risk.
2)Drivers
File – Arduino Drivers
These drivers are needed to make the Arduino UNO work with your computer.
When you connect the Arduino and your computer tries to install drivers from the update manager, direct it to this folder and it will install them.
If that doesnt Work:
Go to
Control Panel >> System >> Device Manager
And Install them from there.
**This number Changes if you plug the Arduino into a different USB Port**
If you are using a different Arduino the Drivers are up to you to find.
3) The Drivers and .dll to make the arduino work with Game Maker
File – usb.dll
4)The dll to let Game Maker interface with your computers Webcam
File – Webcam.DLL
**It is important that all files using the .dll are saved in the same folder with the .dll**
 usb.dll
 Arduino Drivers.zip
Step 3: Testing Serial Connection to Arduino (Optional)
Go to
Control Panel >> System >> Device Manager >> Ports
Look for the Arduino and right next to it in brackets it should say “COM” and then a number. Remember that Number! (it changes if you plug the Arduino into a different USB
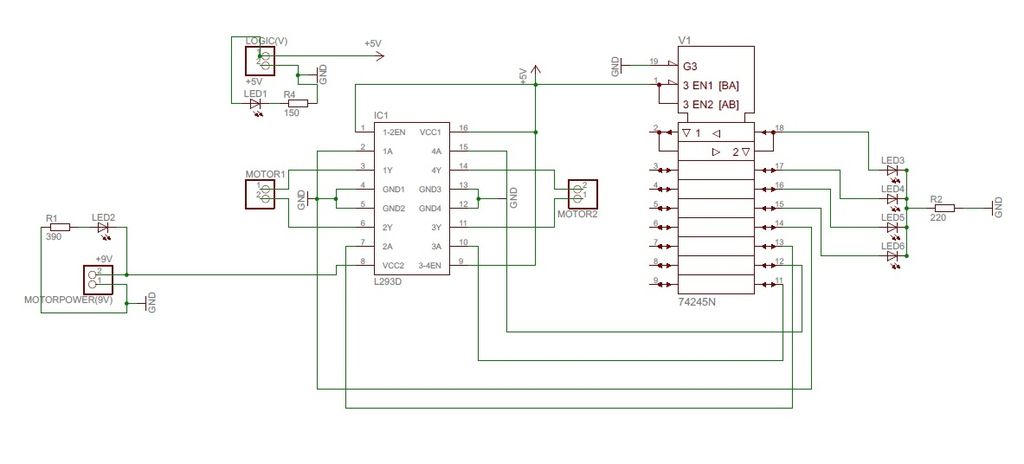
If you have any experience in electronics you can wire a breadboard to test the Arduino connection.
Pins 2-9 on Arduino to pins 9 – 2 on the LS245N
Pins on LS245N 11-18 to LED’s
Push buttons wired to Analog pins 1&2 on Arduino
Now Open the Folder Called Test (on this instuctable) and run serialtest3 (in Gamemaker) then Execute it.
Or Run the .exe serialtest3
When it asks for your Com Port enter that Number you were supposed to remember
Mercury Tilt Switch x 1
Laptop
Bread Board
Arduino (uno)
For more detail: Game maker Rover using an Arduino