Summary of Eggbot
This article details a university project where students built an Arduino-based Eggbot to draw on spherical objects. Designed as an introduction to CNC machines, the device uses acrylic for its frame and 3D-printed parts for specific holders. The build involves assembling two stepper motors, a servo motor, bearings, and electronic drivers to control the egg's rotation and pen movement. The project emphasizes hands-on learning of firmware and hardware concepts using Inkscape for design and programming via the Arduino IDE.
Parts used in the Arduino Eggbot:
- Lead Screw 8 mm x 150 mm
- KLF08 bearing
- M3 screws
- M3 nuts
- CNC shield
- Arduino Uno
- A4988 Stepper Driver
- Nema 17 Stepper Motor
- SG90 Micro Servo
- Jumpers
- 12V 2A Power Supply
- Male to Female Jumper Wires
- Acrylic sheets
- PLA filament (for 3D printing)
Rafael Fuentes, Carmen María Fuentes and Carmen Pérez decided to create this project that was submitted to ‘Creative Electronics’, a Beng Electronics Engineering module at University of Málaga, School of Telecommunications. The project consists of making an eggbot using an Arduino Uno development board.
This project was done for being a good introduction to CNC machines because you can clearly see and learn all the firmware and hardware concepts that involves them in a fun way. It was also decided to build the main frame from acrylic sheets in order to get our hands dirty in terms of the physical build.
The eggbot is a friendly art robot that can draw on spherical or egg-shaped objects. Your barebone version only needs two stepper motors, a micro servo motor to lift the pen, a bearing and some threaded rod. And of course, you’re going to need the electronic bits to drive it all.
Conceptually, one stepper rotates the egg around its axis of symmetry, the other rotates the pen’s axis so that it can travel north-south, and the servo lifts up the pen between strokes.
Supplies
Mechanical components:
- Lead Screw 8 mm x 150 mm (1x)
- KLF08 bearing (1x)
- M3 screws
- M3 nuts
Electronic components:
- CNC shield (1x)
- Arduino Uno (1x)
- A4988 Stepper Driver (2x)
- Nema 17 Stepper Motor (2x)
- SG90 Micro Servo (1x)
- Jumpers (6)
- 12V 2A Power Supply (1x)
- Male to Female Jumper Wires (3x)
Step 1: 3D Printing
This project is very little 3D printing demanding because all of the main frame is made from acrylic sheets. To print these pieces, I would recommend using PLA, 20% infill and 0.2 mm layer if you want good results.
Step 2: Pen Holder
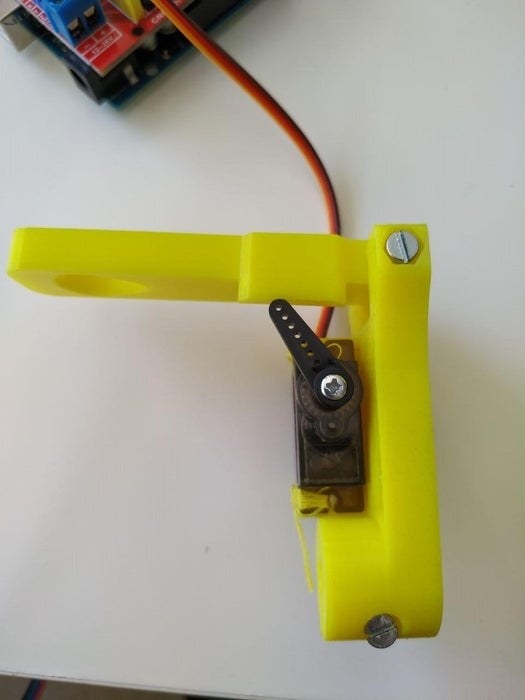
In this step we are going to assemble the pen holder. This part will hold the pen, make the pen go up and down and later on we will attach a second motor that will make the pen rotate.
The hinge between the top and bottom part is created by an M3 30 mm screw. Just line the parts up so, you can see through the hole and push the screw in and attach it on the other side with an M3 nut. The servo is attached using (2x) M2 12 mm screws and (2x) M2 nuts. In this case we sewed the servo to the piece because we didn’t have M2 screws.
Step 3: Stepper Motors
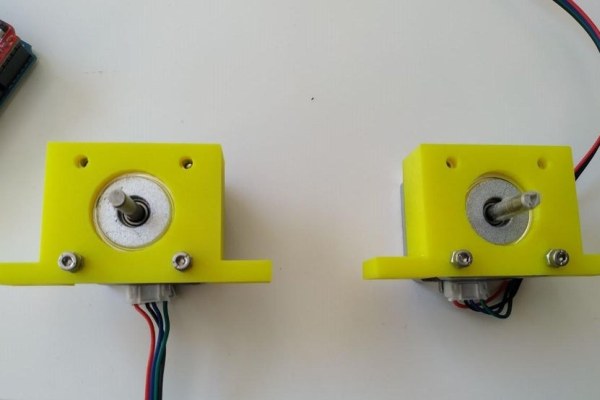
In this step, we are going to attach the stepper motors to their correct holders. The stepper motors will make the egg rotate and make the pen move to the right and left.
First of all, you have to attach the holders to the stepper motors using (4x) M3 8 mm screws. After that you can attach the egg holder and the pen holder to the stepper motors using (2x) X mm screws as shown in the picture.
Step 4: Bearing Holder
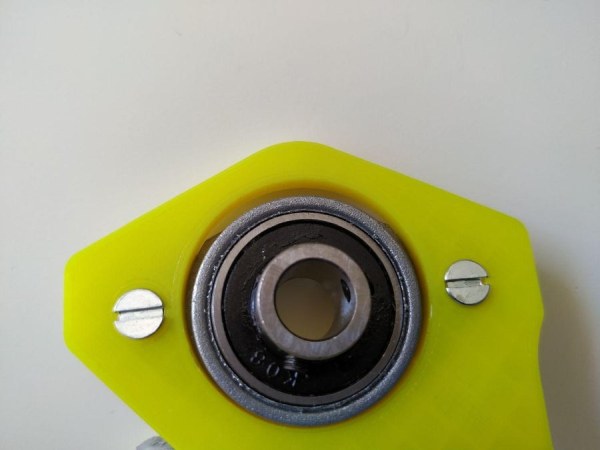
In this step we are going to attach the bearing to the egg holder and the lead screw. This part will allow the egg to rotate freely.
First you have to attach the KLF08 bearing to the 3D printed holder. It is held in place by (2x) M3 8mm screws and (2x) M3 nuts.
Then you have to attach the 3D printed egg holder to the Lead Screw using an X mm M3 and place an M3 nut in the rectangular hole to keep things in place.
Then you can adjust the Lead Screw using an Allen Wrench. You have to adjust this everytime you add an egg to the machine to adapt to the Egg’s shape.
Step 5: Electronics
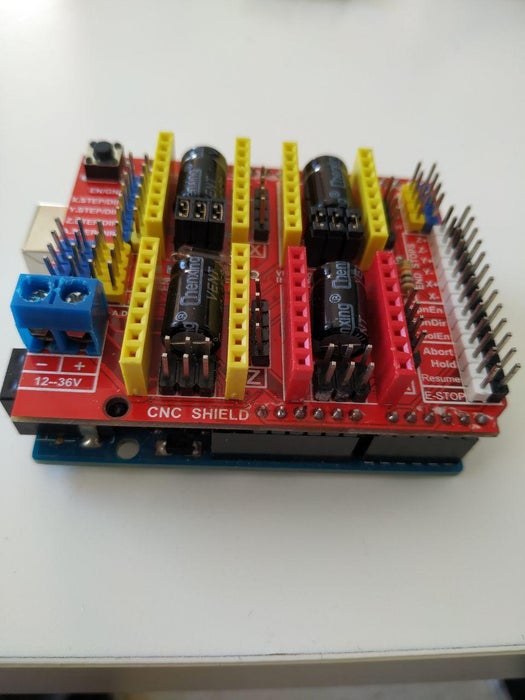
First you have to attach the CNC shield to the Arduino UNO. Just make sure align the pins correctly and put some pressure to secure it. After that you will have to put the (6x) jumpers on the X and Y spots on the CNC shield as shown in the picture. These jumpers allow us to control the steps of the motors.
Then you have to connect the (2x) A4988 drivers on the X and Y spots for them in the right orientation as shown in the second picture, you can now insert the wires from the stepper motors.
Now it is the time for the servo connections. First you have to somehow separate the wires that usually comes together. In this case we separated them using (3x) male to female jumper wires, and we attached them using tape. After that you have to identify the data wire (it is usually yellow coloured) and you have to connect it to the white SpnEn pin on the CNC shield. Finally, you connect the red pin to 5v5 and the brown or black to GND.
Step 6: Creating the Frame
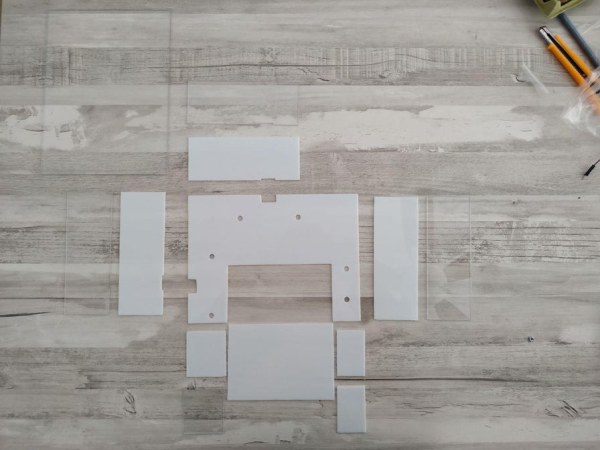
As we said, we built the main frame entirely of acrylic. First we cut the parts as shown in the picture, and we glued them together to form a nice little box. Later we attached all the components to the acrylic frame. We left an empty space opened to have access to all the connections of the electronic components. It is very important to make sure that everything is well aligned, or the egg will not rotate as it should and the pen has to be just in the middle of the egg holders in order to let the marker draw well.
Step 7: Programming the Arduino

Program the Control board using the ARDUINO IDE (v 1.8.1) software. It is quite simple:
1) Download the ARDUINO IDE (v 1.8.1 or above) here:
https://www.arduino.cc/en/Main/Software and install it.
2) Run the software. Select the Arduino/Genuino UNO(native USB port) board and the right COM PORT in the menu “tools->board”…
3)Open and Upload the Ejjduino_M0.ino code. CLICK HERE TO DOWNLOAD IT (decompress all the files inside the same folder, name it “Ejjduino_M0”).
Step 8: Controlling the Egg Bot (Inkscape)

The program that we will use to control the Egg Bot is called Inkscape, because it is very easy to use and there is already many extensions done to facilitate the process of drawing.
Download and install the Inkscape software with the eggbot plugins already installed.
Please note that most of this information comes directly from the Evil Mad Scientist wiki webpage and jjrobots. We have basically adjusted it to our design. All the hard work has been made by Evil Mad Scientist and jjrobots for developing this and they should take all the credit.
The EggBot Control extension for Inkscape is the tool that you will use to help you test and align the EggBot, as well as transfer your drawings to an egg. First you’ll need to start Inkscape. Once Inkscape is running, you’ll have an Extensions menu, and on that menu will be a submenu labeled Eggbot. If you do not see an Eggbot submenu, you have not yet correctly installed the extensions; please back up and carefully reinstall the extension.
In the Eggbot submenu are several different extensions that perform various Eggbot-related tasks. By far the most important of these is theEggbot Control extension, which is the program that actually communicates with the Eggbot.
Now that we have all assembled and the software already installed you can start making your first plot.
In order to do that I would recommend taking a look at the Evil Mad Scientist wiki this is by far the most complete guide that you can find online and it will guide you to calibrate your machine and making your first plot. They also have uploaded a video explaining all of these little details that will make a difference on your drawings.
Step 9: Final Thoughts and Good Resources Online
We encourage you to try to make your own version of the Egg Bot. It is definitely a cool project, and trying to change a design already tested is always fun and challenging. In order to achieve that you can check the best resources we have come across online some of them gave us ideas and inspiration and they must take all the credit for it.
- Sphere-O-Bot. (one of the best desings so far there is a video assembling guide that you can find here using the same CNC shield that we used, you can even order the kit that includes the electronics from jjrobots)
- Evil Mad Scientist (the best machine if you can pay the $220 that it costs, they also have a very informative wiki)
- SphereBot (design made of MDF scraps)
- CNC Eggbot (design made of thin plywood)
- Arduino Based Egg Plotter (impressive design and one of the best instructables so far)
I just bought a 3D printer (Artillery X1) so, in the coming weeks I will make another version of this machine based on the Sphere-O-Bot (wich is more 3D printing demanding), trying to improve the drawings that we got with this project and I will try to make a short guide on Instructables emphasizing on the difficulties that I find.
Source: Eggbot
- What is the main purpose of this project?
The project serves as a good introduction to CNC machines to learn firmware and hardware concepts while drawing on spherical or egg-shaped objects. - How do you assemble the hinge between the top and bottom parts of the pen holder?
You line the parts up so you can see through the hole, push an M3 30 mm screw in, and attach it with an M3 nut on the other side. - Can you use materials other than acrylic for the main frame?
The authors built the main frame from acrylic sheets, but they mention that other designs exist using MDF scraps or thin plywood. - Which software is recommended for controlling the Egg Bot?
Inkscape is recommended because it is easy to use and has extensions like the Eggbot Control extension to communicate with the machine. - What are the recommended settings for 3D printing the required pieces?
The article recommends using PLA, 20% infill, and a 0.2 mm layer height for good results. - How do you connect the servo data wire on the CNC shield?
You must identify the yellow colored data wire and connect it to the white SpnEn pin on the CNC shield. - Why is it important to align everything correctly during the frame assembly?
Proper alignment ensures the egg rotates correctly and the marker draws well by being positioned in the middle of the egg holders. - Where can you find more information about calibrating the machine?
The Evil Mad Scientist wiki provides a complete guide on how to calibrate the machine and make your first plot.