Summary of Easy Programmable EL-Wire Wall Art Project with Cool-Neon using arduino
This project transforms a blank brick wall into animated EL-Wire art using an Arduino Microcontroller and a Cool-Neon Shield. The creator designs a rabbit logo on foam core, mounts it in a picture frame, and controls up to ten independent wire segments for dynamic lighting effects like flashing eyes or varying speeds without extensive programming.
Parts used in the Animated EL-Wire Wall Art:
- EL Wire - 4 5' segments of Cool Neon wire (High Bright Standard 2.6mm)
- Coolneon Arduino Shield
- Arduino Microcontroller - Borderless Electronics Arduino Leo clone
- Micro- USB Adapter / powersupply
- Old Picture Frame
- Black foam core poster board
- Fishing line or Magnet wire
- 1 Nail
- Acrylic or glass to fit the picture frame
- Translucent Glitter paint
- Duct tape
- Xacto knife
- Computer projector, Overhead projector or artist
Our hackerspace has a blank brick wall above the fireplace. It’s been a cold winter so we’ve had a fair number of fires, but there is just something wrong about a blank brick wall. Well in this project I’ll document how to create an animated, Arduino controlled, EL-Wire design mounted in a picture frame, sure to spiff up any lonely chunk of wall space. I’ll go beyond just powering the lights and show how you can control up to 10 different segments of your picture using an a Cool-Neon Arudino Shield and a bit of open source software.
Supplies Needed
- EL Wire – 4 5′ segments of Cool Neon wire (High Bright Standard 2.6mm)
- Coolneon Arduino Shield – available on the CoolNeon website
- Arduino Microcontroller – I used a Borderless Electronics Arduino Leo clone
- Micro- USB Adapter / powersupply
- Old Picture Frame – from the attic
- Black foam core poster board – from Hobby Lobby
- Fishing line or Magnet wire – to hold the EL wire to the board, I found the magnet wire (normally used to wind around for electric motors) worked better than the fishline neither blocked the glow of the EL-Wire (as bell wire would for example), but the magnet wire seemed to make it easier to hold the EL Wire in shape.
- 1 Nail – to poke holes through the posterboard
- Acrylic or glass to fit the picture frame
- Translucent Glitter paint, – adds a special glow and hides imperfections in logo design.
- Duct tape
- Xacto knife
- Computer projector, Overhead projector or a good artist – to transfer the logo design to the posterboard
Here’s a video of the Logo in action including a demo of how the shield can be dynamically customized to power a different number of channels and or a different pattern and speed.
Step 1: EL Wire, What is It?
EL-Wire, What is it?
Generally pronounced “E” “L” Wire, it’s short for Electro Luminescent Wire. EL-Wire is thin, like a USB cable, when electrically charged and glows like a little neon sign. It’s very flexible, and can be sewn into clothing. There are even waterproof versions of EL-wire!
For good background on the inner workings of EL Wire, (how AC Current causes phosphor to glow, and how to solder EL Wire), take a look at this award winning Instructable:
http://www.instructables.com/id/The-Full-How-Too-Manual-For-EL-Electroluminesce
How Do I Control My EL-Wire?
The Cool Neon EL-Wire power adapter includes a corded, or battery powered power supply which has the options: On, Off, or Flashing, so if all you want to do is flash your glowing wire, you are all set. But we wanted to play with other options, including lighting up different sections of the sign at different times, flashing only the eyes of our logo, varying the speed of the blinking, etc. In order to do this I used an Arduino and the Cool Neon Shield. The good thing about this project is there is a very flexible and powerful driver (see the Cool Neon Sketch below) available and that means little to no programming required (but you’ll still need to set up the software to load the driver)
Setting Up The Cool Neon Shield
Prior to creating the Wall-Art, you may want to get the software set up and see what can be done with the EL-Wire. There are 10 Channels on the Cool-Neon shield, so you can boost, blink or dim up to 10 different sections of your project independently. I ended up using 4 different channels: the rabbit eyes are one channel, the rabbit head is one channel, the upper left and lower right wrench are the third and the upper right and lower left wrench make up the forth channel.
To set up the shield you’ll need to
- Download the Arduino IDE
- If you’ve never used an Arduino, you may want to try one of the included Example pieces of code in the Getting Started Guide
- Download the Cool Neon Code Sketch by Tully Gehan of www.SamuraiCircuits.com
- Plug the Cool Neon EL-Wire into the channel sockets – be careful plugging and unplugging these sockets, it’s easy (but not fatal) to snap off the little plastic clips that secure the EL-Wire
- Choose the “Run” arrow on the Arduino IDE and the code will load and begin running on the Arduino Shield
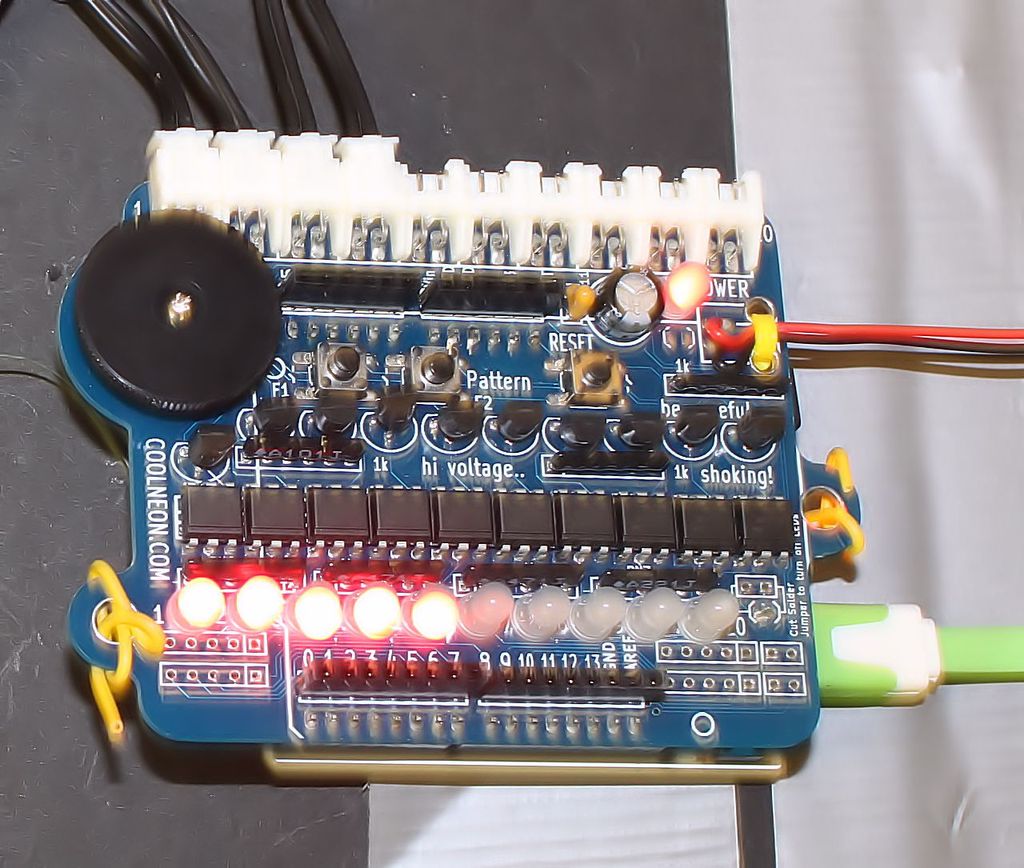
Running the Arduino Shield: (as shown on the video on page 1)
- Press the the button labeled “F1” to choose the number of channels you want activated
- Press the button labeled “Pattern” to cycle through the available patterns
- Adjust the potentiometer wheel to a speed or slow the flashing of the EL Wire
For more detail: Easy Programmable EL-Wire Wall Art Project with Cool-Neon using arduino
- What is EL Wire?
It stands for Electro Luminescent Wire, which is thin, flexible, and glows like a neon sign when electrically charged. - How do I control different sections of the EL Wire?
You can use an Arduino and the Cool Neon Shield to light up different sections at different times with customizable patterns. - Can I customize the number of channels on the shield?
Yes, the Cool-Neon shield has 10 channels, allowing you to boost, blink, or dim up to 10 different sections independently. - What software is required to run the shield?
You need the Arduino IDE and the Cool Neon Code Sketch by Tully Gehan of www.SamuraiCircuits.com. - How do I change the flashing speed?
You adjust the potentiometer wheel on the shield to speed up or slow down the flashing of the EL Wire. - How do I select the number of active channels?
Press the button labeled F1 on the Arduino Shield to choose the number of channels you want activated. - How do I cycle through available patterns?
Press the button labeled Pattern on the shield to cycle through the different available patterns. - Which wire works best for holding the EL Wire in shape?
Magnet wire worked better than fishing line because it did not block the glow and made it easier to hold the wire in shape.