Contents
hide
In this project, we are going to make a Digital Thermometer using Arduino Uno. We will use DS18B20 temperature sensor to sense the temperature and Nokia 5110 LCD to display it. DS18B20 is a 1-Wire digital temperature sensor manufactured by Maxim Integrated and is capable of reporting degree celsius with 9 ~ 12 bit precision.

Components Required
- Arduino Uno
- DS18B20 Temperature Sensor
- Nokia 5110 LCD
- 1KΩ Potentiometer
- 10KΩ Resistors – 4
- 4.7KΩ Resistor
- 1KΩ Resistor
- 330Ω Resistor
- Connecting Wires
- Breadboard
Explanation
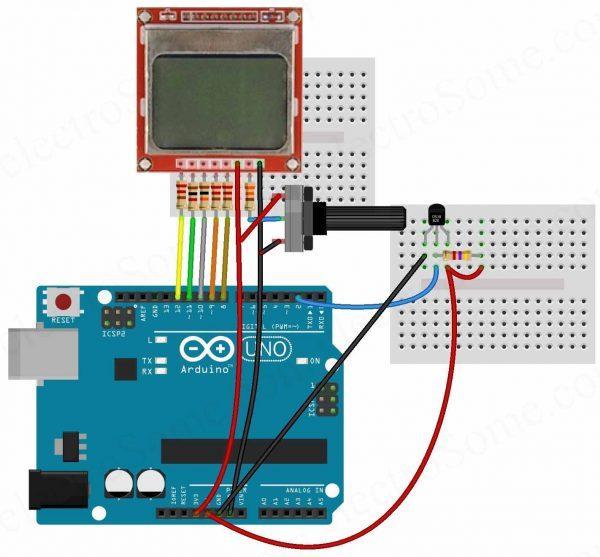
First we will connect Nokia 5110 LCD to Arduino as follows.
- Connect the GND pin of Nokia 5110 LCD to GND of Arduino.
- Connect the LED pin of Nokia 5110 LCD to middle pin of 1KΩ potentiometer through 330Ω resistor and connect other two pins of the potentiometer to VCC, GND.
- Connect the VCC pin of Nokia 5110 LCD to 3.3V output pin of Arduino.
- Connect the CLK pin of Nokia 5110 LCD to Pin 8 of Arduino through a 10KΩ resistor.
- Connect the DIN pin of Nokia 5110 LCD to Pin 9 of Arduino through a 10KΩ resistor.
- Connect the D/C pin of Nokia 5110 LCD to Pin 10 of Arduino through a 10KΩ resistor.
- Connect the SCE pin of Nokia 5110 LCD to Pin 11 of Arduino through a 1KΩ resistor.
- Connect the RST pin of Nokia 5110 LCD to Pin 12 of Arduino through a 10KΩ resistor.
Then connect DS18B20 temperature sensor to Arduino as follows.
- Connect left pin of DS18B20 to GND of Arduino.
- Connect right pin of DS18B20 to 5V output of Arduino.
- Connect middle pin of DS18B20 to Pin 2 of Arduino
- Connect a 4.7KΩ resistor from middle pin of DS18B20 to 5V as pull up.
Read More: Digital Thermometer using Arduino and DS18B20 Sensor