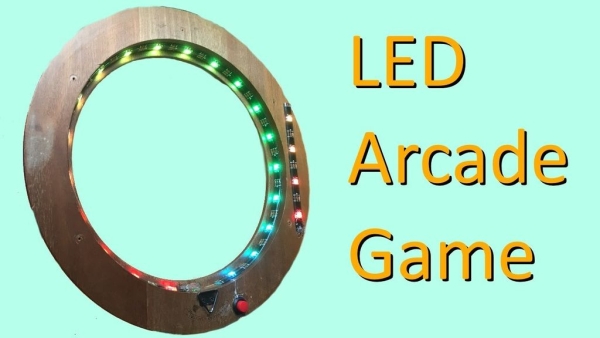
Summary of Cyclone(Arduino LED Game)
This tutorial guides users in building a portable arcade-style LED game using an Arduino Nano and 24 WS2812B LEDs. The project requires minimal coding experience, featuring five game states controlled by a momentary push button. It can be powered via USB or a 3 AA battery pack and is designed to be completed in about an hour with basic soldering and hot glue assembly.
Parts used in the Arduino LED Game:
- WS2812B LEDs x24
- Arduino Nano
- Momentary push button
- Picture frame
- 5v cord
- 3 AA battery pack
In this tutorial, I will teach you how to create an LED game with very little code or experience! I had this idea for a while and finally got around to creating it. It’s a fun game that reminds us all of the arcade games. There are other tutorials that I will link for further references. This can be made within an hour of hard work and is worth the effort 🙂
Supplies:
WS2812B LEDS x24
Arduino Nano
Momentary push button
Step 1: Watch the Demo
Step 2: Find Any Type of Frame
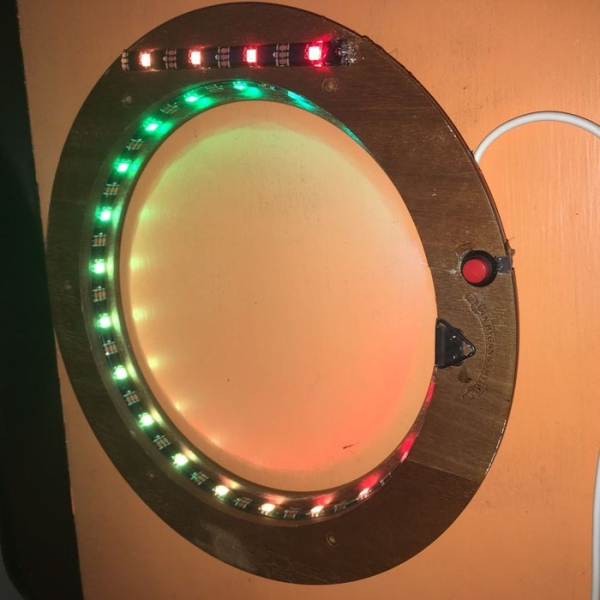
In this case, I used a picture frame. Building one is always an option but I wanted to quickly finish this project. My project has 20 LEDs that wrap around the frame. However, this number can always be changed based on preference or desired power consumption.
Step 3: Programming
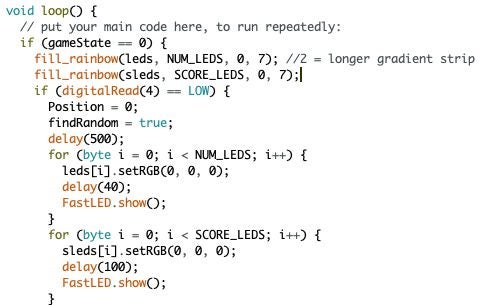
This program is not the most efficent.. but it does the job perfectly. The game has five different gamestates. Gamestate zero represents the idle state until the button is pressed. The other gamestates represents which level the player is on. To counter the debounce of the button, I use the function millis() instead of delay(). This way the game can still run while the button processes.
To tweak the speed to the preference, lowering the ledSpeed variable will increase the speed. The speeds are in order of the difficulty.
Step 4: Wiring and Soldering
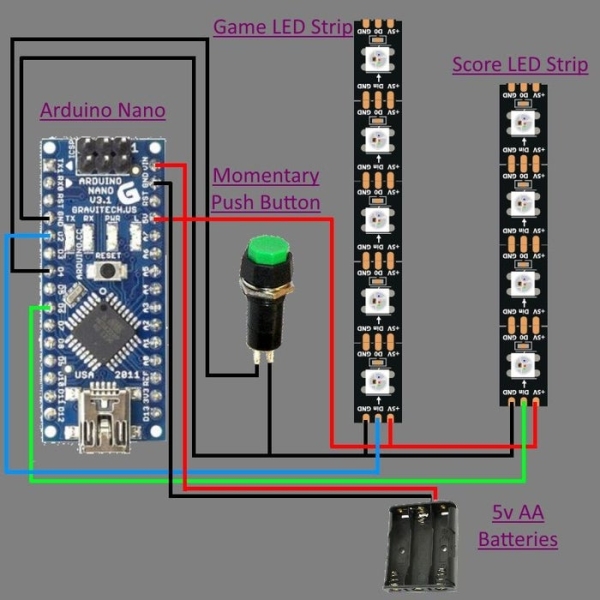
This project can either be powered by a 5v cord running to the Arduino Nano or from a 3 AA battery pack to make it portable.
Drill a hole for the momentary push button or have it separate from the frame. Connect one side to ground and the other side to pin 4.
(Optional)-Connect the battery pack with the switch on the 5v line to the VIN and Ground pins on the Arduino Nano. Make sure the signal is 5v and the output can handle powering the Arduino and the LED’s. To increase the longevity of batteries, put a brightness capacity on the LED’s.
Connect both sets of LED’s to the 5v rail on the Arduino and connect the Grounds. Finally, follow the Din lines to the desired pins on the Arduino.
Step 5: Hot Glue and Secure

I used a lot of hot glue and a Zip Tie to secure the wires. Try to cover any sharp objects and secure the wires firmly. Hands may be holding this.
Step 6: Another Reference
More instructable I found are linked. Thank you for your time and I hope you got some use of this project. Visit my website(www.neehaw.com) for more documentation and fun projects. Enjoy!
Source: Cyclone(Arduino LED Game)
- How many LEDs are used in this project?
The project uses 24 WS2812B LEDs, though the number can be changed based on preference. - Can this game be made portable?
Yes, it can be powered by a 3 AA battery pack for portability instead of a 5v cord. - What function is used to handle button debounce?
The function millis() is used to counter the debounce of the button without stopping the game loop. - How do I adjust the game speed?
Lowering the ledSpeed variable will increase the speed of the game. - Which pin connects to the momentary push button?
One side of the button connects to ground and the other side connects to pin 4 on the Arduino. - How many different game states does the program have?
The program has five different game states, including the idle state. - What method is used to secure the wires?
The author used hot glue and a Zip Tie to secure the wires firmly. - Does the signal need to be 5v for the battery option?
Yes, the output must be 5v and capable of powering both the Arduino and the LEDs.