Summary of Automated Plant Watering System
This article details a DIY automated plant watering system using an Arduino microcontroller. The device monitors time and triggers a relay to power a fountain pump, delivering water to up to four plants on a customizable schedule (daily or every "x" days). The project involves constructing a waterproof wooden box, integrating electrical components like an LCD screen and relays for 120V AC control, and writing code that utilizes modulo arithmetic to manage watering intervals efficiently.
Parts used in the House Plant Babysitter:
- Fountain Pump
- Nylon tubing
- Light Bulbs (the right ones for plants)
- Light fixture
- Micro controller (Arduino)
- Relay PCB
- LCD screen
- Wire
- Tub to hold water
- Maple plywood
- Polycrylic
House Plant Babysitter
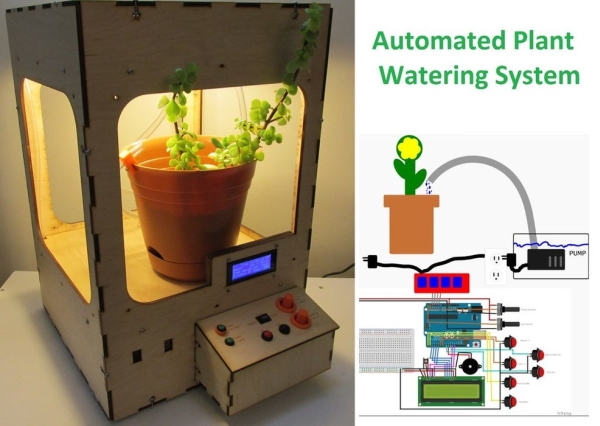
Going away from a while? Need something to babysit your house plants?
This box will automatically deliver an adjustable volume of water to four plants (or less) every day, or once every “x” day (up to seven days). A micro controller handles the time tracking and 120AC switching (via a relay). The relay powers a fountain pump which functions as the water delivery system.
Step 1: Materials
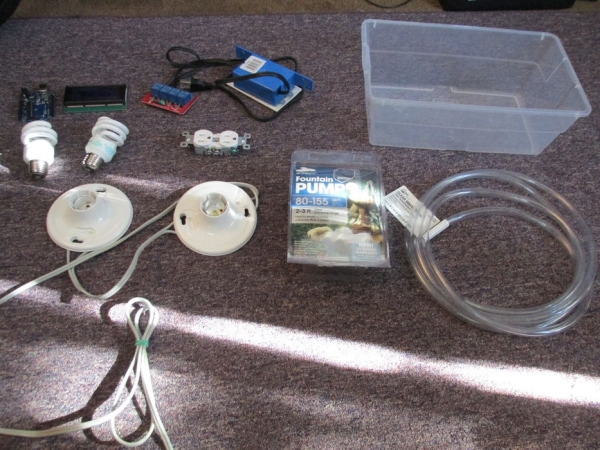
You’ll need these basics to build this setup.
Fountain Pump (pick on that can deliver water upward to match your box)
- Nylon tubing……………………………………………… $12.00
- Light Bulbs (the right ones for plants)…………… $2 x2
- Light fixture ………………………………………………..$1.60 x2
- Micro controller……………………………………………$4 (buy the 3rd party Arduino)
- Relay PCB ………………………………………………..$3.50
- LCD screen ……………………………………………….$8.00
- Wire…………………………………………………………….free
- Tub to hold water …………………………………………$1
- Maple plywood…………………………………………….. $12
The total cost of this build is around $80 when you add all the misc stuff.
Step 2: Build a Box!
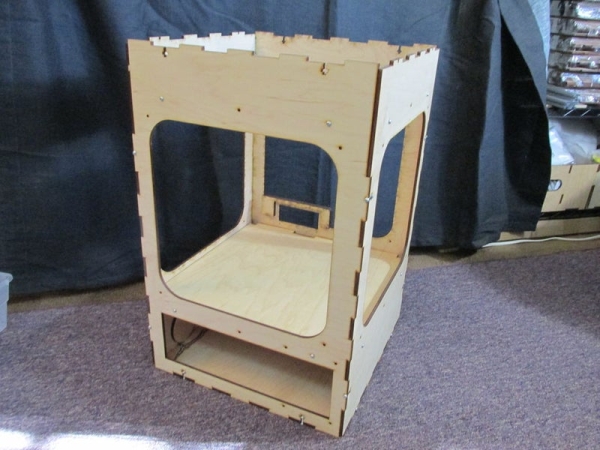
You can make just about any box to house this system. Im actually borrowing this box design from another ‘secret’ project I’m working on. But it will do just fine to make the system “all-in-one”.
I am not going into detail how to make this box as you can find great tutorials on Instructables for boxes. I will say I am using straight slats to hold the two ‘shelf’ layers. No brackets here.
Since we are making a water pump system, it might be beneficial to protect said wood from the water. I put about 4 coats of Polycrylic to make this wood “water tolerable”. The box was cut on a laser cutter at work and glued together.
Step 3: Electrical System
The arduino will keep track of time as well as the day of the month. When the alarm is triggered, the Arduino will power a relay. This relay will complete the 120V circuit for a water pump. The pump will deliver water to the plant! It’s simple enough, but each sub step has some complexity.
Disclaimer: This will not satisfy any NEC requirement for 120v AC circuit next to wet environments. Build at your own risk.
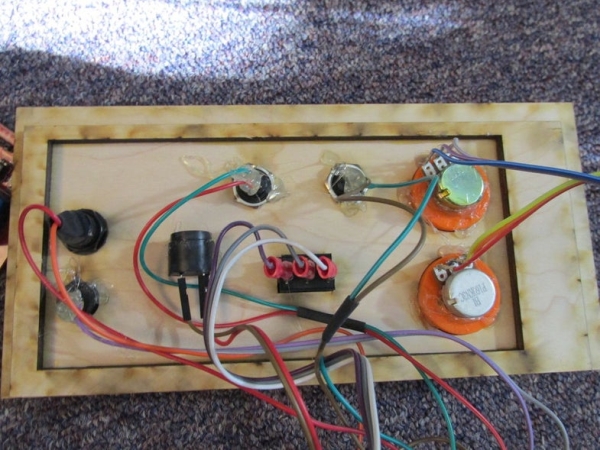
The photos show the connections for the Arduino, LCD and the control panel. Depending on the Relay board you buy and how many safety violations you want to avoid your 120AC wiring might look different. I haven’t shown any as this my way to say, you shouldn’t do this unless you’re confident in your abilities.
To summarize: 120V comes into the Relay, and when the Relay closes, that 120 gets passed to the outlet, powering the pump. The outlet is a single gang, but it is important to note I removed the tabs that tie both electrical sockets together. Now the outlets can be independently wired. One always on, the other switchable via relay.
My setup uses two relays to switch the 120AC on/off. Instead of passing the Neutral wire through the to outlet and only switching the L (hot) line, I am actually switching both the N and L 120 lines in separate relays. Double the redundancy for reasons that involve lack of foresight: I clipped the power cord in half (instead of just one wire) without thinking, so here we are.
Step 4: Mount Electrical
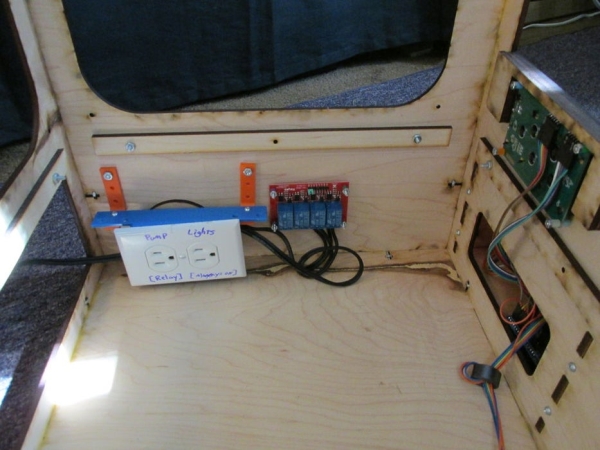
The outlet and relay board get mounted to the side of our box. Tip: If the water reservoir fails and leaks into our box , it would be best to mount any lines carrying 120AC above the “flood zone”. Next we wire the arduino.
Step 5: Arduino
The control panel is wired up and dropped into our box. The LCD screen also gets bolted in and wired. Both of these are wired to the Arduino.
Step 6: Code
A simple time keeping program that also tracks the day lies at the heart of our Arduino. I wrote some basic push counters that allow you to set the Hour and Minute locally for both the time and the alarm time. The day tracking is arbitrary and starts at day one and will count up to whatever day depending on the month is being tracked.
Building flexibility into the system means a few features. This code has the ability to:
- manually override pump
- control duration of when pump is active (control volume of water delivered)
- control how many times per week plants are watered
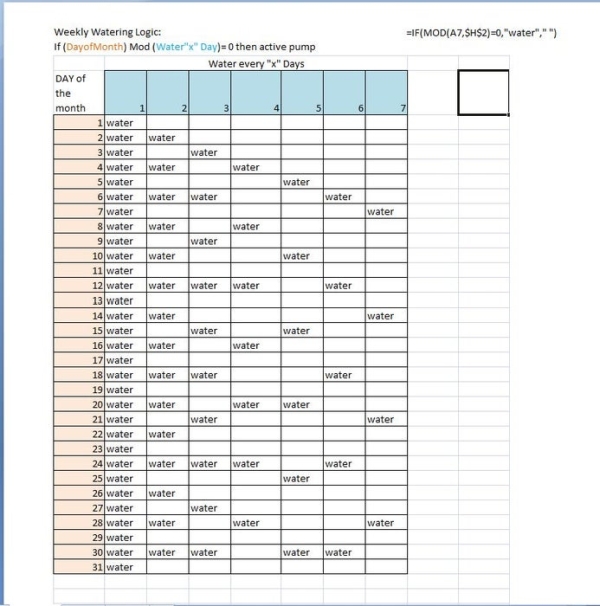
The more interesting section of this code is how control how many times per week plants are watered. In other words, how do we make the water on every “x” day operation as simple as possible?
IF Day of the MonthMod Water Every X Day = 0 , Then water plant!
Modulo is the key. Take the days of the month, and divide [modulo] them by x (Water on “x” day). If the remainder is zero then activate the relay [pump]. That’s it. This chart shows the modulo=0 for all possible days of the month (1-31) and the divisor (1-7). Way easier than to make a look up table for every day of the week, and then a command to make that repeat week after week. Thanks Discrete Mathematics course for making me do all those logic proofs and the modulo finally comes in handy.
Read more: Automated Plant Watering System
- How does the system determine when to water the plants?
The Arduino tracks the day of the month and uses a modulo operation where if the day divided by the set interval equals zero, it activates the pump. - Can this system water multiple plants at once?
Yes, the box is designed to automatically deliver water to four plants or fewer. - What component handles the time tracking and switching?
A microcontroller handles the time tracking and controls the 120AC switching via a relay. - How is the wood protected from water damage?
About four coats of Polycrylic were applied to make the wood water tolerable. - Does the system allow for manual adjustments?
Yes, the code allows users to manually override the pump control duration and set how many times per week plants are watered. - Is it safe to build this near wet environments?
No, the author states this will not satisfy any NEC requirements for 120v AC circuits next to wet environments and advises building at your own risk. - Why were two relays used instead of one?
The author switched both the Neutral and Hot lines separately for redundancy after accidentally clipping the power cord in half. - What mathematical concept is used in the coding logic?
Modulo arithmetic is used to determine if the current day of the month matches the desired watering interval.