Choosing the Right Arduino Motor
This guide on Arduino motors aims to provide fundamental information essential for selecting a motor for your project. If you’ve been engaged in DIY electronics for some time and feel confident in your skills, you might be seeking a more challenging and rewarding experience by venturing into larger, more sophisticated inventions. In the realm of advanced projects, creations powered by motors, such as Arduino-based robots, are frequently favored due to their inherent awesomeness.

There exists a wide array of Arduino motors, each possessing distinct strengths and weaknesses. Consequently, not every motor proves ideal for every task, as certain types excel in specific areas but may fall short in others. In this exploration, we delve into various types of electric motors commonly encountered in the realm of electronics. We provide insights on how, when, and where to deploy a particular motor, ensuring that you always have the most suitable equipment for your project based on its specific requirements.
Additionally, for creative inspiration, we briefly showcase some motorized builds we’ve assembled, offering a glimpse into their functionality. This demonstration aims to spark your creativity and provide a practical understanding of the motors under consideration. If you’re an aspiring creator seeking comprehensive insights into Arduino motor systems to elevate your projects, you’ve found the perfect resource to guide you on your journey.
Arduino Motor Types
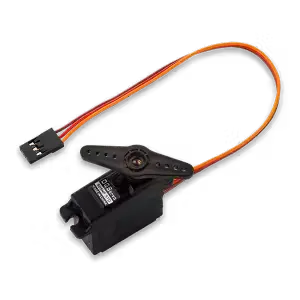
Servo Motors
Servo motors stand out as one of the most favored motor types employed by hobbyists engaged in Arduino projects, seeking precise motor control functionalities. Their widespread appeal can be attributed to the remarkable versatility inherent in servo motors.
Essentially, a servo motor is a concise term denoting a standard DC motor linked to a position feedback sensor and a compact control board. This integrated design facilitates effortless motor control directly from the Arduino using a PWM (Pulse Width Modulation) signal. Hobbyists greatly appreciate servo motors due to their user-friendly nature and seamless integration with Arduino, allowing for straightforward control right from the start.
Beyond the realm of hobbyist projects, servo motors have garnered significant usage in modern industries, especially within robotics. In the field of robotics, these motors have proven exceptionally adept at delivering precise motor control, serving applications ranging from intricate movements in robotic limbs to the operation of mechanized prosthetics utilized by individuals with limb amputations.
How it works
In broad terms, a servo motor can function as either a linear or rotary actuator, exhibiting precise control over linear or angular motion. Rather than being a standalone motor type, it is a composite system that integrates a motor, control circuit, and a sensor for positional feedback into a cohesive operational unit.
Servo motor control
While certain servos are engineered to respond to analog signals, those prevalent in hobbyist markets are typically PWM-controlled servos specifically crafted for compatibility with microcontrollers. The Arduino, referred to as the indexer in the control circuit, regulates the sequence of electrical impulses directed to the motor through an amplifier with the assistance of a motor driver/amplifier.
Pros
Servos exhibit remarkable versatility and are easily controllable and programmable through digital output. They boast high precision, eliminating the need for control loop computations. Furthermore, they come in various variants, offering additional functionalities, including enhanced rotational control.
Cons
Elevated power consumption Tends to have a higher cost compared to basic motors Due to widespread use and increased expenses, numerous servos with plastic gearing are accessible at considerably lower prices. Nevertheless, these are unsuitable for heavy loads or prolonged use, and they are susceptible to becoming stripped (losing teeth over time).
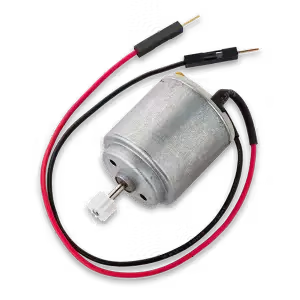
DC Motors
Although somewhat outdated, the conventional Direct Current (DC) brushed motor stands out for its simplicity. It is uncomplicated to assemble and cost-effective to manufacture, making it a ubiquitous choice for various applications requiring electric motors.
How it works
The DC brushed motor comprises an arrangement of conductive windings, with an odd number of them encircling a central axle to which the commutator is affixed. Surrounding this assembly are two magnets with opposing polarities. When the windings receive energy and become charged, they are drawn toward the outer assembly, inducing rotation. The charge state undergoes modification as the brushes make contact with the commutator. This alteration enables the windings to persistently experience attraction toward the outer assembly, facilitating continuous motor rotation as long as power is supplied.
DC motor control
Controlling basic motors is inherently straightforward. Manipulating the power variables, such as increasing voltage to adjust the motor’s rotational speed (RPMs) or amperage to influence torque, offers a simple means of control. Reversing the motor’s direction is as uncomplicated as switching the polarity of the motor contacts.
In applications that demand enhanced precision, DC brushed motors can be coupled with a device known as a wheel encoder or rotary encoder. These devices possess the capability to accurately detect and measure the angular position of a motor’s axle. Subsequently, the microcontroller interprets the output signal, transforming it into digital information. This data proves valuable in determining the motor’s location, speed, and acceleration, contributing to more intricate control in contemporary applications.
Pros
Robust torque
Straightforward assembly and user-friendly control
Exceptionally cost-effective production
Cons
The longevity of brushes diminishes due to wear and tear.
Extended operation at higher RPMs may result in brush heating and motor damage.
Minimal electromagnetic interference on radio frequencies necessitates increased computation for closed-loop control.
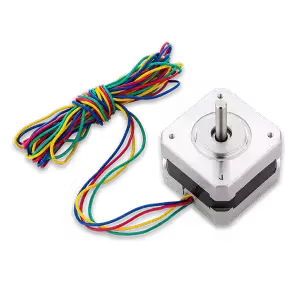
Stepper Motor
Differing from the typical DC motor, the stepper motor becomes the preferred option when precise and controlled movements are essential, surpassing the capabilities of a standard motor. These motors are frequently employed in the printing sector and find applications in straightforward robots, such as factory robot arms tailored for specific tasks.
How does this motor work
In contrast to other motors that offer continuous rotation during operation, stepper motors are engineered to move a specific number of ‘steps’ at a designated speed when activated. Each activation of the motor supplies sufficient power for a single step. The precision of each individual ‘step’ reflects the overall accuracy capacity of the motor.
Stepper motor control
In contrast to other types of motors, stepper motors are specifically crafted to leverage sophisticated electronics for precise motor control. To harness their intricate capabilities, stepper motors necessitate a dedicated driver circuit. This circuit facilitates the connection of the stepper motor to a control system, such as an Arduino, enabling effective regulation of power to the motor.
Pros
Exceptionally precise operational control
Ease of construction and dependability
Elevated torque – applicable to specific cases
Control without feedback loop
Cons
Specialized application
Demands a sophisticated control system for optimal functioning
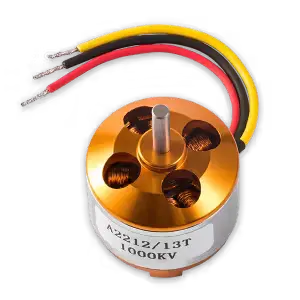
Brushless Motor
A progression from traditional brushed motors, brushless motors are rapidly gaining favor among hobbyists and enthusiasts due to their significant potential and enhanced reliability compared to their predecessors. Similar to brushed motors, they offer substantial torque and can operate consistently at high RPM. The versatility of brushless motors makes them highly adaptable, making them an excellent choice for Arduino Motor applications, and they are especially favored by individuals constructing RC cars or drones.
How it works
The brushless motor operates by utilizing alternating current to induce opposing charges between the windings and the magnets located on the outer assembly. In this configuration, only the outer assembly connected to the axle undergoes rotation. The advantage of having a solitary moving component, coupled with the elimination of contact brushes, results in several benefits for brushless motors, including enhanced energy efficiency, prolonged operational lifespans, seamless transfer of mechanical energy to the axle, and reduced friction.
Brushless motor control
Despite being more challenging to manage compared to basic brushed motors, advancements in modern technology have significantly simplified the control of brushless motors through computer interfaces. Hall effect sensors, capable of detecting alterations in magnetic fields and converting them into digital information, are commonly employed in conjunction with brushless motors to monitor and regulate their output. This parallels the way wheel encoders are utilized with brushed motors.
Pros
Extended Durability
High Reliability Due to a Single Moving Component
Low-Friction Design Ideal for Prolonged Operation at High Speeds
Energy-Efficient Configuration
Cons
Necessitates dedicated control systems
To achieve optimal motor performance, the incorporation of a gearbox is essential for regulating power delivery.
Parameters for choosing an Arduino motor
Selecting the appropriate motor for your project is typically contingent on the nature of the project you are aiming to construct and the specific performance criteria that will define the optimal motor for your needs. Three key parameters, interdependent with each other, must be carefully considered when making the decision on the suitable motor for our project.
Torque
While we won’t delve into complex mathematics and physics in this article, it’s essential to grasp the significance of your motor’s torque rating and how it shapes your decisions when selecting a motor for your projects. This understanding ensures that you choose a motor that adequately meets your needs or expectations.
In simpler terms, a motor’s torque rating denotes the rotational force it can exert on a load. Torque is calculated using a straightforward formula:
\[ \text{Torque} = \text{Distance from axis of rotation} \times \text{Force} \]
To illustrate how torque influences creations, consider another realm where torque plays a crucial role—the automotive sector. In scenarios like ascending hills or steep roads, an engine with a high torque rating is preferred because it can exert greater force on the load (the vehicle). This capability allows the vehicle to ascend the hill even at low speeds or from a standing start.
Maintaining a high torque rating is crucial for sustaining the rapid rotational speed of a motor, especially in applications such as drones. A motor with a high torque rating possesses the capability to swiftly alter RPM values, contributing to smoother and more responsive performance in an electric vehicle utilizing such a motor. For those seeking high torque options, standard DC brushed motors are cost-effective but have a shorter lifespan and require more maintenance. Alternatively, a pricier but more reliable and energy-efficient option is the DC brushless motor.
It is essential to align your motor’s torque rating with the specific requirements of your creation to ensure prolonged operation. A torque rating that is too low renders your creation inoperable, while an excessively high torque rating could induce mechanical stress during operation. Although the risk of catastrophic failure due to excessively high torque ratings is minimal in DIY electronics, it can lead to accelerated wear of components and shorten the operational lifespan of your innovative creation.

Voltage – Velocity/RPM
In this context, Velocity refers to the speed of rotation of the electric motor, measured in revolutions per minute (RPM). Alongside torque, these two factors significantly impact motor performance. To simplify, a motor with high torque excels in moving heavier loads at a slower speed, while a drive system with high RPM allows for faster speeds at the expense of overall load-carrying capacity.
When integrating an Arduino motor into your project, it’s crucial to consider your power supply, whether from a wall outlet or batteries, and ensure that the motor voltage requirements are met for optimal performance.
For more advanced builders, incorporating a gearbox—similar to those found in conventional cars—enables motors to operate effectively in both scenarios as needed. As experienced drivers know, lower gears provide ample torque for initial movement, but shifting quickly to higher gears is necessary to maintain acceleration. Attempting to start in a high gear without sufficient torque or inertial momentum, such as 4th or 5th gear in a manual transmission, demonstrates how high RPM alone won’t propel you swiftly.
In general, a brushless motor stands out as an excellent choice for those seeking reasonable torque, along with reliability and energy efficiency even at higher RPMs, without the added weight and complexity of a gearbox.
Current/Amperage
When selecting an electric motor, it is crucial to choose one that can deliver the required power while staying within acceptable power consumption limits. The power (wattage) of a motor is determined by multiplying volts and amps. Voltage influences a motor’s RPM, and a higher amp rating is necessary to enhance torque. While a powerful motor with high voltage and amp ratings may be suitable for certain applications, it results in heavier power load requirements.
While this may not significantly impact projects relying on power from wall sockets, considerations for motor requirements become vital in portable projects like unmanned vehicles, robots, and wearables. In such cases, the batteries powering the project must be configured to deliver sufficient power. Hence, smaller, lighter, and more efficient motors are preferred when developing portable electronics to minimize both power consumption and weight (of the motor and the required power source).
Selecting the right motor involves numerous factors, but a solid understanding of these three primary criteria should guide you effectively. Although, in theory, any electric motor can be adapted for various functions with ingenuity, you should now possess the knowledge to choose the optimal motor or motors that suit your project best.
In the subsequent section, we will explore the practical applications of some of the motor types discussed earlier, featuring a few projects assembled at circuito.io.
Arduino Motor project examples
At circuito.io, we are constantly working on intriguing projects, and in this section, we aim to spotlight a selection of our Arduino motor projects that leverage various motor types. These projects serve as exemplary demonstrations of the diverse capabilities associated with each motor.
Each project title is hyperlinked to its respective page, providing you with the opportunity to delve into the details of how to manipulate different motors. Additionally, you can access the link to our builder tool, enabling you to modify one of our showcased projects or seamlessly craft your own from the ground up with speed and simplicity.
Arduino Motor Project #1: IoT Pet Feeder
Managing the task of an internet-enabled pet feeder was ideal for a single servo motor, given the limited rotational range required to dispense food. Employing the servo motor in this context emerged as an economical, space-efficient, and user-friendly solution, devoid of the need for supplementary components. With minimal power requirements, this setup ensures reliability, making it suitable for prolonged use.

Arduino Motor Project #2: Line Follower
In the construction of the line follower robot, we employed two standard DC brushed motors. The choice of brushed motors proves advantageous when assembling compact wheeled robots like this one due to their provision of high torque, ease of control, and cost-effectiveness.
Given the small size and light weight of the robot, the energy efficiency gained from transitioning to a brushless DC motor is not particularly necessary. The addition of gears is essential for this project to transform the DC motor’s speed into torque. Utilizing a DC motor makes coding relatively straightforward, and both acceleration and speed are easily regulated. However, a separate drive system must be devised to interpret commands from the Arduino and convert them into electrical impulses, known as a DC motor driver. Additionally, incorporating a rotary encoder or a similar device may be necessary to convert motor feedback into digital information, allowing the Arduino to monitor its own position and progress.