Over the years as technology advanced and grew at a tremendous pace, so did the horizon of ideas and creation in our mind. If we look a few years back, a teenager like me would dare think about creating a robot that would operate listening to their voice and follow the given commands. All they could do was dream about making such a fancy robot and let the idea pass from their mind. But with the help of today’s technology, those great ideas are no more left being dreams but are coming true. Having not to deal anymore with complex circuits, Arduino gives us a very simple approach into building projects that were once impossible to make unless you were a genius and had all the materials required for making such a project.
In this Instructables, I have accomplished a project that was once a dream to me. With the help of materials and components that I found lying around in my house, I ended up making this simple yet fascinating voice controlled robot with the help of an Arduino UNO.
If you find this helpful and fascinating, do drop a vote for me in the “first time author” contest.
Step 1: Gather the Materials Needed
In order to make this project, you’ll need to gather the materials mentioned below. They are easily found at a nearby local electronic shop or simply purchase them online.
Electronic components:
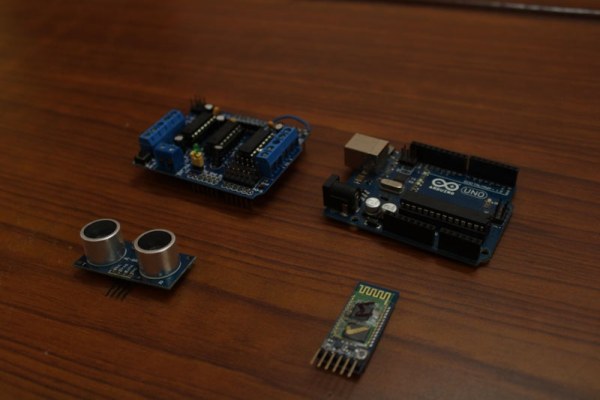
- Arduino UNO – 1x
- L293D motor driver – 1x
- Servo motor (MG995) – 1x
- DC gear motor – 4x
- HC-05 bluetooth module – 1x
- Ultrasonic distance sensor – 1x
- Mini breadboard – 1x
- 3.7v LiPo battery – 2x
- Jumper wires
Hardware:
- Chassis – 1x
- Rubber wheels – 4x
Tools:
- Soldering iron
- Screwdriver
- Double sided tape (or you can use hot glue if you have a glue gun)
- Scotch tape
- Scissors
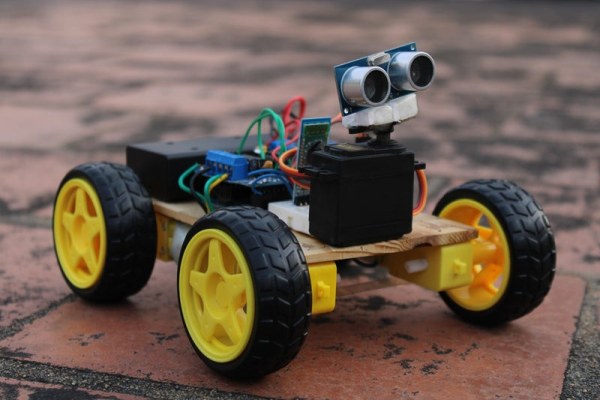
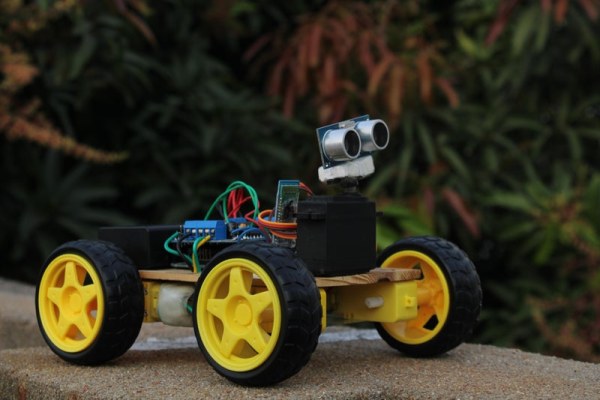
Step 2: Building the Base
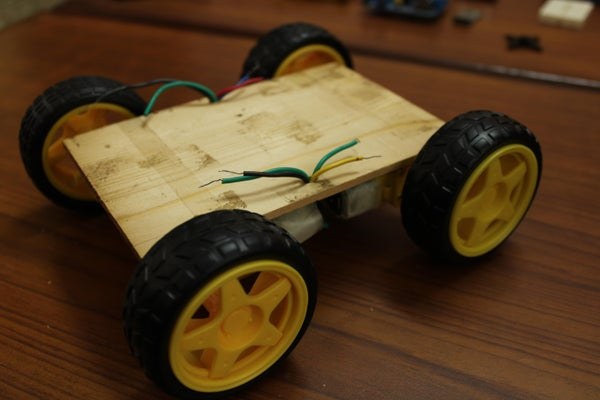
To begin with, fix the motors to the chassis. In my case, I used a wooden chassis. With the help of double sided tape, get the four motors fixed in their respective corners. For safeties sake, I put a layer of scotch tape around the chassis and the motors. Make sure the wires coming out from the motors are neatly arranged for in case there’s a problem, it’s easily solved. Once the motors are attached to the chassis, fix the wheels to the motors.
Step 3: Getting Into the Circuit Part 1
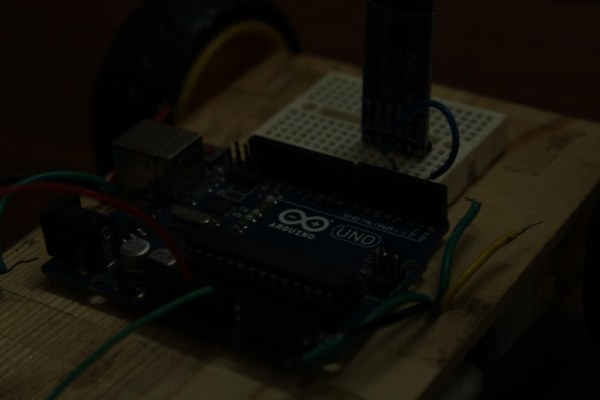
Place the Arduino in the centre of the chassis as it will be acting as the brain for the robot. You will need four jumper wires. Place the first one in one of the Gnd port of the Arduino. The second wire in the 5v port. The third wire in the TX port and the fourth wire to the RX port of the Arduino. Once done, place the L293D Motor Driver right on top of the Arduino.
After the motor driver is fixed properly on top of the Arduino board, take the motor wires one by one and with the help of a screwdriver, connect the wires of motor 1 to M1 of the motor driver, then motor 2 to M2,then motor 3 to M3, and finally motor 4 to M4. Make sure there’s no loose connection.
Step 4: Getting Into the Circuit Part 2
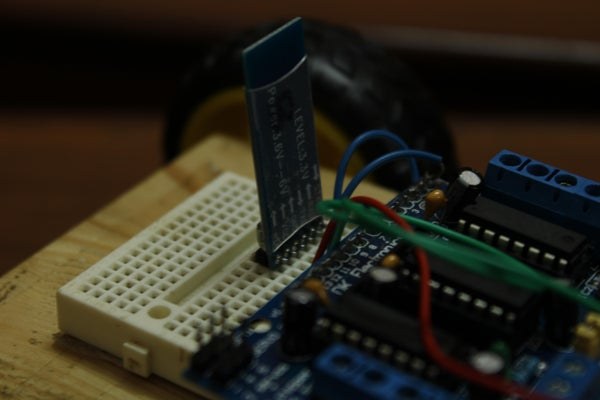
Place the mini breadboard close to the Arduino. Fix the HC-05 bluetooth module onto the breadboard and connect the Gnd wire coming out of the Arduino board to the Gnd of the bluetooth module. Then connect the 5v wire to the VCC of the bluetooth module. Take the RX from the Arduino and connect it to the TX of the bluetooth module. And finally, connect the TX of the Arduino to the RX of the bluetooth module.
Once the bluetooth module is connected, place the Servo Motor (MG995) right at the front of the chassis. I have attached the servo with the help of double sided tape, but if you have a glue gun, then you can use that as well.
Finally, fix the Ultrasonic Distance Sensor on top of the servo’s head. In my case, I used a thin layer of polystyrene. I inserted the pins of the sensor into the polystyrene as it’s a soft and light material.
Connect the three wires coming out of the servo to the specific ‘servo ports’ on the motor driver.
In the end, connect the two 3.7v LiPo batteries to the motor driver’s power source. Once done, you’re ready with the hardware.
Step 5: Uploading the Software
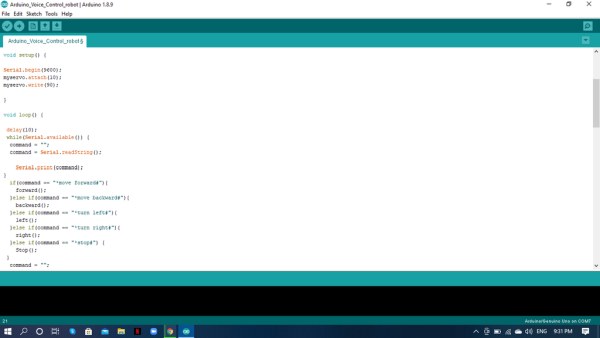
Download the code I’ve shared below and make sure you have the Arduino IDE installed on your computer.
Before uploading the code onto the Arduino, you’ll need to download the ‘AFMotors’ library. You will need to go to: https://learn.adafruit.com/adafruit-motor-shield/library-install and download the respective library. Once downloaded, open the Arduino IDE, go to the library section and click of the ‘AFMotors’. You will also need to select the ‘Servo’ library which comes preinstalled with the Arduino IDE.
IMPORTANT: Before uploading the code onto your robot, make sure the RX and TX pin of the bluetooth module is disconnected. Also, make sure you choose the correct Port and Micro-controller before uploading the code.
Step 6: Install the App on Your Smartphone
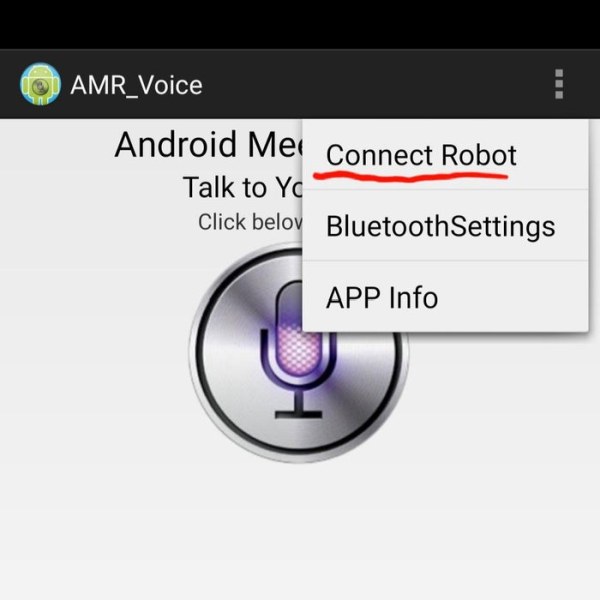
You will need to go to Google and search for the app called: ARM_Voice. Once the app is downloaded, turn on your robot with the help of the external power supply and on your phone turn on bluetooth. From the app, choose the ‘HC-05 Bluetooth Module’ option and you will notice that the fast blinking red light on the bluetooth module slowing down into a slow blinking gesture which means you successfully connected your smartphone with your newly made robot.
(To make it simpler, I’ve attached two pictures of how to connect the robot’s bluetooth module with your smartphone.)
Step 7: Command Your Newly Built Robot
In order for the robot to go forward, simply say, “move forward” and to go backward say, “move backward”.
To make the robot turn left or right, command, “turn left” or “turn right”. While your robot is performing a specific task, if you want it to stop doing what it’s doing, simply command, “stop”.
I really hope you enjoyed going through my Instructables and liked this project. I will highly recommend you to try this out if you like tinkering during your free time or you are passionate about such cool stuff. Personally, I had a lot of fun making this project. I hope it will be the same for the ones you try it out.
Once again, thanks for your patience and please drop a VOTE for the “First Time Author” challenge 🙂
Source: Arduino Voice Controlled Robot