Summary of Arduino-Powered Bidirectional Counter with IR Sensor
This article details a bidirectional people counter project using an Arduino Uno and IR sensors to track individuals entering and exiting a space. The system utilizes two sensors to determine direction, updating a 16x2 LCD display with counts for entries, exits, and the net total. Ideal for seminar halls, conference rooms, and parking monitoring, this automated solution eliminates manual counting needs.
Parts used in the Bidirectional Counter:
- Arduino Uno board
- IR sensor (two units)
- 16×2 LCD display
- Arduino IDE software
- C/C++ programming language
Hello everyone, welcome back to Techatronic. Today, we’re diving into a highly practical project – the Bidirectional Counter. Our goal with this project is to tally individuals passing through the sensor. Bidirectional counters have become increasingly prevalent, especially aiding us during the pandemic. They find specific utility in seminar halls and conference rooms, accurately recording the total number of people entering or exiting an area. For instance, in a scenario where there’s a limit of 100 people allowed in a designated space, this counter automates the counting process without requiring human intervention.
Introduction
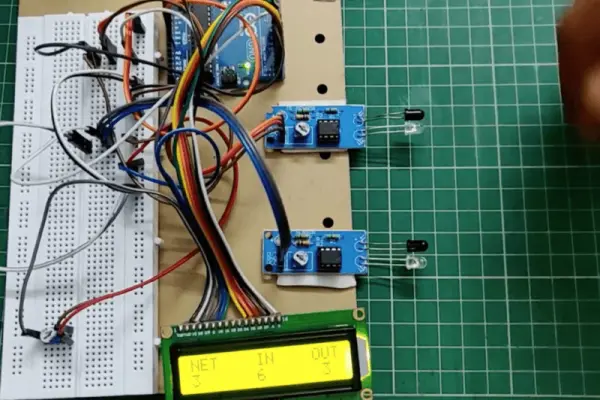
This project functions as a people-counting system facilitated by sensors. Termed a bidirectional counter, it employs two sensors—one positioned at each side—to effectively tally individuals entering and exiting. A 16×2 LCD display serves as the project’s output, showcasing the count of individuals inside and outside the area, along with the net count of people within the room.
Construction of bidirectional Counter
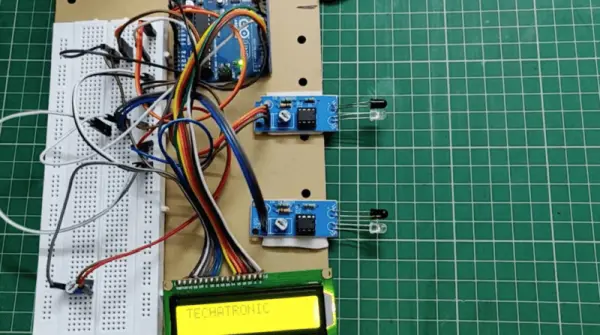
Below, we will provide all the necessary information and materials required to construct this Arduino counter project. It is essential to adhere to the provided instructions and utilize the given data to ensure successful implementation of the project. Once the circuit and code assembly are completed, replicate the circuit layout exactly as depicted in the accompanying image.
Bidirectional visitor counter using Arduino Counter Circuit diagram

Bidirectional Counter Code
This project was completed using Arduino Uno, employing C/C++ programming language within the Arduino IDE software. We’re providing the code sketch here, which you can upload directly to your Arduino Uno board.
#include const int rs=12, en=11, d4=5, d5=4, d6=3, d7=2 ;
const int in=6,out=7;
int temp=0,femp=0,wemp=0;
LiquidCrystal lcd(rs,en,d4,d5,d6,d7);
void setup() {
Serial.begin(9600);
lcd.begin(20,4);
pinMode(in,INPUT);
pinMode(out,INPUT);
pinMode(8, INPUT_PULLUP);
lcd.print(“bidirectional counter”);
lcd.setCursor(0,1);
lcd.print(“IN”);
lcd.setCursor(6,1);
lcd.print(femp);
lcd.setCursor(0,2);
lcd.print(“OUT”);
lcd.setCursor(6,2);
lcd.print(wemp);
lcd.setCursor(0,3);
lcd.print(“NET”);
lcd.setCursor(6,3);
lcd.print(temp);
}
void loop() {
int m=digitalRead(8);
if(m==1)
{
if(digitalRead(in)==1)
{
delay(100);
if(digitalRead(out)==1)
{
temp=temp+1;
femp=femp+1;
wemp;
lcd.clear();
lcd.print(“HOPE SECURITY”);
lcd.setCursor(0,1);
lcd.print(“IN”);
lcd.setCursor(6,1);
lcd.print(femp);
lcd.setCursor(0,2);
lcd.print(“OUT”);
lcd.setCursor(6,2);
lcd.print(wemp);
lcd.setCursor(0,3);
lcd.print(“NET”);
lcd.setCursor(6,3);
lcd.print(temp);
delay(1000);
}}
else if(digitalRead(out)==1)
{ delay(100);
if(digitalRead(in)==1)
{
temp=temp-1;
femp;
wemp=wemp+1;
// if(temp<=0)
//{temp=0;
//wemp=0;
//femp=0;
// }
lcd.clear();
lcd.print(“HOPE SECURITY”);
lcd.setCursor(0,1);
lcd.print(“IN”);
lcd.setCursor(6,1);
lcd.print(femp);
lcd.setCursor(0,2);
lcd.print(“OUT”);
lcd.setCursor(6,2);
lcd.print(wemp);
lcd.setCursor(0,3);
lcd.print(“NET”);
lcd.setCursor(6,3);
lcd.print(temp);
delay(1000);
}}
}
else
{lcd.clear();
lcd.print(“HOPE SECURITY”);
femp=0;
temp=0;
wemp=0;
lcd.setCursor(0,1);
lcd.print(“IN”);
lcd.setCursor(6,1);
lcd.print(femp);
lcd.setCursor(0,2);
lcd.print(“OUT”);
lcd.setCursor(6,2);
lcd.print(wemp);
lcd.setCursor(0,3);
lcd.print(“NET”);
lcd.setCursor(6,3);
lcd.print(temp);
}
}
Bidirectional Counter Working
The operation of a Bidirectional counter is straightforward. Initially, understanding the functionality of each component from the list of components is essential. Let’s start by discussing the sensor. In this setup, we utilize an IR sensor designed to detect the presence of an individual within its range. Whenever someone approaches the sensor, it promptly detects their presence and transmits this information. For a comprehensive understanding of the IR sensor’s operation, detailed information is available on my website.
Moving on, let’s delve into the controller or the central processing unit (CPU) employed in this project. We’ve selected the Arduino Uno as the controlling unit. Naturally, a robust controller is necessary to manage all aspects of this project, from acquiring input to processing and generating output. Serving as the project’s brain, the Arduino Uno interacts with the IR sensor, receiving input from it. This setup effectively interfaces the IR sensor with the Arduino, which acts as the counter. As the Arduino receives input from the IR sensor, it proceeds to process this information and responds accordingly based on predefined conditions.
The concluding segment of this system involves the utilization of Arduino, serving as the output component for this project. Arduino plays a crucial role in transmitting instructions to the display, dictating what should be showcased on it.
We’ve integrated a 16×2 LCD display to exhibit comprehensive details regarding the project and the count of individuals entering and leaving a room. This liquid crystal display operates by using analog signals to illuminate crystals, displaying the desired numbers or letters. Should you encounter any difficulties in connecting the display, please refer to our guide on connecting a 16×2 display with Arduino.
To comprehend the functionality of the bidirectional counter project, it employs two sensors—S1 and S2. When an individual crosses the S1 sensor initially, the system awaits the crossing of the S2 sensor. Only when both conditions are met does the project tally the person entering the sensor. Conversely, if the S2 sensor is crossed first followed by the S1 sensor, the project registers the person exiting the system or room. This delineates the operational mechanism of the bidirectional counter. We’ve furnished comprehensive details encompassing the code and circuitry for the bidirectional visitor counter using Arduino.
Application of Bidirectional Counter
Utilize in a seminar hall for people counting purposes.
Apply in a conference hall to track attendance.
Suitable for use in school and college classrooms.
Also applicable for monitoring parking spaces.
- What is the primary function of the bidirectional counter?
The system tallies individuals passing through a sensor area to record total entries and exits. - How does the system distinguish between entering and exiting?
It uses two sensors; crossing S1 then S2 registers an entry, while crossing S2 then S1 registers an exit. - Can this project be used in a seminar hall?
Yes, it is specifically suitable for use in seminar halls for people counting purposes. - What display component is used to show the count?
A 16×2 LCD display is integrated to exhibit the number of people entering, leaving, and the net count. - Which microcontroller serves as the brain of this project?
The Arduino Uno is employed as the controlling unit to process inputs from the sensors. - Does the counter require human intervention to operate?
No, the counter automates the process without requiring human intervention. - Where else can this device be applied besides conference rooms?
It is also applicable for monitoring parking spaces and school or college classrooms. - What programming language is used for the code sketch?
The project employs C/C++ programming language within the Arduino IDE software.