Summary of Arduino PIR motion water gun
This article guides a beginner on building an automated motion-activated water gun using an Arduino Uno, a PIR sensor, and a MOSFET to control a motor from a battery-operated sprayer. The project involves coding the Arduino, wiring the circuit on a breadboard, and constructing a custom enclosure with plywood and super glue.
Parts used in the Automated Motion Water Gun:
- MOSFET or transistor capable of handling the water gun motor current
- Diode
- 10k ohm resistor
- PIR (Passive Infrared) sensor
- Breadboard
- Jumpers
- Arduino Uno
- Battery-operated pesticide sprayer (repurposed as water gun)
- Tubing, .22 air gun pellet, and tack (for custom sprayer tip)
- Battery and battery holder
- 1/4 luan plywood
- "2p-10" heavy duty super glue
first what youll notice my grammer isnt the best 🙂
ok what youll need: 1 transister/mosfet that can handle the current for the water gun motor, this is the one i used –
http://www.sparkfun.com/products/10213 – then a diode, i used this one – http://www.sparkfun.com/products/8589 – then a 10k ohm resistor, then a PIR, i didnt use this one but it should work – http://www.sparkfun.com/products/8630 – then a bread board, i used this one – http://www.sparkfun.com/products/7916 – then some jumpers these are what i used – http://www.sparkfun.com/products/124 – then an arduino, i used a uno – and a water gun, which was for me, a pretty hard thing to find around the house, but i got one from a pesticede battery operated sprayer (it had never been used). and i made the sprayer tip using some tubing, a .22 air gun pellet and a tack ( im pretty creative:). last a battery and battery holder that will work for your sprayer motor. oh and also keep in mind this instructable was done by me, a 14 year old who just got into elctonics in the last few months, plus this is my first instructable :).
Step 1: The code
first, upload the code. go to the bottom of this page – http://www.ladyada.net/learn/sensors/pir.html – copy and then paste it in the arduino ide, then change the LED pin to digital pin 3, then save the code in the ide, then upload the code to your arduino.
Step 2: Wiring up the PIR
follow this wiring diagram for the PIR. yellow jumper is out or signal, black is ground, and red is positive
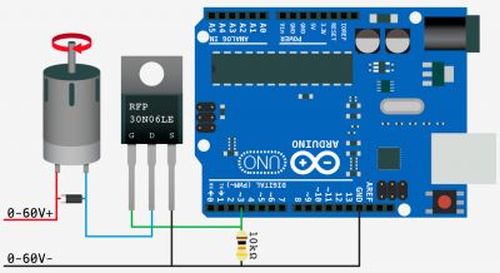
Step 3: The circuit
now build this circuit on a bread board, but know that you wont get it to work the first time. and its very picky on how you put the jumpers, especially around the mosfet/transistor.
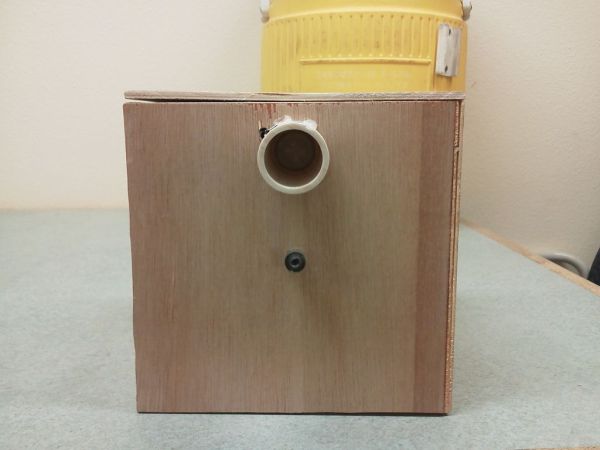
Step 4: The box
now, i built a box from some 1/4 luan plywood and some VERY heavy duty super glue called “2p-10” made by fast cap. but im not going to tell you exactly how to built it because it depends on how you want to rig it all up and how big your water tank is.
PIR
For more detail: Arduino PIR motion water gun
- What components are required for this project?
You need a MOSFET or transistor, diode, 10k ohm resistor, PIR sensor, breadboard, jumpers, Arduino Uno, a battery-operated sprayer, tubing, a pellet, a tack, a battery holder, plywood, and super glue. - How do I prepare the code for the Arduino?
Copy the code from the provided Ladyada link, paste it into the Arduino IDE, change the LED pin to digital pin 3, save, and upload it to the board. - Which wires connect to the PIR sensor?
The yellow jumper connects to the output signal, the black to ground, and the red to positive voltage. - Can I use any transistor for the motor?
No, you must use a transistor or MOSFET that can handle the specific current requirements of your water gun motor. - What should I do if the circuit does not work initially?
The author notes the circuit is very picky regarding jumper placement, especially around the MOSFET or transistor, so check your connections carefully. - How was the enclosure constructed?
The box was built using 1/4 luan plywood and held together with VERY heavy duty super glue called "2p-10". - Where did the author source the water gun?
The author used a never-used battery-operated pesticide sprayer found at home. - Is special equipment needed for the sprayer tip?
The author created a custom tip using tubing, a .22 air gun pellet, and a tack.