Hello internet people, This is gonna be about how to make what DEFINITELY isn’t a rip off of a mobile game on an arduino uno r3.
so to start, your gonna need all the parts, which are as follows!
1x Arduino Uno r3 ($42)
2x LCD Keypad Shield ($19 each)
5x buttons
5x 220Ω resistors
28x wires
Alright, once you’ve got all the parts it’s time to get started!
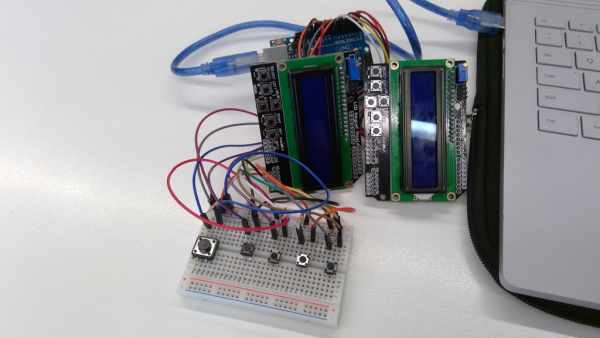
Step 1: Wiring
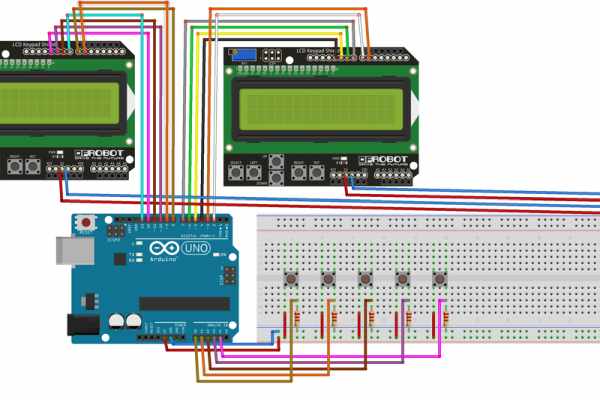
Begin by wiring up your arduino and friends as shown in the diagram,
Make sure that the buttons are linked up the right way around, with the A0-4 slots on the ground side of the button rails, or the arduino will instead think the buttons are being held down constantly instead of only on a press.
Step 2: Declaration Statements
All code here should go before your void setup and void loop, this is because all of these variables and objects are used in several of the functions we will set up.
Begin by putting:
<p>#include <LiquidCrystal.h>
</p>
at the top of your code, this is telling the arduino to use the library “LiquidCrystal.h” and the functions that are a part of it.
The next step is to define the pins we are using for our buttons by putting this code in below our #include:
<p>#define btnEnter A0<br>#define btn1 15
#define btn2 16
#define btn3 17
#define btn4 18</p>
We define the terms btnEnter and btn1 to btn 4 to make the code easier for us to read, or change if necessary. It means that when we type btn1 the arduino will know we in fact mean the button 15. Although we are calling the ports port 15, 16, 17 and 18, they are labelled on the arduino as A1 A2 A3 and A4, this is because they are ports used specifically for analog inputs, although we are only using them for digital inputs.
Next we are going to create the objects that will control the Liquid Crystal Displays. To do this put this code below our defines
<p>LiquidCrystal lcdLeft(8, 9, 12, 10, 11, 13);<br>LiquidCrystal lcdRight(2, 3, 4, 5, 6, 7);</p>
What this does is tells the arduino that when we call lcdLeft or lcdRight we are refering to a LiquidCrystal object. The numbers in the attached brackets tell the arduino which ports the object should be using to send messages to the LCD when we use their functions.
Now we need to declare the variables by putting the next bit of code below the object declarations:
<p>//these variables are options that you can change - higher numbers = faster game speed up<br>int intGameSpeedEasy = 10;
int intGameSpeedMedium = 25;
int intGameSpeedHard = 80;</p><p>//set up variables for the game<br>boolean bolPlay;            //tracks if the player
int intScore;               //tracks the player's score
int intDiff;                //just an estetic thing for telling what difficulty the game is on
//set up variables for input
int intEnter;               //trackes if the user presses the enter button
int intInput;               //tracks which buttons the user presses
boolean bolTilePressed;     //ensure the player doesn't accidently press a button 5x and lose
//set up variables for turn
int intTick;                //counts up millies (per loop) until intDelay
int intDelay;               //the time the program waits till the next turn in millis
int intGameSpeed;
//abit of debug options
boolean bolSerialBoard;     //when true will print the board in the serial monitor</p>
We declare a variable by stating the data type and then the variable’s name, ex. int thisIsAnInteger
Boolean variables, such as bolSerialBoard and bolPlay can only have one of two values, true or false.
Integer variable (int) such as intScore and intInput can take whole numbers as values, such as 1, 5 or 100.
Some other notable data types that we aren’t using here are a string, which is a chunk of text, and a float, which is a decimal number.
Each of the variables here are used in several different places by the program, here’s a synopsis of what each ones does
bolPlay tells the program if the menu should be displayed or if the actual game should be running.
intScore tracks the player’s score as they hit tiles,
intDiff is used on the main menu to tell the program what bit of text to print on the LCD’s,
intEnter is used to tell the program if the enter button (furthest left) is pressed,
intInput is used to tell the program which of the other 4 buttons is pressed.
bolTilePressed is used to make sure the program only reads on when the button is pressed and not when it is held.
intGameSpeed, intGameSpeedEasy, intGameSpeedMedium and intGameSpeedHard are used to control how quickly the game should speed up based on which difficulty is selected.
intTick and intDelay are used to stop the program from moving the board every time it loops.
bolSerialBoard is used to allow you to make the program send the board to the arduino’s serial monitor as a series of numbers for testing purposes.
Finally it is time to declare our board as an array using this code:
<p>// set up game array<br>int arrGame[16][4] = {
  {0, 0, 0, 0},
  {0, 0, 0, 0},
  {0, 0, 0, 0},
  {0, 0, 0, 0},
  {0, 0, 0, 0},
  {0, 0, 0, 0},
  {0, 0, 0, 0},
  {0, 0, 0, 0},
  {0, 0, 0, 0},
  {0, 0, 0, 0},
  {0, 0, 0, 0},
  {0, 0, 0, 0},
  {0, 0, 0, 0},
  {0, 0, 0, 0},
  {0, 0, 0, 0},
  {0, 0, 0, 0}
};</p>
An array is a matrix that any point on which can be called for maths or to be changed.
Your code should now look something like this;
<p>// include libraries<br>#include
</p><p>//these variables are options that you can change - higher numbers = faster game speed up
int intGameSpeedEasy = 10;
int intGameSpeedMedium = 25;
int intGameSpeedHard = 80;</p><p>// Define pins
#define btnEnter A0
#define btn1 15
#define btn2 16
#define btn3 17
#define btn4 18</p><p>// create LCD objects (n, ~, n, ~, ~, n)
LiquidCrystal lcdLeft(8, 9, 12, 10, 11, 13);
LiquidCrystal lcdRight(2, 3, 4, 5, 6, 7);</p><p>// set up game array
int arrGame[16][4] = {
  {0, 0, 0, 0},
  {0, 0, 0, 0},
  {0, 0, 0, 0},
  {0, 0, 0, 0},
  {0, 0, 0, 0},
  {0, 0, 0, 0},
  {0, 0, 0, 0},
  {0, 0, 0, 0},
  {0, 0, 0, 0},
  {0, 0, 0, 0},
  {0, 0, 0, 0},
  {0, 0, 0, 0},
  {0, 0, 0, 0},
  {0, 0, 0, 0},
  {0, 0, 0, 0},
  {0, 0, 0, 0}
};</p><p>//set up variables for the game
boolean bolPlay;            //tracks if the player
int intScore;               //tracks the player's score
int intDiff;                //just an estetic thing for telling what difficulty the game is on</p><p>//set up variables for input
int intEnter;               //trackes if the user presses the enter button
int intInput;               //tracks which buttons the user presses
boolean bolTilePressed;     //ensure the player doesn't accidently press a button 5x and lose</p><p>//set up variables for turn
int intTick;                //counts up millies (per loop) until intDelay
int intDelay;               //the time the program waits till the next turn in millis
int intGameSpeed;</p><p>//abit of debug options
boolean bolSerialBoard;     //when true will print the board in the serial monitor</p>
Step 3: The Setup Function
The setup loop is a function read by the arduino only once when it initially starts.
In the setup loop we’re just setting the values of a few of our variables because instead of setting them a value when declaring them we’re doing it here.
Begin by putting this code into your Void Setup.
bolPlay = false;
intScore = 0;
intTick = 0;
intDelay = 1000;
intDiff = 1;
intGameSpeed = intGameSpeedMedium;
Each line is just setting a variable to a value.
bolPlay is set to false so that the game doesn’t start playing.
intScore is set to 0, because naturally your score starts at 0.
intTick starts at 0 because the program isn’t currently counting anything.
intDelay is set to 1000 because that is the rate the tiles start at.
intDiff is just an ascetic thing so that the program knows what to write for the game’s difficulty.
intGameSpeed is set to whatever intGameSpeedMedium is, meaning it is set at the medium difficulty.
Next put this code in the Void Setup below the code you just put in.
lcdLeft.begin(16,2);
lcdRight.begin(16,2);Serial.begin(9600);
This tells the arduino to start communicating with the computer through the serial monitor (visible by clicking the button in the top right of the arduino IDE).
Your Void Setup should now look something like this!
void setup() {
  Serial.begin(9600);       //start the serial monitor
    //set up the variables
  bolPlay = false;
  intScore = 0;
  intTick = 0;
  intDelay = 1000;
  intDiff = 1;
  intGameSpeed = intGameSpeedMedium;
  //begin lcd's
  lcdLeft.begin(16,2);
  lcdRight.begin(16,2);
}
Step 4: The Loop Function
The loop function is run by the arduino every iteration of the arduino.
Copy the following code into your Void Loop.
<p>void loop() {<br>  input();                        //check for playing input
  if (bolPlay == true){
    if (intTick >= intDelay){     //check to see if the game should play a turn or continue to wait
      Serial.println("~~~~~~~~~");//print to signify the board moving on
      //writeSerial();              //if option is enabled write the board into serial
      buttonsGame();              //check for player inputs
      playBoard();                //move the board and add a new tile
      clearLcd();                 //clean the LCDs before drawing
      drawBoard();                //draw the board onto the lcd's
      bottomCheck();
      intTick = 0;                //reset intTick
    } else {
      buttonsGame();                         //check for player inputs
      clearLcd();                            //clean the LCDs before drawing
      drawBoard();                           //draw the board onto the lcd's
      intTick = intTick + intGameSpeed;      //add to tick
    }
  } else {
    clearLcd();                   //clean the LCDs before drawing
    title();                      //display title and score info
    buttonsMenu();                //read player input
    clearBoard();                 //ensure the whole board = 0
  }
  delay(10);                      //delay the arduino by a short moment
}</p>
when bolPlay is equal to true it means that the game is playing, and all the code for when the game is playing should be run, but we only want the board to add a new tile and move down when intTick is greater than our intDelay, otherwise we still want to allow the user to press a button to hit a tile and for intTick to increase in speed.
Most of this code uses functions we are yet to make, and we will make them in the next steps. The purpose of these functions is as follows.
Input reads which buttons the user has pressed.
buttonsGame controls what the buttons do when in the game, and not in the menu
playBoard adds a new tile to the board, and then moves everything in the board down one space
clearLCD cleans the LCDs to make sure no ghosts are left behind the tiles
drawBoard goes through arrGame and prints it onto the LCDs
clearBoard clears the whole of arrGame when the game is not in play
bottomCheck checks the bottom of arrGame for a failure condition
title displays the game’s title and score information when on the menu
buttons menu controls what the user’s inputs do when in the menu.
gameOver is another function, although is not called here as it is instead called in the bottomCheck and buttonsGame functions.
Step 5: The ClearLCD Function
to create a function we start by adding this to the code
void functionName() {
}
the “functionName” can be anything, as long as it does not already exist.
Copy this code into your program:
void clearLcd() {
  for (int i = 0; i <= 15; i++){
    for (int ii = 0; ii <= 1; ii++){
      lcdLeft.setCursor(i, ii);
      lcdLeft.write(" ");
      lcdRight.setCursor(i, ii);
      lcdRight.write(" ");
    }
  }
}
this runs through the entire array by using 2 counted loops to go through each point on the LCDs and write a space.
Without being reset to nothing the LCD’s will maintain whatever was written previously
Step 6: The DrawBoard Function
copy this code into your program
void drawBoard() {
  for (int i = 1; i <= 15; i++){
    //draw collums 1 and 2 on the left LCD
    //if the tile = 0 write nothing, = 1 write "#", = 2 write "@"
    lcdLeft.setCursor(i, 1);                        //set to the first collumn (furthest left)
    if (arrGame[i][0] == 1) {lcdLeft.write("#");}
    if (arrGame[i][0] == 2) {lcdLeft.write("@");}
    lcdLeft.setCursor(i, 0);                        //set to the second collumn (centre left)
    if (arrGame[i][1] == 1) {lcdLeft.write("#");}
    if (arrGame[i][1] == 2) {lcdLeft.write("@");}
    lcdRight.setCursor(i, 1);                       //set to the third collumn (centre right)
    if (arrGame[i][2] == 1) {lcdRight.write("#");}
    if (arrGame[i][2] == 2) {lcdRight.write("@");}
    lcdRight.setCursor(i, 0);                       //set to the fourth collumn (furthest right)
    if (arrGame[i][3] == 1) {lcdRight.write("#");}
    if (arrGame[i][3] == 2) {lcdRight.write("@");}
  }
}
this uses a loop to go through each row of the board, it then checks to see if any column in the row is equal to 1 or 2, based on that it then prints on the LCD either a hashtag, for a tile yet to be hit, or an @ for a hit tile.
Step 7: The PlayBoard Function
copy this code into your program.
void playBoard() {
  for (int i = 0; i <= 3; i++){arrGame[0][i] = 0;}      //clear the top row
  arrGame[0][random(0, 4)] = 1;                         //set a random point on the top row to be a tile
  for (int i = 15; i >= 1; i--){                        //working from the bottom of the board to the top
    for (int ii = 0; ii <= 3; ii ++){                   //for each collum
      arrGame[i][ii] = arrGame[i - 1][ii];
    }
  }
}
this code begins by clearing the whole top row to 0, or no tile, and then sets one random tile to be a 1, and unhit tile.
It then goes through a counted loop in reverse, from 15 to 1, setting the row to equal whatever the row above it is equal to, making the board move down the LCD’sAdd TipAsk QuestionCommentDownload
Step 8: The ClearBoard Function
copy this code into your program.
<p>void clearBoard() {<br>  //reset tick and delay values
  intTick = 0;
  intDelay = 1000;
  //go through the board and set everything to 0
  for (int i = 0; i <= 15; i++){
    for (int ii = 0; ii <= 3; ii++){
      arrGame[i][ii] = 0;
    }
  }
}</p>
This code is run when the game is not playing to make sure the whole of arrGame is set to 0, or no tiles, by using counted loops to go through the array.
The code also resets the values of intDelay and intTick.
Step 9: The Title Function
copy the following code into your program
void title() {
  //write title onto LCD and space for score
  lcdRight.setCursor(0, 0);
  lcdRight.write("Piano Tiles");
  lcdRight.setCursor(0, 1);
  lcdRight.write("Score: ");
  //convert the score into a string
  char strScore[3];
  sprintf(strScore, "%d", intScore);
  //display score onto LCD
  lcdRight.write(strScore);
  //add the diffictuly
  lcdRight.setCursor(10, 1);
  if (intDiff == 0){
    lcdRight.write("Easy");
  }
  if (intDiff == 1){
    lcdRight.write("Medium");
  }
  if (intDiff == 2){
    lcdRight.write("Hard");
  }
  //Press a little bit of instruction
  lcdLeft.setCursor(0, 0);
  lcdLeft.write("Press Enter");
  lcdLeft.setCursor(0, 1);
  lcdLeft.write("to begin!");
}
This code writes the title of the game and the score onto the LCDs, it does this by telling the LCD where to start typing using LCD.setCursor and then writing the string in LCD.write.
A new variable is also created here, strScore, it is used to convert intScore into a string or char data type using the sprintf function.
intDiff is also used here, based on it’s values it prints the different difficulty options.
Step 10: The ButtonsMenu Function
insert the following code into your program
void buttonsMenu(){
  // when enter is pressed start the game and reset score value
  if (intEnter == 1){
    bolPlay = true;
    intScore = 0;
    playBoard();
    drawBoard();
  }
  // when button 3 is pressed turn on debug option of printing the board in serial
  if (intInput == 3){
    if (bolSerialBoard == false){
      Serial.println("Serial Board Active");
      bolSerialBoard = true;
    } else {
      Serial.println("Serial Board Disabled");
      bolSerialBoard = false;
    }
  }
  //set game speed to easy difficulty
  if (intInput == 0){
    Serial.print("Game set to easy (");
    Serial.print(intGameSpeedEasy);
    Serial.println("ms acceleration)");
    intDiff = 0;
    intGameSpeed = intGameSpeedEasy;
  }
  //set game speed to medium difficulty
  if (intInput == 1){
    Serial.print("Game set to medium (");
    Serial.print(intGameSpeedMedium);
    Serial.println("ms acceleration)");
    intDiff = 1;
    intGameSpeed = intGameSpeedMedium;
  }
  //set game speed to hard difficulty
  if (intInput == 2){
    Serial.print("Game set to hard (");
    Serial.print(intGameSpeedHard);
    Serial.println("ms acceleration)");
    intDiff = 2;
    intGameSpeed = intGameSpeedHard;
  }
}
this code is only run when bolPlay is equal to false in the void Loop
if intEnter is set to 1 it means that the enter button has been pushed, if it is being pressed the program sets bolPlay to true and the game starts.
The program then reads what intInput is equal to. if it is equal to 0 the first button from the left is being pressed, going up to the right up to 3. If intInput is equal to 4 no button is being pressed.
if buttons 0-2 are pressed the game changes the difficulty, also adjusting the game speed value, meaning it will accelerate faster.
if button 3 is pressed the game will activate or deactivate a debug mode where the whole board is printed in the serial monitor to assist in finding issues in the program.
Step 11: The ButtonsGame Function
copy the following code into your program
void buttonsGame(){
  if (intInput != 4) {                              //if a button is pressed
    if (bolTilePressed == false){                   //only if bolTilePressed is false trigger action for checking a button press
      bolTilePressed = true;                        //then set bolTilePressed to true to make sure it isn't acidentilly triggered again
      int intLowestTile = 0;                        //to be set to the tile with the lowest tile
      int intCheckedTile = 15;                      //to keep track of which tiles have been checked
      while (intLowestTile == 0) {                  //as long as it isn't set to anything check tiles
        for (int i = 0; i <= 3; i++){               //check through the row
          if (arrGame[intCheckedTile][i] == 1){     //check to see if a tile is untouched
            intLowestTile = intCheckedTile;         //set lowest tile to equal the checked row
          }
        }
        intCheckedTile--;                           //take one from checkedTile and move onto the next row
        if (intCheckedTile == -1){                  //if it goes off the board trigger game over and set lowest tile to 16 to avoid a forever loop
          Serial.println("No Tile to press");
          gameOver();
          intLowestTile = 16;
        }
      }
      if (intLowestTile != 16){                     //ensure no check is done off the board
        if (arrGame[intLowestTile][intInput] == 1){ //if the tile pressed is an unclicked one
          arrGame[intLowestTile][intInput] = 2;     //set to 2 to say it's been press
          intScore++;                               //add one to score
          if (intDelay > 100){                      //as long as int delay is not lower than 100
            intDelay = intDelay - 20;               //take a value from it
          }
        } else {
          Serial.println("Wrong button pressed");
          gameOver();                               //otherwise game over
        }
      }
    }
  }
}
The code is only run when bolPlay is equal to true in the void Loop.
Like buttonsMenu based on the value of intInput it checks to see if the player has hit a tile or missed one.
It does this by going through arrGame from bottom to top using a while loop to look for which row is the lowest with an unhit tile. It then checks to see if the spot in that row corresponding to the button pushed is an unhit tile or not, if it is unhit it sets it to equal 2 instead of 1, meaning it will display as an @, otherwise it triggers the gameOver function which we are yet to create.
This function also utilises the bolTilePressed variable by setting it to true when a button is pressed and false when no button is pressed. This is to ensure the user doesn’t accidentally loose the game because the program thought they pressed the button multiple time when they held it down.
Source: Arduino – Piano Tiles