Summary of Arduino – How to Read SD Card Text File Line by Line
This tutorial shows how to read a text file from a microSD card line by line and display each line on an I2C LCD using an Arduino (e.g., UNO) and Visuino. It covers SD card preparation, wiring, Visuino component setup and connections, and building/uploading the generated Arduino code so the LCD displays the file lines at power-up.
Parts used in the Read SD Card Text File Line by Line Project:
- Arduino UNO or any compatible Arduino board (Arduino Mega suggested for displays requiring more memory)
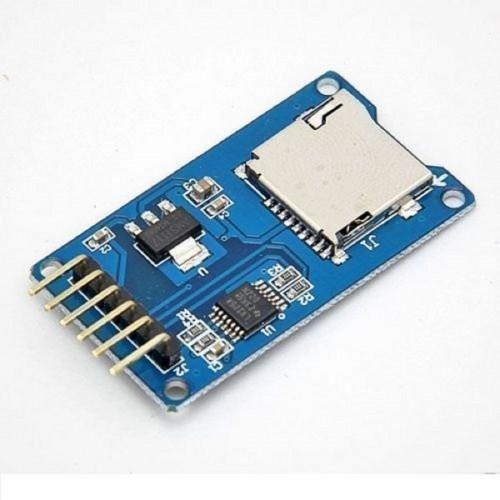
- SD card module
- microSD card (containing TEST.TXT)
- LCD Display I2C 20x4 (or other I2C LCD; set correct columns and rows)
- Jumper wires
- Computer with Visuino software installed
- USB cable for programming Arduino

In this tutorial we will learn how to read the SD card text file line by line.
Watch the Video!
Note: You can use other Displays such as OLED, but make sure that you use a board with enough memory like Arduino Mega,etc
Also check out this tutorials:
Arduino Nano: Measure Distance With Ultrasonic Ranger and Log It to MicroSD Card With Visuino
Arduino Nano: Log GPS Information to MicorSD Card With Visuino
Step 1: What You Will Need
- LCD Display I2C 20X4 (if you use diferent LCD then make sure that you specify the right Columns and Rows in the Visuino component)
- SD card module + SD card
- Jumper wires
- Arduino UNO or any other board
- Visuino software: Download here
Step 2: Start Visuino, and Select the Arduino UNO Board Type
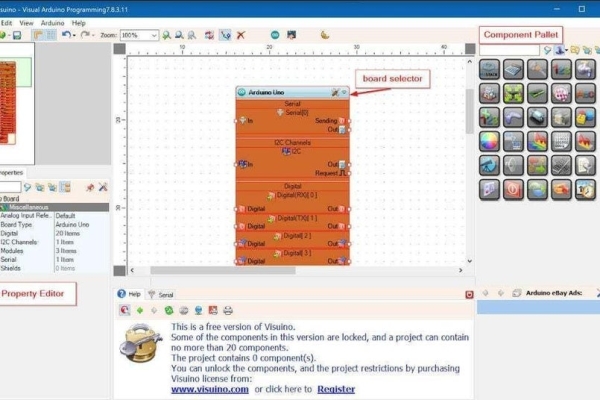
The Visuino: https://www.visuino.eu also needs to be installed. Download Free version or register for a Free Trial.
Start Visuino as shown in the first picture Click on the “Tools” button on the Arduino component (Picture 1) in Visuino When the dialog appears, select “Arduino UNO” as shown on Picture 2
Step 3: Prepare the SD Card
Open a Notepad or any other writing software on your computer and write it like this:
TEXT LINE1
TEXT LINE2
TEXT LINE3
TEXT LINE4
Then save it as a “TEST.TXT” to the SD card. Remove the SD card from your computer and put it in the Arduino SD card module.
Step 4: Circuit
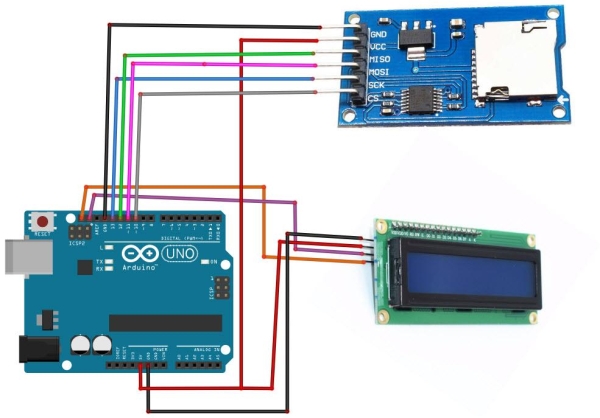
- Connect SD card Module pin GND to Arduino pin GND
- Connect SD card Module pin VCC to Arduino pin 5V
- Connect SD card Module pin SCK to Arduino digital pin 13
- Connect SD card Module pin MISO to Arduino digital pin 12
- Connect SD card Module pin MOSI to Arduino digital pin 11
- Connect SD card Module pin CS to Arduino digital pin 10
- Connect LCD Display pin VCC to Arduino pin 5V
- Connect LCD Display Module pin GND to Arduino pin GND
- Connect LCD Display pin SCL to Arduino pin SCL
- Connect LCD Display pin SDA to Arduino pin SDA
Step 5: In Visuino Add Components
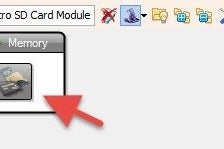
- Add “Micro SD Card Module” component
- Add “Liquid Crystal Display (LCD) – I2C” component
- Add “Start” component
Step 6: In Visuino Set Components
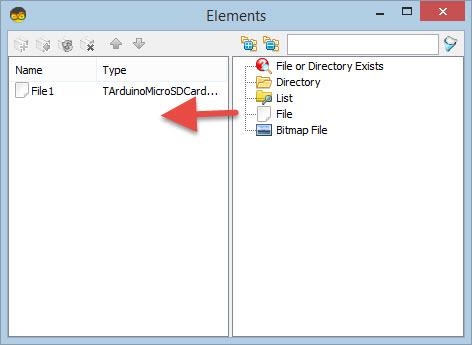
- Double click on the “SDCard1” component and in the Elements window drag “File” to the left side
- Now on the Left side of the Elements window select “File1” and in the properties window set “New Line” to False, “Path Name” to TEST.TXT
and select “Elements” and click on the 3 dots button, a New Elements window will open, here drag 4X “Read Text Line” to the left side. - Close both “Elements” windows
Select “LiquidCrystalDisplay1” and in the properties window set the properties of your LCD in our case the LCD is 20X4, so set “Columns” to 20 and “Rows” to 4
Step 7: In Visuino Connect Components
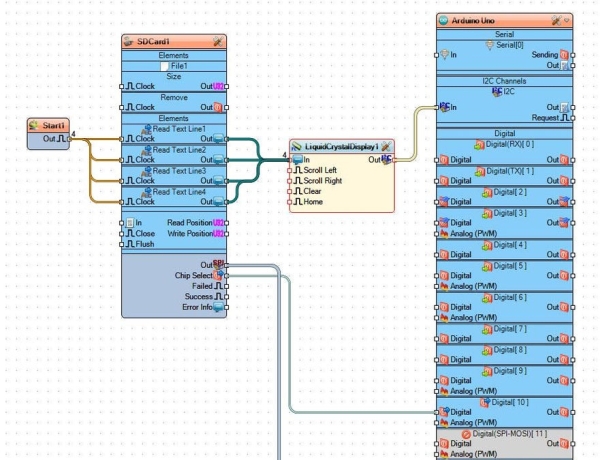
- Connect “SDCard1” pin SPI to Arduino pin SPI In
- Connect “SDCard1” pin Chip Select to Arduino digital pin 10
- Connect “Start1” pin Out to “SDCard1” pin > “Read Text Line1” pin Clock
- Connect “Start1” pin Out to “SDCard1” pin > “Read Text Line2” pin Clock
- Connect “Start1” pin Out to “SDCard1” pin > “Read Text Line3” pin Clock
- Connect “Start1” pin Out to “SDCard1” pin > “Read Text Line4” pin Clock
- Connect “SDCard1” pin > “Read Text Line1” pin Out to “LiquidCrystalDisplay1” pin In
- Connect “SDCard1” pin > “Read Text Line2” pin Out to “LiquidCrystalDisplay1” pin In
- Connect “SDCard1” pin > “Read Text Line3” pin Out to “LiquidCrystalDisplay1” pin In
- Connect “SDCard1” pin > “Read Text Line4” pin Out to “LiquidCrystalDisplay1” pin In
- Connect “LiquidCrystalDisplay1” pin I2C Out to Arduino pin I2C In
Step 8: Generate, Compile, and Upload the Arduino Code
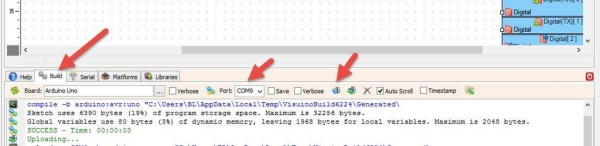
In Visuino, at the bottom click on the “Build” Tab, make sure the correct port is selected, then click on the “Compile/Build and Upload” button.
Step 9: Play
If you power the Arduino UNO, the Display will show the text lines that are in the text file on the SD card.
Congratulations! You have completed your project with Visuino. Also attached is the Visuino project, that I created for this Instructable, you can download it and open it in Visuino: https://www.visuino.eu
Source: Arduino – How to Read SD Card Text File Line by Line
- What file name should be on the SD card?
The file should be named TEST.TXT as specified in the SDCard1 Path Name property. - How should the SD card text file be formatted?
Put each line as separate lines (e.g., TEXT LINE1 on first line, TEXT LINE2 on second line) and save as TEST.TXT. - Can I use a different LCD than 20x4?
Yes, but you must set the correct Columns and Rows in the LiquidCrystalDisplay component properties in Visuino. - Which Arduino pins connect to the SD card module?
Connect GND to GND, VCC to 5V, SCK to digital 13, MISO to digital 12, MOSI to digital 11, and CS to digital 10. - How is the I2C LCD connected to the Arduino?
Connect LCD VCC to 5V, GND to GND, SCL to Arduino SCL, and SDA to Arduino SDA. - How do I trigger reading the lines in Visuino?
Connect Start1 Out to the Read Text Line Clock inputs on the SDCard1 File elements to initiate reading. - Where do the read lines go in Visuino?
Connect each Read Text Line Out pin from SDCard1 to the LiquidCrystalDisplay1 In pin to display the lines. - What must I do after wiring and configuring Visuino?
Use the Build tab in Visuino, select the correct port, then click Compile/Build and Upload to program the Arduino. - What will the display show after powering the Arduino?
The LCD will show the text lines that are in TEST.TXT on the SD card.