
Summary of Wireless Finger Drum using Arduino
This project integrates four Force Sensitive Resistors (FSRs) onto a RevIO Arduino-compatible board to create a wireless finger drum. The FSRs are mounted on the device's case and connected via an XBee module to trigger drum sounds on a PC wirelessly. The build involves drilling, soldering, and wiring the sensors and components together to form a compact controller.
Parts used in Wireless Finger Drum:
- RevIO or any Arduino compatible board
- XBee breakout board or similar
- 4 nos. Force Sensitive Resistors
- 4 nos. 10K Resistors
- 30 AWG Wire Wrap
- 4 nos. Small Bumpers
- 2 nos. 4-pin Break Away Male Headers Machine Pin
- 2 nos. 4-pin Break Away Female Headers Machine Pin
I came across these Force Sensitive Resistors. I like them a lot and I wanted to do something with them, may be making them more usesable than standing on the breadboard.
Few months ago, I created the pocket-sized RevIO – Arduino Compatible and having fun with it since then.
While playing with these two, I decided to put them together!
To complicate things further, I wanted to use them wirelessly. So I added XBee module to send commands wirelessly from RevIO to play different drum sound snippets on the PC speakers.
Above was not the only reason to make me put these four force sensitive resistors onto the RevIO case permanently. I saw that I could used these force sensitive resistors as the controllers, such as robot controller, or radio control car, or anything that required the maximum of four controllers.
This instructable only shows how to use these FSRs to make drum sounds as they are pressed.
Step 1: Tools
Tools
The tools that I used in this project are:
Hand drill
Paperclip
Solder iron and Solder station
Hookup Wire
Diagonal Cutter
Pliers
X-Acto Knife
Wire Stripper
SolderSucker
Step 2: And the Sensors go to..
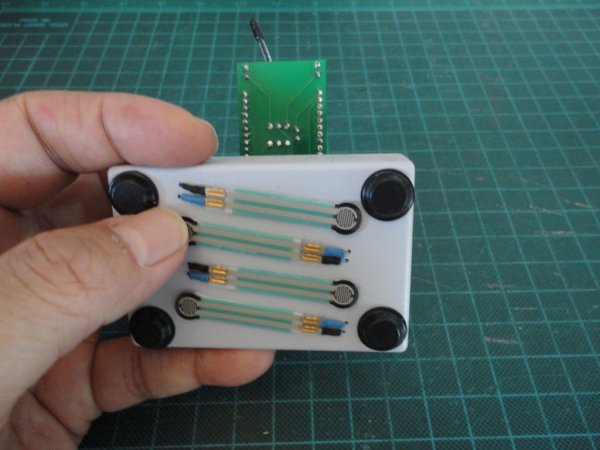
The most suitable places for the sensors is on the back of the case of RevIO.
If you are going to make this project happen. And you are using any Arduino or compatible. You will need to have some sort of surface to place the force sensitive sensors on.
For the placements, I want to place the two FSRs on top row another two on the bottom row.
And each pair, top and bottom pair, should stay on the same horizontal line.
The result is shown in picture 1 below.
Then I transfered the layout on to the surface of the case.
When we are dealing with these sensors:
- Flex Sensor
- Flexiforce Pressure sensor
- Force Sensitive Resistor
- HotPot Membrane Potentiometer
- etc.
It really hard to solder their leads to PCB. Because these sensors made out of plastic, and they melt easily.
The following instructable shows how to solve the problem :
http://www.instructables.com/id/Cheapest-Wire-Wrapping-Tool/
RevIO or any Arduino compatible board
(Note: If you are using any Arduino or compatible. You will need to have some sort of surface to place the force sensitive sensors on)
XBee breakout board or similar (I used my xB-Buddy kit in this project)
4 nos. Force Sensitive Resistors
4 nos. 10K Resistors
30 AWG Wire Wrap
4 nos. Small Bumpers
2 nos. 4-pin Break Away Male Headers Machine Pin
2 nos. 4-pin Break Away Female Headers Machine Pin
For more detail: Wireless Finger Drum using Arduino
-
What is the primary function of this project?
The project uses four force sensitive resistors to make drum sounds when they are pressed. -
How does the system transmit commands wirelessly?
An XBee module is added to send commands from the RevIO to play different drum sound snippets on PC speakers. -
Where should the sensors be placed on the case?
The most suitable places for the sensors are on the back of the case of RevIO. -
How are the four FSRs arranged on the device?
Two FSRs are placed on the top row and another two on the bottom row, with each pair staying on the same horizontal line. -
Why is it difficult to solder leads to these sensors directly?
These sensors are made out of plastic and melt easily if soldered directly to a PCB. -
Can this setup be used for other applications besides drums?
Yes, the force sensitive resistors can be used as controllers for robots or radio control cars requiring up to four controllers. -
What specific tool is mentioned for handling the sensor wires?
A cheapest wire wrapping tool is referenced for solving the problem of connecting leads to these sensors.
