Summary of Tree Tidy – a Functional Desktop Decoration (Prototype Build)
This article details the construction of "Tree Tidy," a prototype desktop item combining a pen pot with an illuminated LED tree. The project utilizes an Arduino Nano, IR receiver, and remote to control RGB and green LEDs housed in a cardboard shell. The author outlines the design, electronics assembly, software programming, and physical construction, while noting future improvements like a larger pen pot and more aesthetic tree structure.
Parts used in the Tree Tidy:
- Arduino Nano
- Solderless breadboard
- Solderless breadboard wires (M-M x3), (M-F x39)
- Resistors (2kΩ x1), (220Ω x3)
- IR receiver module
- IR remote
- Breadboard power supply module
- 9v battery and adaptor
- RGB LEDs
- Green LEDs
- Cardboard
- Latching/Non-Momentary switch button
Everyone loves a good desktop decoration. We can also agree that keeping our desks clean is great. So why not combine both? In this Instructable I’ll show you how to make a desktop item that combines aesthetics and cleanliness to create (in my very biased opinion) the best desktop item ever conceived.
Just like the majority of us I have been working at home for some time now and I have started to become more aware of the fact that my desk is a mess- think an episode of Hoarders then reduce the severity by about 3. Still pretty bad. Finally deciding to do something about it I cleared it all out and was left with a nice empty desk, at which point I could start repopulating. It was at this stage however, that I realised I had no pen pot and that buying a nice pen pot online can get pretty expensive. And so after a very long creative dry spell I finally had a problem to be solved.
Now, before I jump into the thick of this, I just want to point out that the item made in this Instructable is a prototype of my idea (hence the slightly sub-par quality). This is just because I don’t have too much free time right now so I’ve settled for a quick and simple version. Feel free to let me know what you think about the idea so far and how you think I could improve it down in the comments below. Who knows, I may use your ideas in the final build.
Supplies:
- Arduino Nano x1
- Solderless breadboard x1
- Solderless breadboard wires (M-M x3), (M-F x39)
- Resistors (2kΩ x1), (220Ω x3)
- IR receiver module x1
- IR remote x1
- Breadboard power supply module x1
- RGB LEDs x3
- Green LEDs x9
- Plenty of cardboard
- Latching/Non-Momentary switch button x1
Quick disclaimer: these are all variants of the components I used that I found on Amazon, I am not endorsed in any way so please feel free to look elsewhere or find better deals other than the ones provided.
Step 1: Design
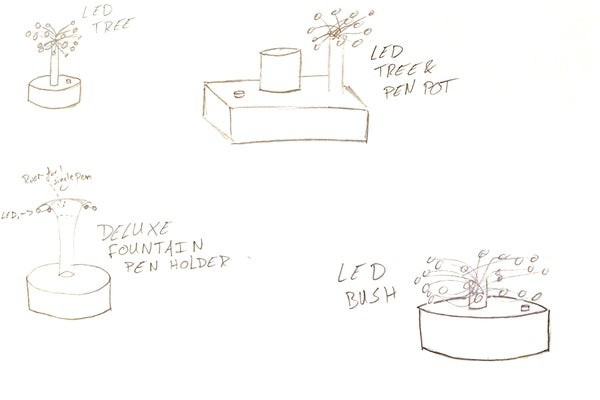
The first thing I did here was to draw some quick sketches – nothing fancy, just slipping down some quick ideas (Image 1). I was initially planning to make the decoration aspect simple; nothing more than some LEDs attached to a battery, but then I saw there was a microcontroller contest and decided I wanted in on the action.
After the initial designs I chose my favourite one and drew it out larger with some dimensions too (Image 2). It is at this stage you can really go to town on the one idea and add as many cool features as you like. Because of this I always go for whatever has the most potential whenever I can’t decide which of my ideas I like most. For this project I decided to have an infrared remote that controlled some RGB LEDs. So I added that into the design.
Now I was almost ready to start prototyping. Almost. I always need a name for a project otherwise it is forever referred to as ‘The Project’ as though I’m a helmet-loving Mandalorian engineer.
After some brainstorming I came up with:
– The LED Tree & Pen Pot
– LED Tree Tidy
– Pen Pot Tree
– Decorated Pen Pot
– And a few more, but I won’t write them all out here.
And so after much thinking I settled on ‘Tree Tidy’. Short, succinct, and it has alliteration so my English teachers can finally be proud of me.
Step 2: Interior (Electronics)
After finishing the design stage I like to gather together all the components I think I will need, that way I get *mise en place* as the cooks say. I recommend this to everyone as you are less likely to find yourself with extended delays in the middle of the build as you wait for parts to arrive; just order them all at the start and they should arrive by the time you get to using them. Or you can practice your ‘Escobar on a bench’ if you like, that is entirely up to you.
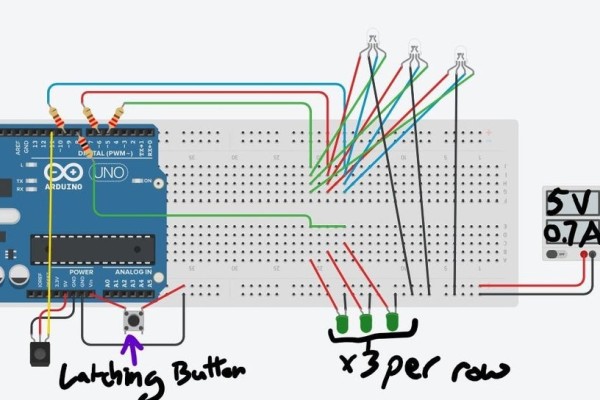
Once we have the parts we can start piecing them together. Always start with basic functionality and work your way out to more complex/ non-core stuff. This way if you run out of time and need to drop something you haven’t stunted yourself by having a core feature of your build missing. When making Tree Tidy I started with the IR remote and made a simple circuit to turn a single LED on and off. After I got the remote working I then tinkered with its commands to get the RGB LEDs lighting up with different colours. The green LEDs came in last as they just need a constant power supply with an appropriate resistance to become the ‘leaves’ on my tree. Remember to use resistors with all your LEDs so they don’t burn out- I used the 220Ω resistors for the RGB wires and the 2kΩ resistor for the green ones. By using a higher resistance on the green LEDs my RGB ones shine through just a little bit brighter, ensuring the light display is the main focus.
In case the circuitry is not clear, the pins I used on the Arduino are as follows:
– IR Receiver Module: pin 11
– RGB Red: pin 6
– RGB Green: pin 5
– RGB Blue: pin 9
– Green LEDs: pin 8
You’ll see an Uno in the schematic because Tinkercad’s circuit design feature does not have a Nano; there is no difference in the code or circuitry but just be sure to have the right board settings in the IDE when uploading (of course with an Uno you will also not need the power supply module as the board has its own barrel jack). It is worth noting that you should NOT use a power source higher than 12v while supplying power using the ‘vin’ pin. Use anything outside that range and you have a good chance of frying your circuitry – I used the 5v channel my power supply module provided to the breadboard.
Step 3: Software
The software aspect of a build tends to develop alongside the circuitry and is always the most interesting (read: frustrating) part of my builds. This particular one required me to run around in circles trying to figure out why the remote was initially not working, which I eventually realised was because my machine did not like the remote’s library (still trying to figure out why, let me know if you have any ideas). After moving to another machine everything worked fine again and I was able to tell certain buttons to make the RGBs shine with different colours.
Once the remote worked I programmed in a selection of 8 colours off the spectrum plus white before having 2 buttons play some colour cycles (Step 5 contains all the usable buttons). The first cycle goes through every colour of the rainbow by blending the primary colours in the order R-G-B. The second does the exact same thing but in reverse colour order.
Always remember that some components will require specific libraries to talk to each other or to the microcontroller, so make sure to know which ones your components need. This project was made possible by use of the IRremote library, which you will need to download if you want to make it. This link will take you to the official Arduino page where you can download the most recent version.
The code is commented if you want to know more about how it all works.
Step 4: Exterior
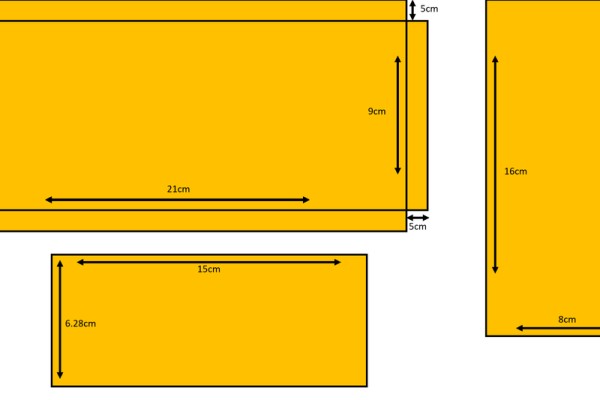
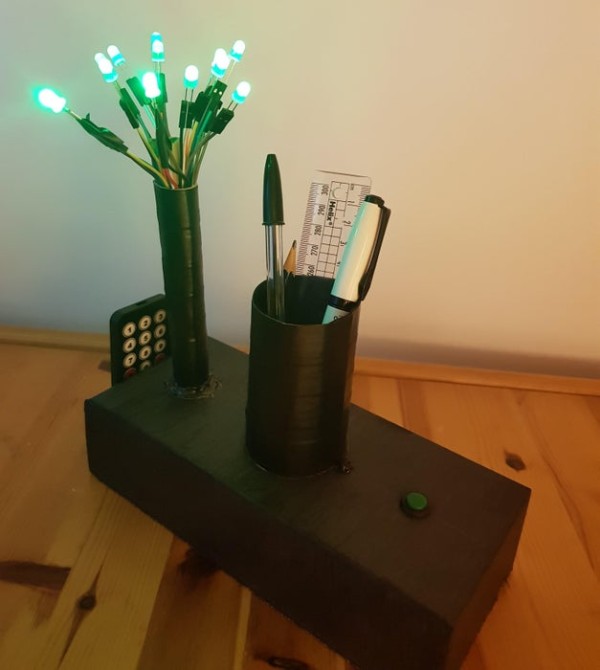
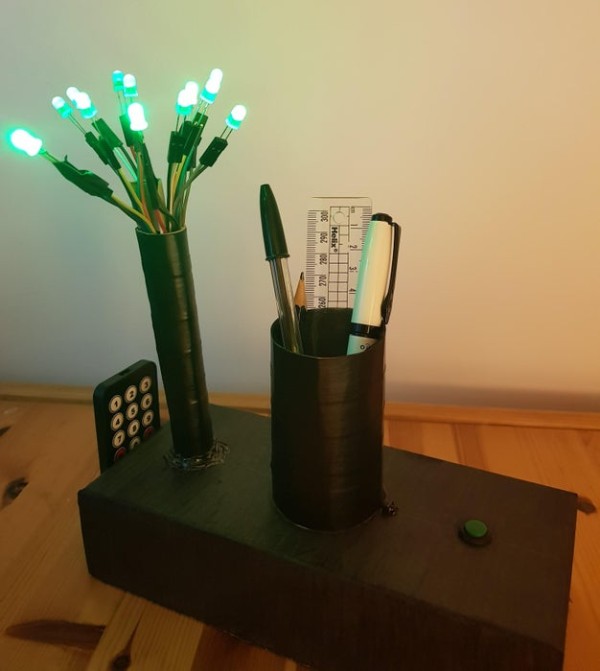
After getting the electronics to work it was time to make Tree Tidy’s shell. Seeing as this was a prototype build, cardboard was the obvious material choice. I simply cut out the shapes shown in image 1 and glued the larger one into a box and the other two into cylinders (glue them along the 15 and 8 cm edges). Keeping the longer of the two cylinders together was a bit of a struggle as the cardboard kept unfurling so, as you can see in image 2, I simply used tape to hold it in shape. I then drew a guideline down the middle of the box and cut a hole 2cm in diameter out 3.5cm along from one end and another the size of my button 3.5cm from the other end. At the very centre of the box (10.5cm along) I drew a circle with a diameter of 5cm as a guideline for where the pen pot should go. The button was then screwed in place, and the pot and tree were stuck in place using some hot glue (Image 3).
At this point a minor issue occurred to me- infrared cannot penetrate solid objects well and so the sensor would not be able to pick up on the remote’s signals. To get around this I cut a small hole next to the pen pot and stuck the sensor through it (Image 4). Thankfully the sensor is pretty small and so it was a discrete modification.
When everything was set in place the LEDs were threaded through the tree and the button was attached to the breadboard. At this point the prototype was complete but I decided to paint it black too, just to make it look nice. With that Tree Tidy’s prototype was all done and ready to show to the world!
Step 5: Finished Prototype & Future Improvements
If I am being honest, Tree Tidy has turned out to be one of my favourite ideas of all time. I think it has a lot of potential so keep your ears to the ground because it may make a return.
Seeing as the purpose of a prototype is to identify room for improvement in an idea, here are some things I have taken away from this build:
- The pen pot is too thin. This was glaringly obvious when I went to fill it with pens and so the next iteration will feature a larger pot, maybe 7cm in diameter instead of 5cm.
- The tree is not very aesthetically pleasing. The trunk is too thick and there aren’t enough LEDs, I think giving it more of a bonsai look would be nicer.
- Although it was most definitely a lot of fun learning how to integrate an IR remote into my build, I think that it is a bit of a useless feature. It’s just that this is a small desktop item and not a coffee-table-esque talking point, so overdoing the features is a bit redundant (although… if I were to get LED lighting for my room it might be cool to have Tree Tidy follow along with the light show…)
- Lastly there is the obvious issue of the base being too high. This should solve itself when I make this without a breadboard and solderless wires that take up more space than necessary.
On the pros side though:
- The multifunctionality is great- it helps keep the desk clean while providing decoration to your workspace.
- Tree Tidy is going to be a pretty sweet item once all the above improvements have been implemented.
- I like the alliteration.
Also, just for clarification:
[*] – Activate cycle A (R-G-B)
[#] – Activate cycle B (B-G-R)
[<] – Slows down colour changes in cycles A and B
[>] – Speeds up colour changes in cycles A and B
Colours are as shown on each button.
Source: Tree Tidy – a Functional Desktop Decoration (Prototype Build)
- What is the main purpose of the Tree Tidy project?
To combine aesthetics and cleanliness by creating a desktop item that serves as both decoration and a pen pot. - Can infrared signals penetrate solid objects like cardboard?
No, infrared cannot penetrate solid objects well, so a hole was cut for the sensor to receive signals. - How can I prevent my LEDs from burning out?
You must use resistors with all your LEDs, specifically 220Ω for RGB wires and 2kΩ for green ones. - Which Arduino pin connects to the IR Receiver Module?
The IR Receiver Module is connected to pin 11 on the Arduino. - What happens if I use a power source higher than 12v on the vin pin?
Using a voltage higher than 12v carries a high chance of frying your circuitry. - Why did the user initially struggle with the software?
The machine did not like the remote's library, but the code worked fine after moving to another computer. - What is one specific improvement planned for the next iteration?
The pen pot is currently too thin and will be made larger, possibly 7cm in diameter. - How many colors can the remote program the RGB LEDs to display?
The remote can program a selection of 8 colors off the spectrum plus white. - What material was used to create the exterior shell of the prototype?
Cardboard was chosen as the obvious material choice for the prototype build. - Does the project require the IRremote library to function?
Yes, this project was made possible by using the IRremote library which must be downloaded.