The temperature sensor for Arduino is a fundamental element when we want to measure the temperature of a processor of the human body.
The temperature sensor with Arduino must be in contact or close to receive and measure the heat level. That’s how thermometers work.
These devices are extremely used to measure the body temperature of sick people, as the temperature is one of the first factors that change in the human body when there is an abnormality or disease.
One of the diseases that alter the temperature of the human body is COVID 19. Therefore, we present the main symptoms:
Cough Tiredness Difficulty breathing (Severe cases) Fever Fever is a symptom whose main characteristic is an increase in body temperature. In this disease, we need to constantly monitor these symptoms.
Thus, we will develop a project to monitor the temperature and store this data on a memory card through a JLCPCB Datalogger using a temperature sensor with Arduino.
Therefore, in this article you will learn:
- How does a JLCPCB Datalogger with a temperature sensor with Arduino?
- How works the temperature sensor with Arduino.
- How works the DS18B20 temperature sensor with Arduino
- Use buttons with multiple functions.
Next, we will show you how you will develop your JLCPCB Datalogger using the Arduino temperature sensor.
Supplies
Arduino UNO
DS18B20 Temperature Sensor
Arduino Nano R3
Jumpers
LCD Display 16 x 2
Pushbutton switch
Resistor 1kR
SD Card Module for Arduino
Step 1: Construction of the JLCPCB Datalogger With Temperature Sensor With Arduino
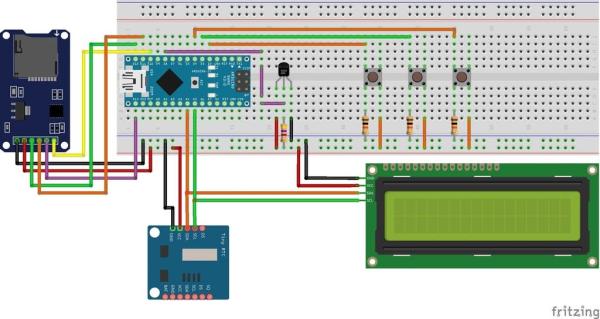
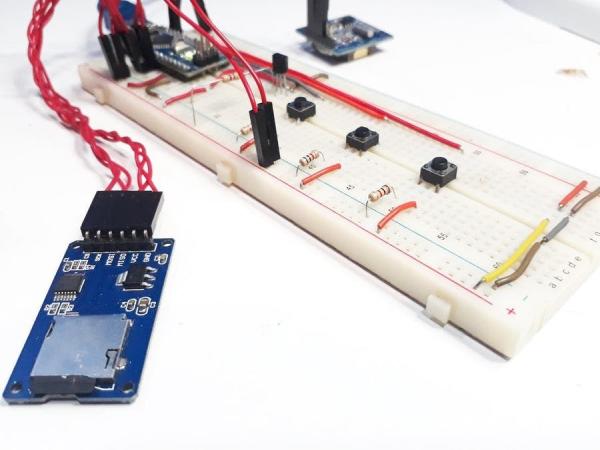
As previously mentioned, the project consists of creating a JLCPCB Datalogger with Temperature Sensor with Arduino, and through this data, we can monitor the temperature of the patient being treated.
Thus, the circuit is shown in the Figure above.
Therefore, as you can see, this circuit has a DS18B20 temperature sensor with Arduino, which is responsible for measuring the patient’s temperature reading.
In addition, the Arduino Nano will be responsible for collecting this data and storing it on the SD Card Module’s memory card.
Each information will be saved with its respective time, which will be read from the RTC Module DS1307.
Thus, for the data of the temperature sensor with Arduino to be saved, the user must perform the process through the Control Menu with the 16×2 LCD.
Step 2:
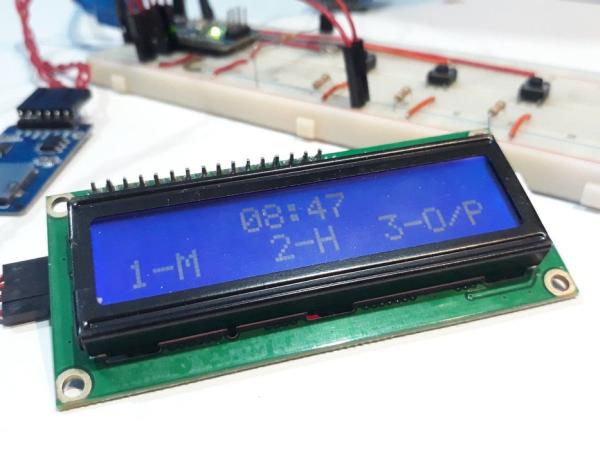
Each button is responsible for controlling an option, as shown on the LCD screen 16×2 in Figure 2.
Each option is responsible for performing a function in the system, as shown below.
- Option M is responsible for starting the measurement and recording of data on the Memory Card.
- Option H is responsible for adjusting the system hours.
- Option O/P is used to confirm data entry in the system or to pause writing data to the memory card.
To understand the system control process, we will provide the code below and discuss the step-by-step control system of the JLCPCB Datalogger with Temperature Sensor with Arduino.
#include <DallasTemperature.h> //Library with all function of DS18B20 Sensor
#include <DS1307.h>
#include <LiquidCrystal_I2C.h> //Biblioteca I2C do LCD 16x2
#include <Wire.h> //Biblioteca de Comunicacao I2C
#include <OneWire.h> //OneWire Library for DS18B20 Sensor
#include <SD.h>
#include <SPI.h>

LiquidCrystal_I2C lcd(0x27,16,2);  // Configurando o endereco do LCD 16x2 para 0x27

#define ONE_WIRE_BUS 8 //Digital Pin to connect the DS18B20 Sensor

//Define uma instancia do oneWire para comunicacao com o sensor
OneWire oneWire(ONE_WIRE_BUS);

DallasTemperature sensors(&oneWire);
DeviceAddress sensor1;

File myFile;

#define Buttonmeasure 2
#define Buttonadjusthour 3
#define Buttonok 4

bool measure = 0, adjusthour = 0, ok = 0;
bool measure_state = 0, adjusthour_state = 0, ok_state = 0;
bool measure_process = 0, adjust_process = 0;

byte actualMin = 0, previousMin = 0;
byte actualHour = 0, previousHour = 0;
byte minUpdate = 0;

int pinoSS = 10; // Pin 53 para Mega / Pin 10 para UNO

int DataTime[7];

void updateHour()
{
      DS1307.getDate(DataTime);

      if(DataTime[5] != minUpdate)
      {
          sprintf(times, "%02d:%02d", DataTime[4], DataTime[5]);

          lcd.setCursor(0,0);
          lcd.print("                ");
          lcd.setCursor(5,0);
          lcd.print(times);

          minUpdate = DataTime[5];
      }

}

void updateTemp()
{
      DS1307.getDate(DataTime);

      if(DataTime[5] != minUpdate)
      {
          sprintf(times, "%02d:%02d", DataTime[4], DataTime[5]);

          lcd.clear();
          lcd.setCursor(5,0);
          lcd.print(times);

          lcd.setCursor(0,1);
          lcd.print("Temperature: ");
          lcd.setCursor(14,1);

          sensors.requestTemperatures();
          float TempSensor = sensors.getTempCByIndex(0);

          lcd.print(TempSensor);


          minUpdate = DataTime[5];
      }

}

void setup()
{

Serial.begin(9600);
DS1307.begin();
sensors.begin();
pinMode(pinoSS, OUTPUT); // Declara pinoSS como saída

Wire.begin(); //Inicializacao da Comunicacao I2C
lcd.init();                      //Inicializacao do LCD
lcd.backlight();

lcd.setCursor(3,0);
lcd.print("Temp System");
lcd.setCursor(3,1);
lcd.print("Datalogger");
delay(2000);

// Localiza e mostra enderecos dos sensores
Serial.println("Localizando sensores DS18B20...");
Serial.print("Sensor Localization successfully!");
Serial.print(sensors.getDeviceCount(), DEC);
Serial.println(" Sensor");

if(SD.begin())
{
// Inicializa o SD Card
Serial.println("SD Card pronto para uso."); // Imprime na tela
}

else

{
Serial.println("Falha na inicialização do SD Card.");
return;
}

  DS1307.getDate(DataTime);

  lcd.clear();

  sprintf(times, "%02d:%02d", DataTime[4], DataTime[5]);

  lcd.setCursor(5,0);
  lcd.print(times);
  lcd.setCursor(0,1);
  lcd.print("1-M   2-H  3-O/P");
}

void loop()
{
  updateHour();

  //Reading button states
  measure = digitalRead(Buttonmeasure);
  adjusthour = digitalRead(Buttonadjusthour);
  ok = digitalRead(Buttonok);

  if(measure == 0 && measure_state == 1)
  {
    measure_state = 0;
  }

  if(measure == 1 && measure_state == 0 && measure_process == 0)
  {
    measure_process = 1;
    measure_state = 1;

    if (SD.exists("temp.txt"))
    {
      Serial.println("Apagou o arquivo anterior!");
      SD.remove("temp.txt");
      myFile = SD.open("temp.txt", FILE_WRITE); // Cria / Abre arquivo .txt
      Serial.println("Criou o arquivo!");
    }

    else

    {
      Serial.println("Criou o arquivo!");
      myFile = SD.open("temp.txt", FILE_WRITE); // Cria / Abre arquivo .txt
      myFile.close();
    }

    delay(500);

    myFile.print("Hour: ");
    myFile.println("Temperature");

    DS1307.getDate(DataTime);
    actualMin = previousMin = DataTime[5];

    sprintf(times, "%02d:%02d", DataTime[4], DataTime[5]);

    lcd.clear();
    lcd.setCursor(5,0);
    lcd.print(times);

    lcd.setCursor(0,1);
    lcd.print("Temperature: ");
    lcd.setCursor(14,1);

    sensors.requestTemperatures();
    float TempSensor = sensors.getTempCByIndex(0);

    lcd.print(TempSensor);
  }

  if(adjusthour == 0 && adjusthour_state == 1)
  {
    adjusthour_state = 0;
  }

  if(adjusthour == 1 && adjusthour_state == 0 && measure_process == 0)
  {
    adjust_process = 1;
  }

  //--------------------------------------------------Measuring Process-----------------------------------------------------------
  if(measure_process == 1)
  {
    updateTemp();

    byte contMin = 0, contHour = 0;
    DS1307.getDate(DataTime);
    actualMin = DataTime[5];

//---------------------------------------------------------Count Minutes----------------------------------------------------------
      if(actualMin != previousMin)
      {
        contMin++;
        previousMin = actualMin;
      }

      if(contMin == 5)
      {
        sprintf(times, "%02d:%02d ", DataTime[4], DataTime[5]);

        sensors.requestTemperatures();
        float TempSensor = sensors.getTempCByIndex(0);

        myFile.print(times);
        myFile.println(TempSensor);
        contMin = 0;
      }
//-----------------------------------------------------------Count Hours----------------------------------------------------------
      if(actualHour != previousHour)
      {
        contHour++;
        previousHour = actualHour;
      }

      if(contHour == 5)
      {
        myFile.close();
        lcd.clear();
        lcd.setCursor(5,0);
        lcd.print("Finished");
        lcd.setCursor(5,1);
        lcd.print("Process");
        measure_process = 0;
        contHour = 0;
      }
//----------------------------------------------Condition to stop the datalogger--------------------------------------------------
      if(ok == 1)
      {
        myFile.close();

        lcd.clear();
        lcd.setCursor(6,0);
        lcd.print("Stoped");
        lcd.setCursor(5,1);
        lcd.print("Process");

        measure_process = 0;
        delay(2000);

        lcd.clear();

        DS1307.getDate(DataTime);

        sprintf(times, "%02d:%02d", DataTime[4], DataTime[5]);

        lcd.setCursor(5,0);
        lcd.print(times);
        lcd.setCursor(0,1);
        lcd.print("1-M   2-H  3-O/P");
      }

  }

//-----------------------------------------------------Adjust Hours---------------------------------------------------------------

  //Adjust Hour
  if(adjust_process == 1)
  {
      lcd.clear();
      DS1307.getDate(DataTime);
      lcd.setCursor(0,0);
      lcd.print("Adjust Hour:");

      sprintf(times, "%02d:%02d", DataTime[4], DataTime[5]);

      lcd.setCursor(5,1);
      lcd.print(times);

    //Hour Adjust
    do
    {
      measure = digitalRead(Buttonmeasure);
      adjusthour = digitalRead(Buttonadjusthour);
      ok = digitalRead(Buttonok);

      if(measure == 0 && measure_state == 1)
      {
        measure_state = 0;
      }

      if(measure == 1 && measure_state == 0)
      {
        DataTime[4]++;

        if(DataTime[4] > 23)
        {
          DataTime[4] = 0;
        }

        measure_state = 1;

        sprintf(times, "%02d:%02d", DataTime[4], DataTime[5]);

        lcd.setCursor(5,1);
        lcd.print(times);
        DS1307.setDate(DataTime[0],DataTime[1],DataTime[2],DataTime[3],DataTime[4],DataTime[5],00);
      }

      if(adjusthour == 0 && adjusthour_state == 1)
      {
        adjusthour_state = 0;
      }

      if(adjusthour == 1 && adjusthour_state == 0)
      {
        DataTime[5]++;

        if(DataTime[5] > 59)
        {
          DataTime[5] = 0;
        }

        sprintf(times, "%02d:%02d", DataTime[4], DataTime[5]);

        lcd.setCursor(5,1);
        lcd.print(times);

        DS1307.setDate(DataTime[0],DataTime[1],DataTime[2],DataTime[3],DataTime[4],DataTime[5],00);

        adjusthour_state = 1;
      }

      if(ok == 1)
      {
        lcd.clear();

        DS1307.getDate(DataTime);
        sprintf(times, "%02d:%02d", DataTime[4], DataTime[5]);

        lcd.setCursor(0,0);
        lcd.print(times);
        lcd.setCursor(0,1);
        lcd.print("1-M    2-H   3-O");
        adjust_process = 0;
      }

    }while(ok != 1);
  }
//------------------------------------------------------End Adjust Hour-----------------------------------------------------------


}
First, we define all the libraries for controlling the modules and declaring variables used when programming the JLCPCB Datalogger with a temperature sensor for Arduino. The code block is shown below.
Source: Temperature Sensor for Arduino Applied for COVID 19