materials:
arduino uno
3 photoresistors
4 buzzers
3 10k resistor
(optional) usb solar pannel or usb battery
Step 1: Why?
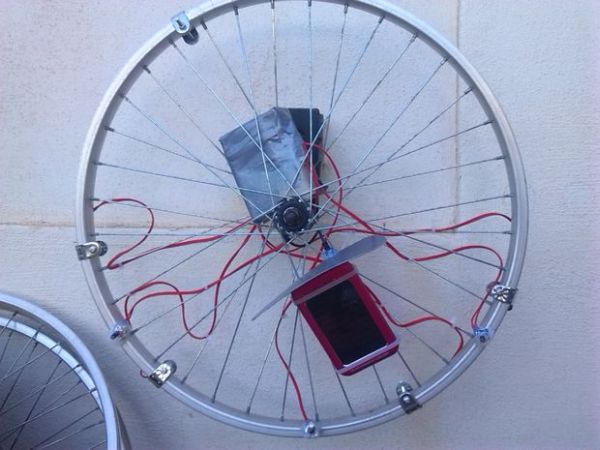
During the 2014 art Exhibition at Met (M. di Ragusa), I created (with the technical collaboration of Carmel Iurato), this theremin made from three photoresistors, managed by the light and powered by a solar panel. All controlled by Arduino Uno. A musical composition of light and shadows.
Please, vote with “like” on Facebook the Ra-Theremin (n.36), a sound installation controlled by the sun
link: https://www.facebook.com/metsicilia/photos/a.72261…
Step 2: How to
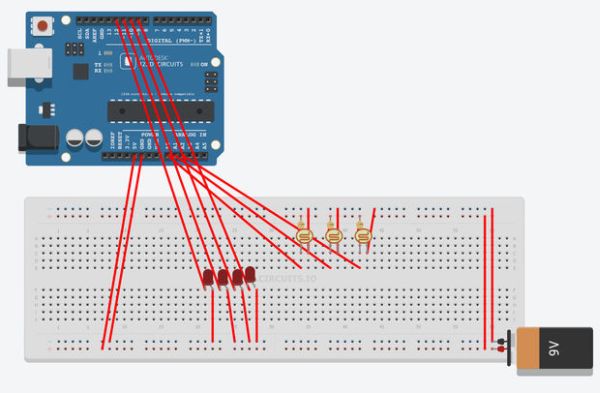
the LED is the BUZZER!
credits:
code:
// Musical caos by Melo
// circuit: // pin d9, 10, 11, 12 buzzer + gnd // pin a0: 5v > cds > pin, pin > 10kOhm resistor > gnd // pin a1: 5v > cds > pin, pin > 10kOhm resistor > gnd // pin a2: 5v > cds > pin, pin > 10kOhm resistor > gnd
//#define DEBUG // uncomment to get serial output, but it kills the speed of the // algorithm, making for a very bad cycle rate //#define KILLSWITCH // comment to disable killswitch code
int photosensorPin = 0; int cutterpotPin = 1; int cyclepotPin = 2; int piezoPin = 9; int piezo1=10; int piezo2=11; int piezo3=12; int verso = 0; // inverte la mappatura se corrisponde al random;
int val = 0; int cut = 0; int cycle = 0; int kill = 0; int duty = 0;
void setup() { pinMode(piezoPin, OUTPUT); pinMode(piezo1, OUTPUT); pinMode(piezo2, OUTPUT); pinMode(piezo3, OUTPUT);
}
void loop() { val = analogRead(photosensorPin); cut = analogRead(cutterpotPin); cycle = analogRead(cyclepotPin);
duty = map(cut, 0, 1023, 1, 700); cycle = map(cycle, 0, 1023, 1, 700); val=map(val,0,1023,1,700); for( int i=0; i
Step 4: Enjoy!
for info and other, contact-me
Please, vote with “like” on Facebook the Ra-Theremin (n.36), a sound installation controlled by the sun
link: https://www.facebook.com/metsicilia/photos/a.7226…
For more detail: Solar theremin with Arduino


