Summary of Robotic E-textile
This article guides users in building Fiberbot, a programmable e-textile robot with an LED smile. The project combines soft art materials like burlap and felt with electronic components including the Adafruit Gemma microcontroller and an 8x8 LED matrix. The tutorial covers sourcing supplies, sewing the body, soldering electronics, connecting power, and using Arduino IDE to code the robot's blinking lights.
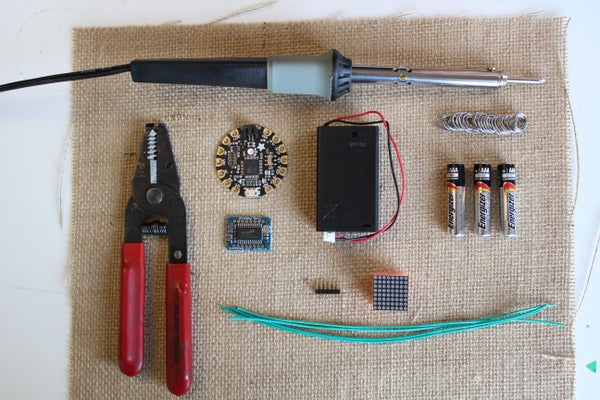
Parts used in the Fiberbot:
- Different coloured felt
- Soldering iron
- Scissors
- Soldering wire
- Embroidery thread
- Wire cutters/stripper
- Needle
- Coated wires or alligator clips
- Velcro
- Burlap
- Fluff or dryer lint
- Adafruit Gemma microcontroller (#1222)
- Adafruit Mini 8x8 LED Matrix with backpack
- Adafruit 3 x AAA battery holder with on/off switch and 2-pin JST connector cable (#727)
- Mini USB cable
- Computer (Windows or Mac)
Hello! My name is Fiberbot, and I am so happy you are going to be making more of my friends. In this instructables you will learn exactly how to make a robot that looks just like me. I will also let you in on a little secret and share with you how to make me smile (aka, how to code me!) Because I’ve been teaching lots of people how to make more Fiberbots, I am very tired and could really use a nap. So, instead of me teaching it will be my owner who always knows how to put a smile on my face…literally. Dive in to the rest of the lesson, have fun, learn lots and I’ll be back later to meet my new friend that you’ve created!! See you soon! 🙂
Step 1: Lesson 1: Getting the Supplies
There are two different components that make up this project, art and technology. The ladder term includes making the body of the Fiberbot with consumable materials and the former piece of the project requires more of a tech savvy approach using non-consumables. For the Fiberbot template, majority of the supplies can be found at your local Dollar Store or craft store. For the robotic component of Fiberbot, I bought most of my supplies online at Adafruit but there are multiple online stores you can find them. I also would recommend buying or renting the book Make: Making Simple Robots by Kathy Ceceri. This book is where I found the project Fiberbot which offers descriptive and easy to follow step-by-step instructions. The materials listed below all costed me roughly around $40, however that is because I didn’t have any have my own. (I also borrowed the soldering iron which drops the price of project). This is definitely one of the cheaper e-textiles, and it is also very cute!!
Fiberbot body/template
– different coloured felt – soldering iron
– scissors – soldering wire
– embroidery thread – wire cutters/stripper
– needle – coated wires or alligator clips
– velcro
– burlap
– fluff/dryer lint
Robot supplies
– Adafruit Gemma microcontroller (#1222)
– Adafruit Mini (0.8 inch) 8×8 LED Matrix with backpack
– Adafruit 3 x AAA battery holder with on/off switch and 2-pin JST connector cable (#727)
– Mini USB cable (#260 – a cell phone cable works)
– Computer (Windows or Mac)
Step 2: Putting the Body Together
Now we are going to get in to creating the soft body for the robot. I purchased these materials at my local dollar store for under $5. I love how cute Fiberbot is, and also how inexpensive!
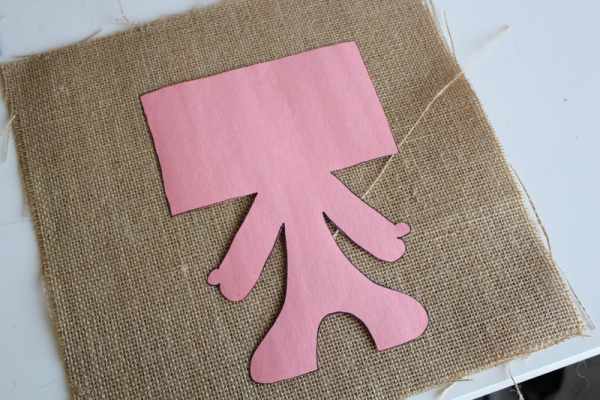
1. I used burlap because it is easy to cut, sew and the frayed edges create for a fun and spunky robot. I followed the template that was provided in Kathy Ceceri’s maker book. However, creating your own template works too as long as there is enough space for the microcontroller and the LED matrix.
2. I created my Fiberbot template from scratch, however there is a printable pattern that can be accessed at http://bit.ly/fiberbot-template. Once you have your template ready, trace it on to your sheet of burlap with a marker that is dark enough to show up.
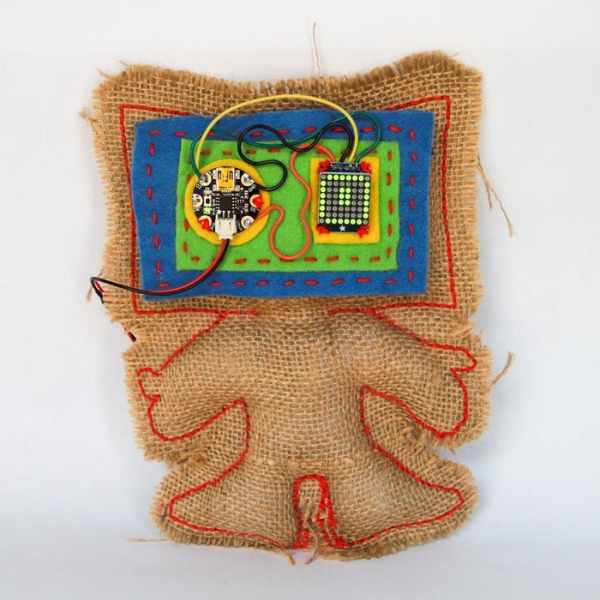
3. Next you are going to want to size out your microcontroller and LED matrix onto coloured felt. In the photo above, I was working with an Arduino FLORA which is much bigger than the Gemma. However, I would recommend using the Gemma for this project. For an even more aesthetically pleasing robot, add another piece of coloured felt behind the initial felt piece. This will add more sturdiness to the “eyes” of the robot making it easier to transfer from robot body to robot body.
4. In order to sew your Fiberbot together, you will need to know how to backstitch. Fortunately, there is an instructable for that! I would recommend viewing this instructable if you do not know how, or you are new to sewing. It is easy and quick to read, not taking too much time away from creating your Fiberbot!
5. Above you can see that I have stitched my entire Fiberbot body but leaving the top of the rectangle open. This is because you will be stuffing your Fiberbot and you need to leave room this step. You will need a material to stuff the body. Fluff works great, I just so happened to not have any laying around my house so I improvised a bit and used dryer lint and it works just as well! Plus, it’s free! Once you have stuffed your Fiberbot to the fullness of your liking, finish sewing up the top of the Fiberbot.
6. You are going to want to cut up some small pieces of Velcro and place them into all four corners on the Fiberbots head. You will need to line up these Velcro pieces with the ones on the back of the felt pieces.
7. Cut the Fiberbot out, but make sure you do not cut too close to the stitching. You will want to leave about 1.5 – 2 inches of room between the thread and the scissors to ensure the burlap does not fall apart.
8. Awe, the Fiberbot is looking amazing so far!!! (Wait till it can actually smile!)
9. Set aside the Fiberbot. Place it in an area that does not produce heat. Burlap and dryer lint are both very flammable!
Step 3: Putting the Robot Together
Okay, now we are just getting started! Putting the E in E-textiles, woo! The instructions below are the directions I followed from the book Make: Making Simple Robots. This book was very detailed and super helpful for me to complete this project. Let’s begin!
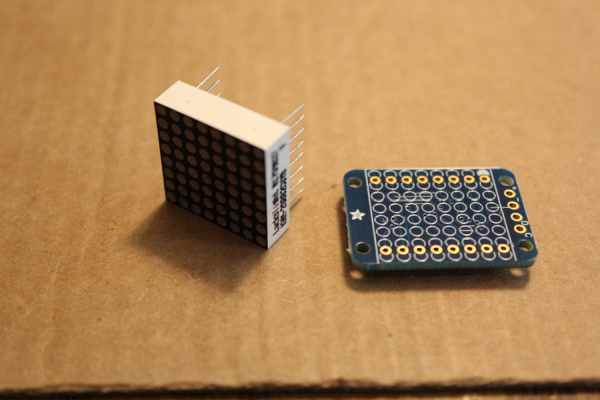
Step 1: The LED matrix comes with a backpack circuit board which enables the matrix to be compatible with simple Arduino programming. These two devices need to be soldered together first before moving to the next step. Soldering is a simple task that uses a soldering iron to melt metal fusing it to other objects. There are 16 holes total on the backpack and 16 wires on the matrix that slide into the sides of the backpack. You can see the the two different pieces in the photos above. Align the wires up with the holes and gently push it through. What I found worked best for soldering the two pieces together was connecting the soldering wire and the soldering iron between the wire on the matrix. Having the matrix wire in the centre and then having the two components meet it allowed the solder to form a nice ball at the bottom of the backpack. Repeat this step for the next 15 wires.
– If you are unsure on how to solder, no fear! There is an instructable for that. Check out this basic how-to solder if you are new to soldering and want to learn more.
Step 2: Now that the matrix is ready to go, the next step is to attach four wires or small alligator clips to the four holes connected to the backpack. You can use different coloured wires, but because I only had one colour of coated wire I just used one. Solder the four wires into each hole using the same technique as I used for soldering the matrix and backpack together. Trim the remaining wires.
Step 3: The next step is connecting the Gemma to the LED Matrix. Each wire has a specific place on the Gemma so it is important to connect the wires correctly. Make sure you have stripped the wire down about half an inch before twisting them on to the Gemma. I used this method, however you can also solder the wires onto the Gemma. Because the holes are meant for sewing and not soldering, if you are soldering the wires you will need pre-tin the holes. This means adding an additional layer of solder to the holes. I used the picture above from the book Make: Making Simple Robots for a reference of where each wire should be attached.
The + wire (red in the photo) will be connected to the bottom pad on the right (marked Vout).
The – wire (black in the photo) will be connected to the top pad on the right (marked GND).
The D wire (yellow in the photo) will be connected to the middle pad on the left (marked D0).
The C wire (green in the photo) will be connected to the top pad on the right (marked D2).
Ceceri, K. (2015). Make: Making Simple Robots. San Francisco: Maker Media Inc.
Step 4: You now have finished building the “eyes” of the robot! YAY! Almost there to waking up Fiberbot and introducing them to their new friend. You can run a test to make sure your Gemma is working properly. You can find these steps in the next lesson!!
Step 4: Downloading Arduino Blink
In this lesson you will be running a test on your Gemma as well as downloading the program that enables you to code your micro controller using Arduino IDE.
How to run a test:
It is important to run a test on your Adafruit Gemma before diving into coding on it. Here are the steps to running a practice test on your Gemma. Instructions derived from Make: Making Simple Robots by Kathy Ceceri.
Step 1: If you are using a Windows computer, you will need to download a driver called USB-tinyISP. The drivers job is to understand the language that is being communicated from the computer to the Gemma. Similar to how humans change their language when they are talking to young people compared to when they are speaking in front of university students. In other words, downloading the driver enables the computer to communicate effectively with the Gemma.
– To install the driver: Type in http//bit.ly/ada-drivers where you will find instructions for Windows 7, 8 and XP.
Step 2: Plug in your Gemma into the computer using the USB port and the mini USB cable on the Gemma. Once this is plugged in, you should see the green LED light on the Gemma light up as well as the red onboard LED flash.
– Once you’ve plugged your Gemma in, there should be a pop-up box prompt on the screen. You do not need it to search the web for the driver as it should directly install the driver onto your hard drive.
Step 3: Next you will need to download the Arduino IDE program onto your computer. Go to downloading the Arduino IDE program page here and follow the prompts. Once you have successfully downloaded the program onto your hard drive you will need to ensure you are using the correct board. Unfortunately, because the Gemma is an Adafruit and only compatible with Arduino you must download the board separately and install it into the program. Watch this tutorial video where I show you how to download the Adafruit Gemma board into the IDE program. You can also view this link that gives you descriptive instructions for downloading additional boards to the IDE programming.
Step 4: Run the code. Watch this video that shows you what code to use to run your test. This specific code is set to change the red LED to start blinking on and off once every second. Although it was blinking before, this blink should be much slower.
Step 4: Now that you’ve got your Gemma working and the body finished, the next step is to connect them together. Using another colour of felt cut out an outline of the Gemma and the LED Matrix. Place the outlines behind each piece. Sew the corners of the LED matrix and the Gemma to the rectangular piece of felt you made earlier in this lesson.
Step 5: Plug in the battery pack to the Gemma and place the black box behind the robot. Attach the battery pack to the back of Fiberbot with velcro. That way if you want to put these “eyes” on a different robot everything is portable.
Alright, so you can put the Fiberbot down for a second. I am going to guide you to the website that gives you step-by-step directions on how to download the Arduino program onto either your MacBook or Windows computers. Now this is going to make your Fiberbot smile!
1. Downloading Arduino: On the adafruit website, there is a page available specifically for learning about your Gemma controller. First things first, you need to download the compatible software onto your computer. Here is the link for completing this step.
Downloading Arduino
https://learn.adafruit.com/introducing-gemma/setti…
2. Programming with Arduino IDE: Again, on the adafruit website under getting started with Gemma you can find a tab called ‘programming with Arduino IDE.’ This specific webpage allows you to understand the meanings behind the code. All coding essentially is, is telling something to perform as task. These are known as inputs and outputs. An input is information coming into object and the output is the end result. For example, if I tell my sister to do the dishes and she does them, the input is represented by me asking her to do the dishes, the output is her doing them. Another example would be using your remote control for your TV. You push the on button which is the input and the TV turns on acting as the output. The same communication is used when working with micro controllers. We are going to learn how to send inputs into our Gemma in order for it to have a response (output). Read about the different meanings of the code. I really like using this website because it breaks steps down for beginners. It is easy to understand and they provide lots of visuals to follow along to.
Programming with Arduino IDE
https://learn.adafruit.com/introducing-gemma/progr…
3. Once you have downloaded the Arduino program onto your computer, open it up and follow the prompt on the video I have provided. You want to click on ‘tools’ at the top menu bar, scroll down to ‘board:’ and click on Adafruit Gemma (ATtiny85 @ 8MHz). Because coding is slightly different from board to board it is important to choose the correct board for the controller you are using.
4. Now that you have downloaded the Arduino program and have become familiar with some of the context behind the coding, I think you are ready to begin coding your very own Fiberbot!!! Check out the next lesson on how to code using Blink.
Step 5: Coding Fiberbot
One. More. Step.
The blink sketch that you used to run a test for your Gemma is a simple code that you can play around with to become familiar with the program. Find where it says delay(1000). This command tells the Gemma to turn the LED on and off for 1000 thousandths of a second or in other words 1 second. You can play around with the timing to understand how changing it will change the speed of the blinking LED. For example, if you change it to delay (500), the LED will blink twice as fast. If you change it to delay(2000), can you take a guess what it would change? Yup, you got it! It tells the Arduino device to blink twice as slow.
**Remember: You will always have to push the reset button on your Gemma every time you want to upload a new file.
There is a chance that when you verify/upload the code, there could be an error at the bottom of the screen in red print. If this happens it is often because you forgot to press the reset button on your Gemma. If this is not the case, you can read through “Setting Up with Arduino IDE” page (http://bit.ly/arduino-setup) for further instruction and assistance. There is also an Adafruit Customer Support Forum, where a live person will be able to provide assistance and answer any further questions you have.
Now that you have successfully ran the blink code onto your Gemma, it is time to get the Matrix involved. For this, you will need to download a library called TinyWireM. Here’s how:
1. Close any open Arduino windows
2. Go to the Adafruit website or type in http://bit.ly/gemma-sc. This is where you will find the TinyWireM library. Download this. I’ve uploaded a video to show you how to do this on a Mac computer. You can also go to this link for a written step-by-step guide for downloading this library. By downloading this library you will have permanent access to this code allowing you to save as new files.
3. Step 2 can be somewhat confusing. If this is the case, the codes are available on the Adafruit website. You can copy and paste the codes into the Arduino Blink program and run them from there. You will want to create two new tabs, similar to how there are tabs in browser. Verify both codes and upload them to your Gemma and Matrix. TA-DA!!!!! You’ve just coded and uploaded using Arduino IDE!!!!! You’ve made Fiberbot very happy!! Plug in your battery pack to your Gemma and unplug the USB from your computer and the micro controller. You can now show off your Fiberbot friend to everyone! Have fun 🙂
** If by any chance nothing is happening go back to the previous lesson and read through the how to troubleshoot/where to find help.
I hope you enjoyed creating your very own Fiberbot through this intractableju!
Source: Robotic E-textile
- Where can I find most of the supplies for the Fiberbot?
You can find the art and template supplies at a local Dollar Store or craft store, while robotic components are often bought online at stores like Adafruit. - What is a recommended book for this project?
The book Make: Making Simple Robots by Kathy Ceceri is highly recommended as it contains the original instructions and detailed steps. - What material is suggested for stuffing the Fiberbot body?
Fluff works great for stuffing, but dryer lint is a free and effective alternative if fluff is unavailable. - How should I prepare the wires before connecting them to the Gemma?
You should strip the wire down about half an inch before twisting them onto the Gemma pads. - Which driver must be downloaded for Windows computers?
Windows users need to download the USB-tinyISP driver to enable communication between the computer and the Gemma. - What board setting must be selected in the Arduino IDE?
You must select Adafruit Gemma (ATtiny85 @ 8MHz) from the tools menu under the board selection. - What library is required to control the LED Matrix?
You need to download the TinyWireM library to get the Matrix involved after running the blink code. - What action is required every time you upload new code?
You must push the reset button on your Gemma every time you want to upload a new file. - What happens if you change the delay command to 500?
Changing the delay to 500 will make the LED blink twice as fast compared to the standard one-second delay. - Why should you leave room between the stitching and scissors when cutting?
You should leave about 1.5 to 2 inches of room to ensure the burlap does not fall apart near the stitches.