
Summary of Portable Luxmeter
This article details the construction of a portable luxmeter designed for educational use, capable of measuring light intensity and calculating solar irradiation. Built with an Arduino Pro Mini, MAX44009 sensor, and OLED display, it runs on a rechargeable Li-Ion battery via a TP4056 charging module. The project is cost-effective at approximately $13 and consumes minimal power, ensuring long operational time.
Parts used in Portable Luxmeter:
- Arduino Pro Mini 5V
- MAX44009 Light Sensor
- OLED Display (0.96 inch)
- TP4056 Charging Module
- Li-Ion Battery (3 - 4.2 Volts)
- 18650 Holder
- Switch Jumper
- Female to Female Cables
- Male and Female Headers
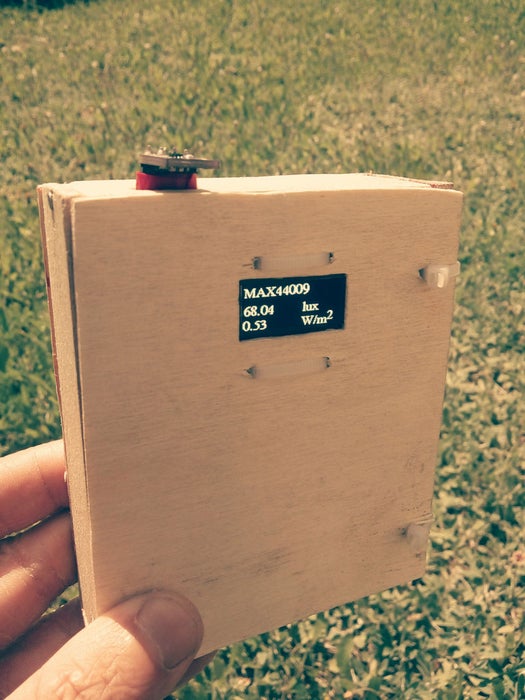
This project is about making portable luxmeter. It can be used in schools, where children can measure different kinds of light sources.
Functions:
1. measure intensity of light in lux.
2. calculate solar irradiation from lux to watts/m2 (factor 112)
3. charging battery using USB port
Total cost is around 13 $ without case. Luxmeter take 15 mA, so it will works long time on one Li-Ion battery.
Step 1: BOM
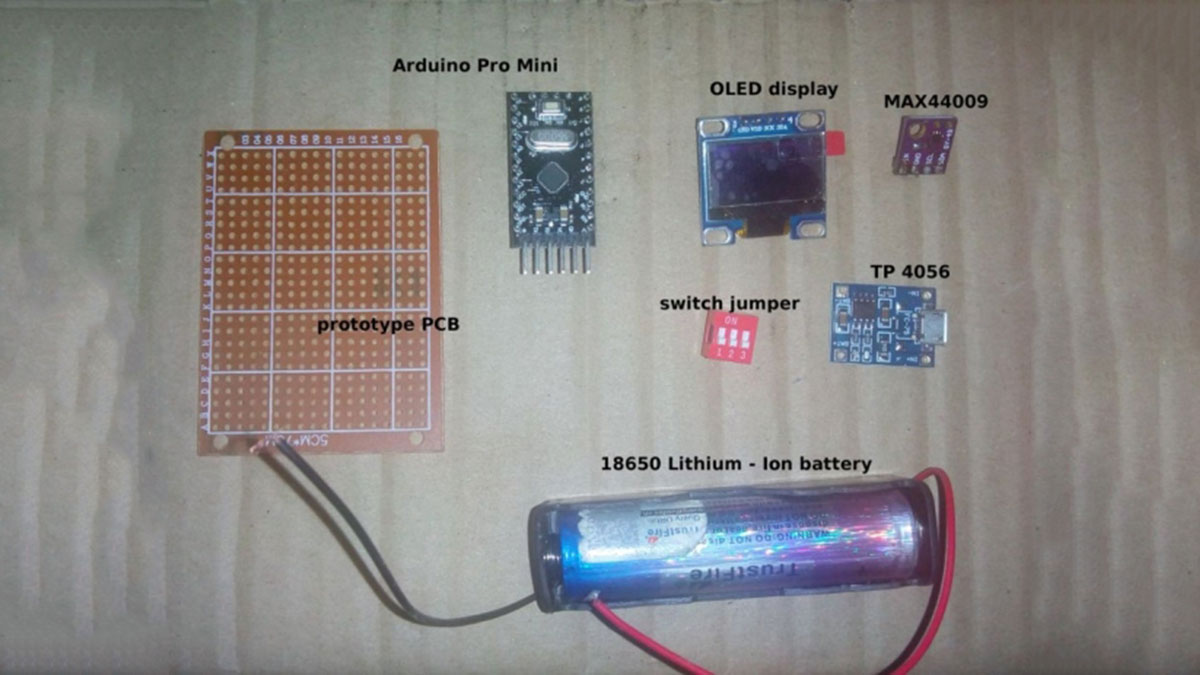
- For project you need this components(affiliate links, if you want to support me):
Arduino Pro Mini 5V
MAX44009
- Wide 0.045 Lux to 188,000 Lux Range
VCC = 1.7V to 3.6V () - ICC = 0.65µA Operating Current
- -40°C to +85°C Temperature Range
- Link
OLED display
- Diagonal Screen Size:0.96″
- Number of Pixels:128 x 64
- Color Depth:Monochrome (Yellow&Blue)
- Dimension:27.8 x27.3x 4.3 mm
- Working Voltage: 3.3~ 5V DC
- Power: 0.06W
- MaxViewing Angle: >160 Degree
- Duty:1/32Brightness ( cd/m2):150 (Typ) @ 5V
- Interface: I2C
- Link
TP4056
- need USB to micro USB cable for charging
- input 5V
- Link
Li-Ion battery
- 3 – 4.2 Volts
- Link
18650 holder
Switch jumper
Cables and header
- female to female
- female and male header
- Link to cables
- Link to pin headers
Step 2: Circuit
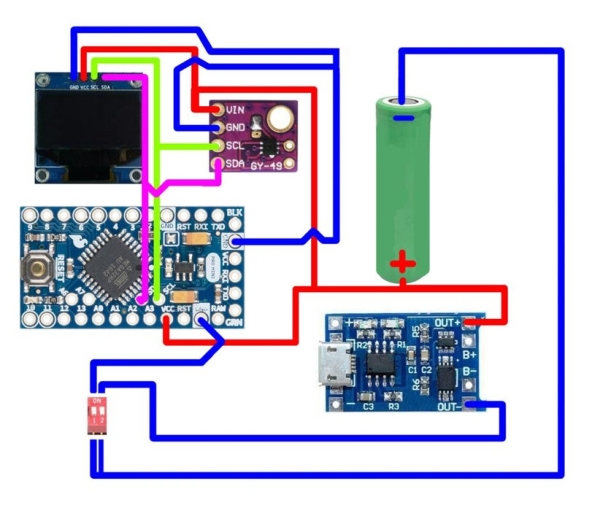
You need of course 5V Arduino to power it with Li-Ion battery (4,2 V!)
Connections:
Arduino – MAX44009 (same for OLED display)
A4 – SDA
A5 – SCL
VCC – VIN
GND – GND
TP4056 – Arduino Pro Mini
OUT+ – VCC
Arduino – battery
VCC – plus terminal (max 5 V for Arduino 5V)
Arduino – switch jumper
GND – first switcher
TP4056 – switch jumper
OUT – – second switcher
Battery – switch jumper
minus terminal – first and second switcher
Read more: Portable Luxmeter
-
What functions does the portable luxmeter perform?
It measures light intensity in lux, calculates solar irradiation from lux to watts/m2 using a factor of 112, and charges its battery via a USB port. -
How much does this project cost?
The total cost is around 13 dollars without the case. -
Can children use this device in schools?
Yes, the article states it can be used in schools where children can measure different kinds of light sources. -
How long will the device work on one charge?
The luxmeter takes 15 mA, so it will work for a long time on one Li-Ion battery. -
What voltage range does the MAX44009 sensor support?
The VCC range is 1.7V to 3.6V. -
Which pins connect the Arduino to the MAX44009 and OLED display?
A4 connects to SDA and A5 connects to SCL. -
What is the input requirement for the TP4056 module?
The input requires 5V. -
Does the OLED display support I2C interface?
Yes, the interface is listed as I2C.
