Summary of Low-cost thermal camera built using Arduino
Vaclav Krejci demonstrates building a low-cost thermal camera using an Arduino UNO, an AMG8833 8×8 infrared sensor, and an 8×8 RGB LED matrix. The system reads 64 temperature points via I2C, maps them to HSV colors with the Colorduino library, and displays a heat map showing cool (blue) to hot (red) areas. The AMG8833 supports an interrupt threshold and can detect human presence up to about 7 meters. Source code is available on GitHub; a higher-resolution option using the InfiRay P2 Pro is shown in a follow-up video.
Parts used in the Arduino thermal camera:
- Arduino UNO Rev3
- AMG8833 infrared sensor module (8×8 thermal sensor array)
- 8×8 RGB LED matrix (SunFounder)
- Colorduino library (software)
- I2C connection wiring
- Optional: Raspberry Pi (alternative platform)
- Optional: InfiRay P2 Pro infrared camera (for higher resolution)
In the realm of DIY electronics, the Arduino UNO has emerged as a versatile platform for a myriad of projects. One such innovative project is the creation of a low-cost thermal camera, as demonstrated by Vaclav Krejci, also known as “upir” on YouTube. Krejci’s tutorial video guides viewers on how to construct an infrared camera using an Arduino UNO, an infrared sensor AMG8833, and an 8×8 RGB LED display from SunFounder.
Thermal cameras are invaluable tools for detecting heat that is invisible to the naked eye. They find utility in a wide range of applications, from identifying excessive heat in custom PCB components to detecting uneven heating in car exhaust headers. Krejci’s design, while affordable, offers an 8×8 resolution, which is the maximum output of the AMG8833 infrared sensor array.
DIY Arduino thermal camera
While the resolution may seem low compared to digital camera standards, it is more than sufficient for the simple tasks that a thermal camera can perform. The device functions akin to a non-contact thermometer, displaying 64 points of heat detection. This allows it to identify hot IC chips and large thermal currents with ease.
Infrared sensor module
To replicate Krejci’s design, you need an Arduino UNO Rev3 board, an AMG8833 infrared sensor module, and an 8×8 RGB LED matrix. The device collects 64 values from the infrared sensor and uses them to set the hue of each pixel in the LED matrix. The Colorduino library, which allows pixel colors to be set using the HSV (hue, saturation, value) model, simplifies the process of adjusting the color by changing the hue of each pixel.
The AMG8833 infrared camera sensor, a compact and streamlined 8×8 infrared thermal sensor array, truly stands out in the realm of thermal imaging. Once hooked up to your microcontroller, be it a Raspberry Pi or any other compatible device in this case an Arduino microcontroller, it delivers 64 distinct infrared temperature data points using I2C. Its user-friendly, simple design makes integration a breeze.
Notably, the AMG8833 surpasses its predecessor, the AMG8831, in terms of performance. The sensor communicates exclusively via I2C and features an adjustable interrupt pin. This can be set to activate when the temperature of any single pixel exceeds or falls short of your predefined threshold.
Detecting human presence
Capable of detecting human presence from an impressive distance of up to 7 meters (or approximately 23 feet), the AMG8833 is an ideal choice for constructing your own human detector or compact camera. Remarkable results have been accomplished using this cutting-edge sensor, in combination with either compatible I2C communication devices or Raspberry Pi. Thanks to the image processing capabilities of the SciPy python library on the Pi, we are able to impose an 8×8 grid and yield truly impressive results if you go down the Pi route.
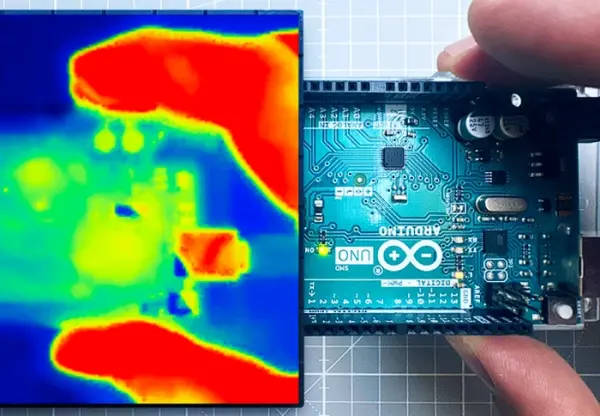
Whichever platform takes your fancy the end result is an LED display that presents a heat map, with cool areas depicted in blue and hot areas in red. Despite the low resolution, each pixel boasts impressive precision. In the second part of the video, Krejci further demonstrates how to achieve a much larger resolution of infrared images by using the InfiRay P2 Pro infrared camera. This tutorial offers a cost-effective solution for those seeking to build their own thermal camera. The project not only showcases the versatility of the Arduino UNO but also the potential of low-cost DIY electronics in creating useful tools.
Jump over to GitHub to download the source code to create your very own Arduino infrared camera without breaking the bank.
Source: Low-cost thermal camera built using Arduino
While the resolution may seem low compared to digital camera standards, it is more than sufficient for the simple tasks that a thermal camera can perform. The device functions akin to a non-contact thermometer, displaying 64 points of heat detection. This allows it to identify hot IC chips and large thermal currents with ease.
Infrared sensor module
To replicate Krejci’s design, you need an Arduino UNO Rev3 board, an AMG8833 infrared sensor module, and an 8×8 RGB LED matrix. The device collects 64 values from the infrared sensor and uses them to set the hue of each pixel in the LED matrix. The Colorduino library, which allows pixel colors to be set using the HSV (hue, saturation, value) model, simplifies the process of adjusting the color by changing the hue of each pixel.
The AMG8833 infrared camera sensor, a compact and streamlined 8×8 infrared thermal sensor array, truly stands out in the realm of thermal imaging. Once hooked up to your microcontroller, be it a Raspberry Pi or any other compatible device in this case an Arduino microcontroller, it delivers 64 distinct infrared temperature data points using I2C. Its user-friendly, simple design makes integration a breeze.
Notably, the AMG8833 surpasses its predecessor, the AMG8831, in terms of performance. The sensor communicates exclusively via I2C and features an adjustable interrupt pin. This can be set to activate when the temperature of any single pixel exceeds or falls short of your predefined threshold.
Detecting human presence
Capable of detecting human presence from an impressive distance of up to 7 meters (or approximately 23 feet), the AMG8833 is an ideal choice for constructing your own human detector or compact camera. Remarkable results have been accomplished using this cutting-edge sensor, in combination with either compatible I2C communication devices or Raspberry Pi. Thanks to the image processing capabilities of the SciPy python library on the Pi, we are able to impose an 8×8 grid and yield truly impressive results if you go down the Pi route.
Whichever platform takes your fancy the end result is an LED display that presents a heat map, with cool areas depicted in blue and hot areas in red. Despite the low resolution, each pixel boasts impressive precision. In the second part of the video, Krejci further demonstrates how to achieve a much larger resolution of infrared images by using the InfiRay P2 Pro infrared camera. This tutorial offers a cost-effective solution for those seeking to build their own thermal camera. The project not only showcases the versatility of the Arduino UNO but also the potential of low-cost DIY electronics in creating useful tools.
Jump over to GitHub to download the source code to create your very own Arduino infrared camera without breaking the bank.
- What components are required to build the Arduino thermal camera?
The article lists an Arduino UNO Rev3, an AMG8833 infrared sensor module, an 8×8 RGB LED matrix, Colorduino library, and I2C wiring; Raspberry Pi and InfiRay P2 Pro are optional. - How many temperature points does the AMG8833 sensor provide?
The AMG8833 provides 64 distinct infrared temperature data points using its 8×8 array. - How does the project display temperature data?
The device maps the 64 sensor values to HSV colors via the Colorduino library and sets each pixel on the 8×8 RGB LED matrix to create a heat map. - Can the AMG8833 communicate with the Arduino using I2C?
Yes, the AMG8833 communicates exclusively via I2C to deliver temperature data. - Does the AMG8833 have an interrupt feature?
Yes, the sensor features an adjustable interrupt pin that can trigger when a pixel exceeds or falls below a set temperature threshold. - How far can the AMG8833 detect human presence?
The article states the AMG8833 can detect human presence from up to about 7 meters (approximately 23 feet). - Is the 8×8 resolution sufficient for practical tasks?
Yes, the article says the 8×8 resolution is sufficient for simple tasks like finding hot IC chips and large thermal currents. - Where can I find the source code for this project?
The article says the source code is available on GitHub. - Is there a way to achieve higher-resolution infrared images?
Yes, the second part of the video demonstrates using the InfiRay P2 Pro infrared camera for much larger resolution images.