In addition to gambling, dice (die – singular) are used in many board games, e.g., Backgammon, Monopoly, Yahtzee, Liar’s Dice, Dungeons & Dragons, Trouble, etc.
Common dice are usually white with black “pips”. They are sometime known as d6 or D6.
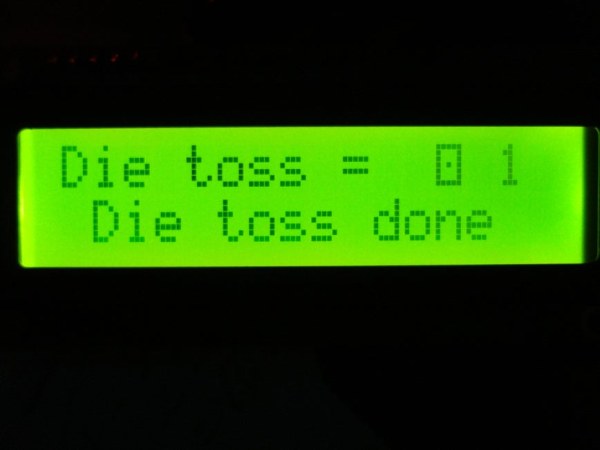
In this Instructable, the results of a simulated toss of a die (i.e., a pseudorandom number between one and six) is output in two forms. The first shows the results as they would appear on the face of a die. Since this result is displayed in a single character position on one 1602 LCD line by a custom character, it maybe somewhat hard to read. So, the results are also shown as a number (after a blank space), one through six, in a subsequent character display position.
Attached to this section are still photos of the die faces of Bicycle-brand dice. Compare these with the die faces/custom characters shown in Step 2.
This Instructable has only three Steps, and an “Introduction”, and it requires only a minimum number of supplies.
Thus, I hope you will find this Instructable useful and interesting, and of course easy to reproduce. If you do find this article helpful, even if you see it when it is some months or even years old, please be kind enough to mouse click “Favorited” at the top of this Instructable. Your action will be appreciated.
Unlike some Instructables, you do not need to be well-off financially to build this, and all components needed are specified adequately so you will have no issue getting them. Only an Arduino UNO, I2C 1602, and some Dupont hookup wires are needed to complete this project.
Because of the ease with which this Instructable can be built, anyone should be able to duplicate this project.
Supplies
– an Arduino UNO
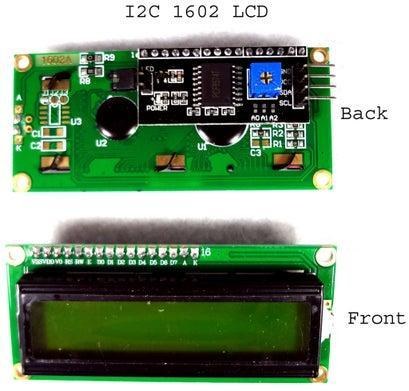
– an I2C 1602 LCD
– four (4) male to female Dupont jumper wires
Step 1: The 1602 LCD
The I2C 1602 is very easy to use, and its connections (there are only four (4)) are easy to make. Its use by Makers is even easier. Thus, it is a surprise it is not used in more Maker projects. Hopefully, this Instructable will help to adjust that situation.
Fortunately, whether you use a “raw” 1602 or an I2C one, all 1602 LCDs are relatively easy to use.
The nice things about any I2C 1602 (“raw” versions of this display have these advantages as well): (1) they allow Makers to become untethered from the display console; i.e., Makers have both mobility and portability, and they can display items needed on an LCD display, rather than the display console, and (2) these LCD displays are easy to use. These displays are identified as 1602s, as they display sixteen (16) characters on each of two (2) lines (i.e., thirty (32) characters in total).
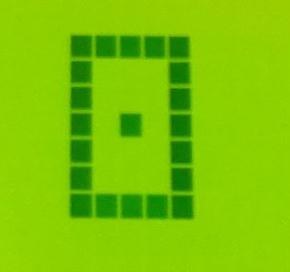
Each character, on the die face, is represented here in a seven (7) rows by five (5) columns matrix (see attached still photograph). The elements of this matrix are small rectangles. Characters are make by illuminating some of the small rectangles in this matrix. It is possible to design a small number of your own custom characters, as is done here to show the simulated face of the die. There are spaces separating characters and line on the displays, so that adjacent lines or characters can be easily distinguished.
An attached video, and some still photographs, shows how the four “piggyback” wires are attached, and how these wires from the four 1602 “piggyback” pins are connected to the UNO.
Here, as in all programming for the 1602 LCD, we have the option of assigning any special character(s) we design (here they were die faces with pips one through six) to one of eight single digit choices, zero (0) through seven (7). Fortunately, for this Instructable, we only needed to use six assignments, not the eight available.
When using I2C 1602s we have the option of purchasing them with the I2C “piggyback” module already soldered to the display, or purchasing the “piggyback” module separately and soldering them to the display ourselves. I have purchased the “piggyback” modules separately myself, but find it easier if they are already soldered on. This is how I would suggest you purchase these modules, unless you are quite short on funds. Solder-on modules do not add much to the cost of an 1602 display, i.e, if you solder yourself you can save some costs.
Step 2: The Sketch
Each of the six potential die faces is represented as a custom character. The die face selected (i.e., the pseudorandom number selected) is done by a call to random(). This function call determines which of the special character die faces (i.e., which of the values one through six) will be chosen as the pseudorandom selection.
The die faces (i.e., custom characters) are each placed in a 5 x 7 matrix (although there is a 5 x 8 matrix available), and enclosed by “pips” around their borders.
The eight row of each matrix, for each character in the set of special characters is set to zeros. That is, it is deliberately ignored.
As noted earlier, the special characters, and their “pips” may be hard to read, and so the actual number each die face represents is shown, after a blank space, in a following character position on the same row of the display.
The command lcd.write() can be used when one wants to send custom character(s) to the LCD display.
Some games require multiple die. If more than a single die is needed the “reset” button on the UNO can be pressed however many times it is necessary to simulate the number of die that are required.
Attached are still pictures of each of the six custom characters (die faces).
A text file is included to mitigate the Instructable’s brackets issue on this site, as it relates to C sketches. Note that the Instructable’s site removes all “<“and “>”brackets, and the text between them in Sketches..
/*
* Programmer: R. Jordan Kreindler
* Die Toss
* July 7, 2021
*/
#include [See written material, and note the greater and less than brackets problem this site has.]
// [Thus, there is an attached text file]
LiquidCrystal_I2C lcd(0x27, 16, 2); // Set I2C address to 0x27
byte die1[] = {
B11111,
B10001,
B10001,
B10101,
B10001,
B10001,
B11111,
B00000
};
byte die2[] = {
B11111,
B10011,
B10001,
B10001,
B10001,
B11001,
B11111,
B00000
};
byte die3[] = {
B11111,
B10011,
B10001,
B10101,
B10001,
B11001,
B11111,
B00000
};
byte die4[] = {
B11111,
B11011,
B10001,
B10001,
B10001,
B11011,
B11111,
B00000
};
byte die5[] = {
B11111,
B11011,
B10001,
B10101,
B10001,
B11011,
B11111,
B00000
};
byte die6[] = {
B11111,
B11011,
B10001,
B11011,
B10001,
B11011,
B11111,
B00000
};
long pseudorandom;
void setup() {
lcd.init();
lcd.backlight();
lcd.createChar(1, die1);
lcd.createChar(2, die2);
lcd.createChar(3, die3);
lcd.createChar(4, die4);
lcd.createChar(5, die5);
lcd.createChar(6, die6);
randomSeed(analogRead(A1));
lcd.setCursor(0, 0); // Set cursor at position zero(0) on first line of 1602 LCD
lcd.print(“Die toss = “); // First line of LCD
pseudorandom = random(6) + 1; // Select final/usable die number
lcd.write(pseudorandom); // Write special character
lcd.print(” “); // Print a space between die face and its value
lcd.print(pseudorandom); // Print the value of the die
lcd.setCursor(0,1); // Set cursor at position zero(0) on second line of 1602 LCD
lcd.print(” Die toss done”); // To indicate simulated die toss done.
}
void loop() {
}
Step 3: Afterwards
If you have come to this point congratulations. You should now have a basic understanding of some of the key elements in the pseuorandom simulation of one or more die tosses.
If you have any thoughts or questions, related to pseudorandom number generators, dice, or custom characters covered, or not, in this Instructable or any suggestions for improvement, I would be pleased to hear from you. You can contact me at [email protected]. (Please replace the second ‘i’ with an ‘e’ to contact me. Thank you.)
Source: Low Cost, Easy to Build and Use: Arduino Die Toss Simulator