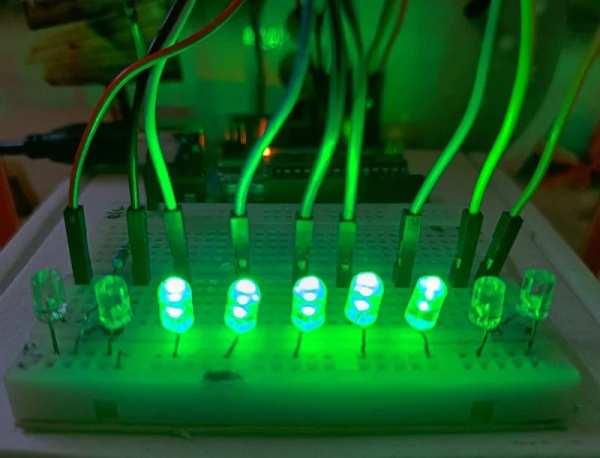
A LED chain with multiple patterns. Control Nine LED bulbs to form different patterns using Arduino UNO.
Working Video at Google Drive Link.
Supplies
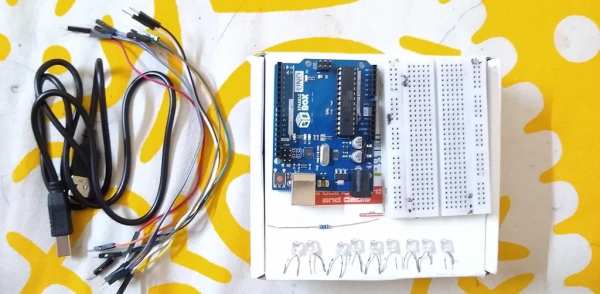
- Arduino Uno
- Bread Board
- Jumper Wires
- LED 5mm 5V (Any Color) 9pcs
- Resistance 220 Ω
- A Working PC
Step 1: Placing the LED Bulbs
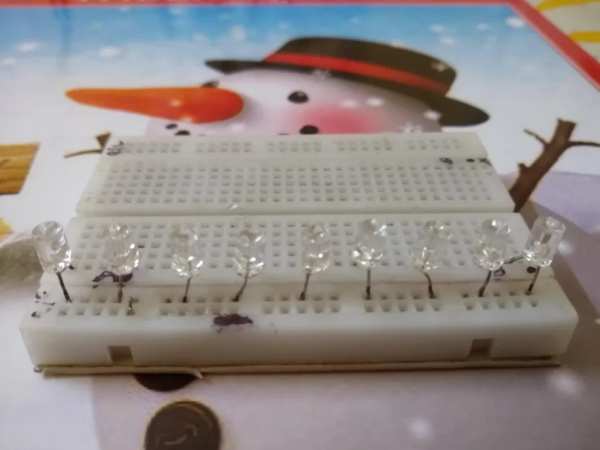
Place all the LED bulbs on the bread board such that their Cathode is all connected to the ground rail of the bread board. The positive terminals will be connected to the pins of Arduino. Place the LED’s and then connect them to pin number 0 to 8 on the Arduino with help of jumper wires. Careful, the sequence Matters.
Take a jumper wire and connect it to the ground port of the Arduino and after connecting it with a 220 Ω resistance, pass it on to the ground rail for the LED’s. I have used a 200 Ω resistor. The resistance is important and should be paid attention as if they are missed out then the fast blinking may burn out the LEDs and I don’t want to be held responsible for damaged property.
Step 2: Connect Pins to the Arduino
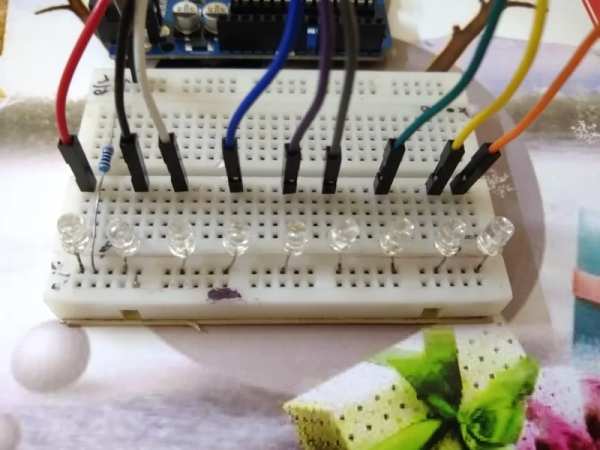
Connect the LED’s with Pin Number 0 to 8 on the Arduino board using Jumper Wires and Remember to connect them sequentially.
Step 3: Programming the Arduino
Connect the Arduino Board to your PC using the USB cable. Open Arduino IDE If you have it installed. The Arduino IDE can be installed from here (official website of Arduino). Or you can get it from the Windows Store if you are on Windows 10 or 11. The program for the Arduino is attached below.
The code goes here (The file is also provided) :-
void setup() {
  // put your setup code here, to run once:
  for (int i = 0; i < 10; i++) {
    pinMode(i, OUTPUT);
  }
}


void loop() {
  // put your main code here, to run repeatedly:
  // 1
  for (int c = 0; c < 3; c++) {
    for (int i = -2; i < 7; i++) {
      digitalWrite(i-1, LOW);
      digitalWrite(i, HIGH);
      digitalWrite(i+1, HIGH);
      digitalWrite(i+2, HIGH);
      delay(25);
    }
    for (int i = 8; i > -2; i--) {
      digitalWrite(i+1, LOW);
      digitalWrite(i, HIGH);
      digitalWrite(i-1, HIGH);
      digitalWrite(i-2, HIGH);
      delay(25);
    }
  }
  // 2
  for (int c = 0; c < 3; c++) {
    for (int i = 0; i < 5; i++) {
      digitalWrite(i, HIGH);
      digitalWrite(8-i, HIGH);
      delay(100);
    }
    for (int i = 0; i < 5; i++) {
      digitalWrite(i, LOW);
      digitalWrite(8-i, LOW);
      delay(100);
    }
  }
  // 3
  for (int c = 0; c < 3; c++) {
    int t = floor(9/2);
    for (int i = 0; i < 5; i++) {
      digitalWrite(t+i, HIGH);
      digitalWrite(t-i, HIGH);
      delay(100);
    }
    for (int i = 0; i < 5; i++) {
      digitalWrite(t+i, LOW);
      digitalWrite(t-i, LOW);
      delay(100);
    }
  }
  // 4
  for (int c = 0; c < 3; c++) {
    int d = 50;
    for (int a = 0; a <10; a++) {
      for (int i = 0; i < 9-a; i++) {
        digitalWrite(i, HIGH);
        delay(40);
        digitalWrite(i, LOW);
      }
      d = d-5;
      digitalWrite(9-a, HIGH);
      delay(d);
    }
  }
  // 5
  for (int c = 0; c < 3; c++) {
    for (int i = 0; i < 5; i++) {
      digitalWrite(i, HIGH);
      delay(25);
      digitalWrite(8-i, HIGH);
      delay(25);
    }
    int t = floor(9/2);
    for (int i = 0; i < 5; i++) {
      digitalWrite(i, LOW);
      delay(25);
      digitalWrite(8-i, LOW);
      delay(25);
    }
    for (int i = 0; i < 5; i++) {
      digitalWrite(t+i, HIGH);
      delay(25);
      digitalWrite(t-i, HIGH);
      delay(25);
    }
    for (int i = 0; i < 5; i++) {
      digitalWrite(t+i, LOW);
      delay(25);
      digitalWrite(t-i, LOW);
      delay(25);
    }
  }
  // 6
  for (int c = 0; c < 3; c++) {
    for (int i = 0; i <10; i++) {
      digitalWrite(i,HIGH);
      delay(30);
      digitalWrite(i, LOW);
    }
    for (int i = 0; i <10; i++) {
      digitalWrite(9-i,HIGH);
      delay(30);
      digitalWrite(9-i, LOW);
    }
  }
  // 7
    for (int r = 0; r<3; r++) {
    digitalWrite(0,LOW);
    digitalWrite(2,LOW);
    digitalWrite(4,LOW);
    digitalWrite(6,LOW);
    digitalWrite(8,LOW);
    digitalWrite(1,HIGH);
    digitalWrite(3,HIGH);
    digitalWrite(5,HIGH);
    digitalWrite(7,HIGH);
    delay(100);
    digitalWrite(1,LOW);
    digitalWrite(3,LOW);
    digitalWrite(5,LOW);
    digitalWrite(7,LOW);
    digitalWrite(0,HIGH);
    digitalWrite(2,HIGH);
    digitalWrite(4,HIGH);
    digitalWrite(6,HIGH);
    digitalWrite(8,HIGH);
    delay(100);
    }
}
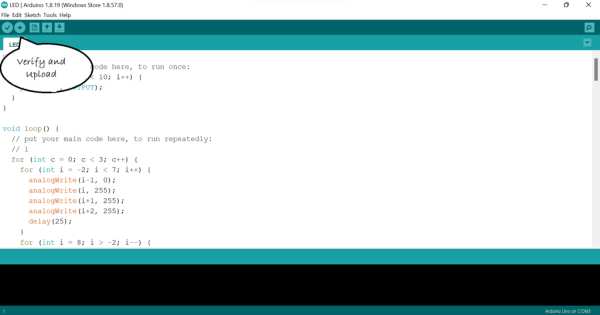
Upload the following code to the Arduino Boards.
If its the first time follow the following steps :
- Click Tools on the top
- Select Board – “Arduino UNO”
- Select Port – The port in which the board is connected
- Click Check to Check and Verify the code for errors
- Click Upload Button
All the buttons are marked in the picture
Step 4: The Code Explanation
The code which is to be ran once at the beginning is placed inside the
void setup() {
  for (int i = 0; i < 10; i++) {
  pinMode(i, OUTPUT);
}
Here for loop is used to loop through the pins from number 0 to 8 and setting the pins to OUTPUT pins
The codes which are to be ran forever are placed inside the
void loop() {
  // put your main code here, to run repeatedly:
}
In different patterns for loop is used to loop through the pins and setting the OUTPUT low of HIGH.
void loop() {
 // 1
 for (int c = 0; c < 3; c++) {
  for (int i = -2; i < 7; i++) {
   digitalWrite(i-1, LOW);
   digitalWrite(i, HIGH);
   digitalWrite(i+1, HIGH);
   digitalWrite(i+2, 255);
   delay(25);
  }
  for (int i = 8; i > -2; i--) {
   digitalWrite(i+1, LOW);
   digitalWrite(i, HIGH);
   digitalWrite(i-1, HIGH);
   digitalWrite(i-2, HIGH);
   delay(25);
  }
 }
}
In the first for loop, we set a variable to start from 0 and go till 2. This is just to run the pattern 3 time.
In the second for loops integer i is set as the pin number, first when i is 0, the pins 0, 1, 2 are set to HIGH and the pin before i is set to LOW ( there aren’t any pin before i when i = 0). Then a 25ms delay is given before the loop continues. The next for loop just to reverse the pattern.
Similarly all other patterns are made using for loop using different logics.
Step 5: Check for Errors
If it is not working as expected, check all the wires for a wrong connection and see whether the wires are connected properly or not and check for short-circuits. Remember to test the LED’s beforehand.
Step 6: LED Patterns
The LED chain should start working now if there isn’t any mistakes.
Step 7: Doing It Without Arduino
If you are at the moment not equipped with a Arduino Board, then Simulators like Fritzing or Tinker cad can be used.
Source: LED Patterns Using Arduino