
Summary of Knock Block using an Arduino board
The Knock Block is a modern, interactive time-telling device disguised as a wooden block. It uses an Arduino and piezoelectric sensor to detect knocks on its surface or the block itself. Upon detecting input, it responds by tapping out the current time in hours and quarter-hours using a solenoid. Additionally, if multiple knocks are detected, a companion app mimics the user's knocking pattern. The project emphasizes realistic human-like variations in knock frequency and amplitude, powered by 9V batteries within a custom mahogany case.
Parts used in the Knock Block:
- Arduino board
- TIP31C high current transistor
- Jameco 191172-001 solenoid
- Measurement Specialties DT-series piezo film element
- 1M ohm resistor
- 9V battery
- Block case (e.g., mahogany)
Knock Block: a modern knocking framework
Man has long wrestled with Time. Also, with knocking on things and not getting the time of day. We propose a knocking platform through which these fundamental needs are met. This is illustrated with the Knock Block KUI and accompanying Clock Knock Block application. The Knock Block possesses realistic knocking action with a human-like variation in frequency and amplitude of knocks.
Just knock on the Knock Block, or even the surface on which it’s resting, and it will knock back the time to you. First it will knock the number of hours, and then the quarter hours.
If you knock several times, the Mock Knock Block application will take over, and repeat back your knocking pattern.
Video: http://www.vimeo.com/6713094
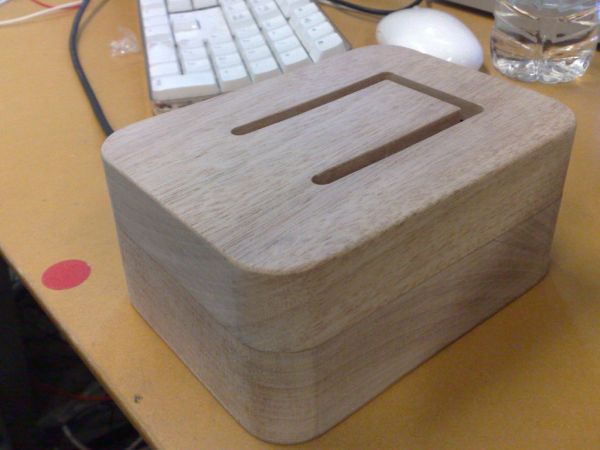
Step 1: Inside the Knock Block
What’s inside that rich mahogany exterior? An Arduino that reads vibrations from a piezoelectric sensor and relays back information with a solenoid tapping against the resonant lid of the block. It’s all powered by one or two 9V batteries.
Parts list:
– any Arduino can handle this
– a TIP31C high current transistor for the switch
– the exotically named Jameco 191172-001 solenoid, prized for its low price ($3!) and current
– a Measurement Specialties DT-series piezo film element (pretty sure that’s the model)
– a 1M ohm resistor (your mileage may vary)
– 9V battery
– block case of your choice
Step 2: Choose your block
As long as it’s hard and has some space to allow the knocking to reverbrate through the body, you’re fine. We also cut an acrylic bracket that holds the parts (especially the solenoid) in place and away from the sides where they might dampen the sound.
We gave it a tongue for a nice tone, with the idea that we could make several blocks each with a different size tongue for a variety of tones.
 knock_block.dxf141 KB
Step 3: Wire the circuit (piezo)
Tape the piezo at the base to something hard, so it can vibrate more freely. A cheap substitute for the piezo element is an old speaker, which also can produce voltage in response to vibrations.
Schematic for wiring to an Arduino is attached.
Step 4: Wire the circuit (solenoid)
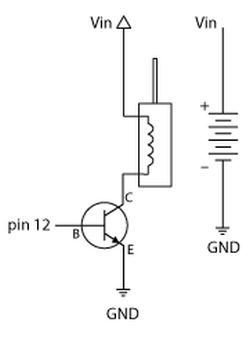
You’ll need to get a high-current transistor (we used a TIP31C) to act as a switch for the solenoid – if it’s connected directly to the Arduino it may reset the whole thing every time it activates, since it draws too much current for the Arduino to supply. Then the Arduino is only turning the base on and off, and the collector/emitter circuit is sourced by the 9V directly. The solenoid we used was designed for 12V but it has some tolerance for lower voltage at the cost of knocking volume.
Schematic and board overview attached. Notes:
– We wired the battery right into the Vin and GND pins on the Arduino (right under the resistor).
– The middle pin of the transistor is bent out so it’s not in the Arduino, and is only connected to the solenoid via the blue wire.
– a TIP31C high current transistor for the switch
– the exotically named Jameco 191172-001 solenoid
– a Measurement Specialties DT-series piezo film element
– a 1M ohm resistor
– 9V battery
– block case of your choice
For more detail: Knock Block using an Arduino board
- How does the Knock Block tell time?
It detects knocks on the block or surface and taps back the number of hours followed by quarter hours. - Can the Knock Block mimic user input?
Yes, if you knock several times, the Mock Knock Block application repeats your knocking pattern. - What component detects the vibrations?
A piezoelectric sensor, specifically a Measurement Specialties DT-series piezo film element, reads the vibrations. - How is the knocking action generated?
A Jameco 191172-001 solenoid taps against the resonant lid of the block to create the sound. - Why is a TIP31C transistor required?
The solenoid draws too much current for the Arduino; the transistor acts as a switch to prevent resetting the board. - What powers the entire system?
The device is powered by one or two 9V batteries connected directly to the Arduino Vin and GND pins. - Is the mahogany case essential for operation?
No, any hard case with space for reverberation works, though mahogany was used for aesthetic and tonal purposes. - Can an old speaker replace the piezo element?
Yes, a cheap substitute like an old speaker can produce voltage in response to vibrations.
