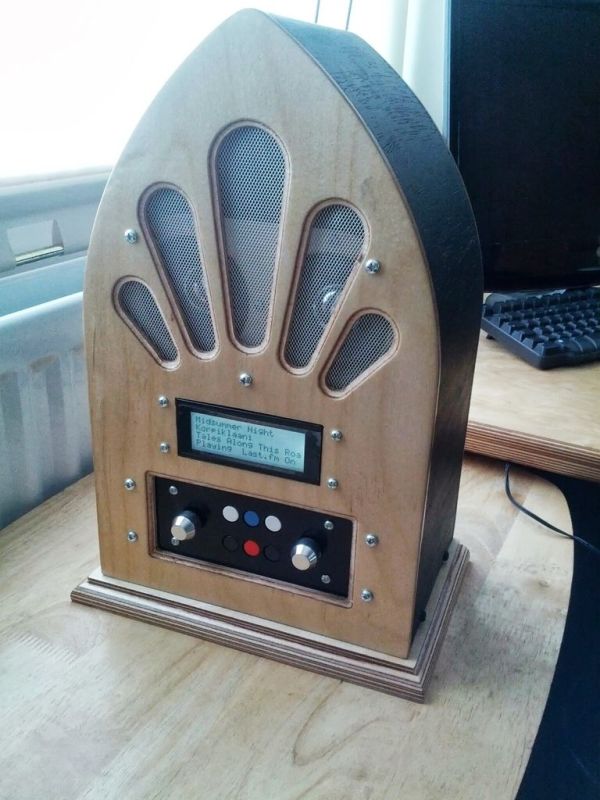
I was looking for a project to do with my Raspberry Pi and found thisInstructable and thought I would have a go at something similar which worked with Google Play Music. I had a rough idea of what I wanted the final item to end up like and was able to get my dad interested in helping me with the design and construction of the enclosure.

Before we begin I should probably point out that a reasonably good understanding of electronics and Linux makes this project a lot easier, especially since my Instructables are probably not the easiest to follow (I do try my best), however feel free to ask if something isn’t clear enough.
A full parts list is a little difficult for a project this size so I’ll highlight the important parts only:
- Arduino IC (i.e. ATmega 328 with Arduino bootloader, you can but them blank and flash then yourself or pre flashed with a bootloader)
- Raspberry Pi (512MB version if possible, because you know, more memory is better… but seriously I haven’t tested with a 256MB version, but it should still work)
- Digital potentiometers (logarithmic taper (we’ll be using it to attenuate audio) & i2c (from the Pi), a DS1807 will do)
- Amplifiers (I used pre-built modules but feel free to build your own if you feel up to it)
- DC-DC converters (12v to 5v, 600mA output, isolated)
- Rotary encoders (from font panel, cursor movement and volume)
- An LCD (4 rows, 20 columns works for me, if you have songs with really long names maybe get a 40 column one)
As for tools, you just need all the standard electronics and woodworking tools, a few others which may be useful:
- Bus Pirate (I don’t actually have one, but they are very useful, alternatively you can do what I do and write Arduino scripts to make an Arduino act like a Pus Pirate to some degree)
- Laser cutter/engraver (not essential, but makes production of mounting hardware and front panels SO much easier)
- Router (for construction of enclosure)
- Accurate callipers (essential for measuring sizes for panels and mounting hardware)
I think that is about it for specialist parts and tools, but of course I would highly recommend you read through the entire Instructable before starting work on this project.
Video demoing the finished radio:
I’m having problems embedding videos in my Instructables, here is a link to YouTube: http://www.youtube.com/watch?v=tgPbvo-8iRc
Step 1: User Interface Electronics
The order in which I went about this project seemed fairly logical and seemed to work for me, so I’ll go with that.
In that case first up is the electronics which control communication between the radio and the user, in my radio the included 6 buttons, two rotary encoders which also have a switch for when they are pressed and a 4 row, 20 column backlit LCD, the majority of this is controlled using a ATmega 328p which interfaces with the Raspberry Pi using RS232 (over a level converter, since the Pi has a logic level of 3.3v and the Arduino is 5v), the one exception is the LCD backlight which is switched on and off using a GPIO pin from the Pi.
So here is an overview of what IO devices were actually connected to the Arduino, how they were connected and why:
- Pins 0 and 1 connected to the Raspberry Pi GPO header through a MOSFET level converter, this was for the serial communication between the Pi and the Arduino.
- The front panel button were connected to ADC pins 0 to 5 with either an external pull up or pull down resistor (whichever is easiest, in hindsight pull up would have been easier then I would only need ground on my front panel board).
- The LCD is connected on digital pins 8 to 13, the actual pin assignment is not important at this stage as it can be configured in the Arduino script.
- The encoder buttons are on pins 6 and 7, using the internal pull up resistor.
- The encoders are on pins 3 and 5 and 2 and 4, it is important to have at least one interrupt pin per encoder, this will greatly improve the performance.
Most of this can be seen easily on the schematic which has all of these relevant sections annotated, note that this is the schematic for the main board only, so the actual devices are shown as pin headers, I will go over wiring the actual devices in the next step.
Step 2: Front Panel and LCD
Before starting this step it is a good idea to know roughly what size you want your radio to be, as this will limit the maximum size of your front button/encoder panel.
Once you know roughly what size you need to make your front panel you can design it however you like to match the style of enclosure you are planning, the only constraints are that the use the same Arduino code as me (at least without vast changes) it will need to use the same type and function of inputs.
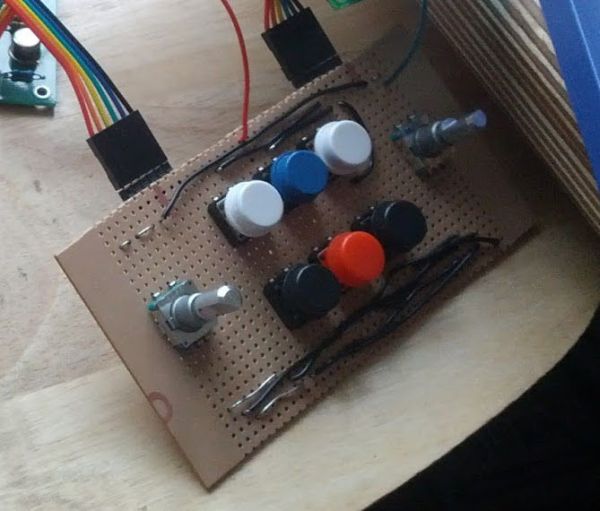
My front panel was simply built on stripboard and bolted to an Acrylic panel which would later be mounted in the enclosure.
On the LCD module I soldered on a small breakout board which tool the 6 and 4 pin ribbon cables which came from the main board and connected them to the appropriate pins on the LCDs 16 pin header.
a 5v and ground wire was needed between the LCD breakout board and button/encoder board as the encoders needed a ground reference and the buttons needed a 5v reference in order to work properly.
Step 3: Arduino Script
If you kept most of the general circuit design similar to mine then there will be very few changes that have to be made to the script before uploading to the Arduino, although it is a good idea to have a look through this list to see if any apply to you:
- You are using pull down resistors on the ADC
Starting on line 174 you will see a lot of tests that look like this: analogRead(PLAY_ADC) <= ADC_TH
Change this to >= and you should be fine. - Pin configuration
You will almost certainly have to change some pin assignments, this is done from lines 26 to 60, all the pins are well labelled in the script.
You will also need some additional Arduino libraries before the script will compile, namely Streaming, CmdMessenger and Encoder. Once theese are in your libraries folder you should be good to go.
Once you have made all your changes, upload the script to the Arduino either by using an Arduino board to upload it or connecting a serial connection to the IC in circuit (I just used a Uno board, it is easier).
Here may be a good time to build the circuit so far on breadboard and test to ensure that everything is working as expected and you get the correct serial data when input devices are actuated and that the LCD responds correctly to serial commands. It is not essential that you do this here, if you prefer you can test the entire circuit before it is moved to the PCB.
Step 4: Audio Electronics
The next part of the electronics control the path of the audio signal between the output of the Raspberry Pi and the speakers, although I have not used them in my radio I also included headers on the PCB for a line out (for connection to an external amplifier) and headphone out (for headphones ;).
A summary of the audio signal path is as follows:
- Raspberry Pi output, close to an unattenuated signal, I used alsamixer to set the output to 0dB.
- Line out header, if used this would be a 5 pin 3.5mm jack which breaks the signal path if a plug is present in the socket.
- Digital potentiometers, these are used to attenuate the audio signal prior to amplification, controlled and powered by the Raspberry Pi over i2c.
- Headphone output, outputs attenuated audio output for use with headphones.
- Attenuation potentiometers, I added a footprint on the board for this but just bypassed it as it was not really needed.
- Amplifiers, 2 12W amplifier modules.
- Speakers, make noise 🙂
If you do not intend to use the line and headphone out then it is probably best to omit them from your design altogether.
My audio electronics are probably not the best designed, and I certainly did not use the best quality speakers (mainly due to size restrictions to fit them in the enclose I had designed) so feel free to improve this in any way you can.
Step 5: Other Electronics
Other electronics needed to make this work:
- Amplifier and LCD Backlight power switching
This was done from two GPIO pins on the Raspberry Pi (since I had maxed out the Arduino), all this involved was a MOSFET level converter switching an PNP transistor.
In the case of the LCD backlight, this directly powered the LCD backlight LEDs through a potentiometer which could be used to set the brightness.
To control the amplifier power a relay was used which was switched by the PNP transistor (with a protection diode). - Power conversion
I was powering the radio with a single supply 12V PSU which could deliver 1.5A constant, this supplied enough power however I had to convert it to 5V for both the ATmega IC and Raspberry Pi, to do this I used two switchmode DC-DC isolated converters, one for the 5V power plane on the main board and one to power the Raspberry Pi.
I used isolated converters as this removed a ground loop which caused problem with the audio circuit. - Power supply
I added an additional board (not depicted on schematic) which included a 1000uF capacitor which helps to compensate for the rapid change in power demand when the amplifiers are powered up.
This board also has a 20mm cartridge fuse holder fitted with a 1A fuse for the sake of protection.
For more detail: Google Play Music Internet Radio (Raspberry Pi and Arduino)

