Summary of Enhancing Projects with Serial Connectivity Between Arduino Boards
Summary: This tutorial explains how to establish serial communication between two Arduino boards (Uno/ Mega) to exchange data and control peripherals. It covers wiring (Tx-Rx cross and common ground), basic Sender/Receiver code using Serial.write and Serial.readBytes, examples controlling an LED via Mega-to-Uno commands, and using pushbuttons on a transmitter to toggle LEDs on a receiver. Proteus simulation and tips for powering one board from another are also included.
Parts used in the Serial Communication between Two Arduino Boards:
- Arduino Uno
- Arduino Mega
- Male-to-male jumper wires (3)
- Push buttons (2)
- LEDs (as required, e.g., onboard LED on pin 13)
- Variable resistor (optional, for transmitting analog values)
- 5V power connection or USB cables/power adapters
- Proteus simulation files (optional)
Description:
Serial communication between two Arduino boards – This tutorial covers the process of establishing serial communication between two Arduino boards. While the Arduino Uno or Arduino Mega typically suffices for various projects such as CNC machines or 3D printers, instances arise where a single board isn’t adequate to complete a project. In such scenarios, linking multiple Arduino boards via serial connection becomes beneficial. Upon completion of this article, you’ll grasp the utilization of functions like Serial.read() and Serial.write(). Beginning with fundamental concepts of serial communication, the tutorial progresses to more advanced applications, expanding your understanding step by step.
How to serially connect two Arduino Boards?
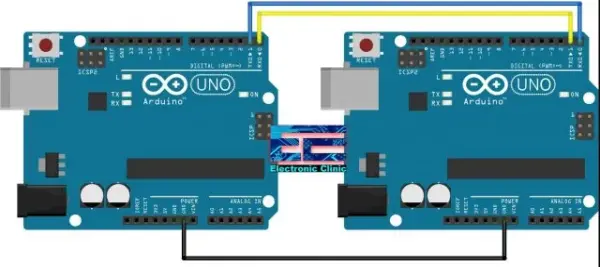
To initiate the connection between the two Arduino Boards, gather three male-to-male jumper wires. Establish the link by interconnecting the RX pin of one Arduino Uno board to the TX pin of the other board, and reciprocally connect the TX pin to the RX pin between the two boards—forming a Tx-to-Rx and Rx-to-Tx configuration. Ensure that the ground connections of both Arduino boards are joined together.
Serial Communication between Two Arduino Boards, Programming:
To grasp the idea behind serial communication involving two Arduino boards, we’ll designate one Arduino as the Sender and the other as the Receiver. This approach entails developing two separate programs: one tailored for the Sender Arduino and another for the Receiver Arduino.
Sender Arduino Code:
|
1
2
3
4
5
6
7
8
9
10
11
12
13
14
15
16
17
18
19
20
|
char Mymessage[5] = “Hello”; //String data
void setup() {
// Begin the Serial at 9600 Baud
Serial.begin(9600);
}
void loop() {
Serial.write(Mymessage,5); //Write the serial data
delay(1000);
}
|
Sender Arduino code Explanation:
This code presents a basic implementation aimed at transmitting the message “Hello” to another Arduino board. I’ve defined an array called Mymessage with a capacity of holding 5 characters, denoted by the number 5 within the brackets. Within the setup() function, I’ve initialized serial communication using Serial.begin() and set the baud rate to 9600. Notably, the setup() function runs only once upon the initial powering up of the Arduino board.
Meanwhile, the loop() function operates continuously until the Arduino board is powered off. To transmit the “Hello” message to the receiving Arduino board, I’ve employed the Serial.write() function, followed by a 1000-millisecond delay (equivalent to 1 second).
Receiver Arduino Code:
char Mymessage[10]; //Initialized variable to store recieved data
void setup() {
// Begin the Serial at 9600 Baud
Serial.begin(9600);
}
void loop() {
Serial.readBytes(Mymessage,5); //Read the serial data and store in var
Serial.println(Mymessage); //Print data on Serial Monitor
delay(1000);
}
Receiver Arduino Code Explanation:
The code for the Receiver Arduino closely resembles that of the Sender Arduino. However, this time, instead of employing the Serial.write() function, we utilize the Serial.readBytes() function to retrieve the transmitted data.
Proceed by uploading the codes and accessing the Serial monitor for the Receiver Arduino. Ensure the Sender Arduino is powered, either via a cable, adapter, or you can use the Receiver Arduino to supply power to the Sender Arduino by connecting 5 volts from the Receiver Arduino to the Vin pin of the Sender Arduino.
Connect a variable resistor to the Sender Arduino and attempt to transmit its value to the Receiver Arduino, then display it on the Serial monitor.
Arduino Uno Serial Communication with Arduino Mega:
Next, let’s elevate the complexity by controlling an LED. Through serial communication, we’ll transmit commands such as “on” and “off” from the Arduino Mega to the Arduino Uno. This will enable us to manipulate the onboard LED linked to pin 13 on the Arduino Uno. For this illustration, the Arduino Mega will function as the sender, while the Arduino Uno will act as the receiver.
Arduino Uno Serial connection with Arduino Mega, Circuit Diagram:
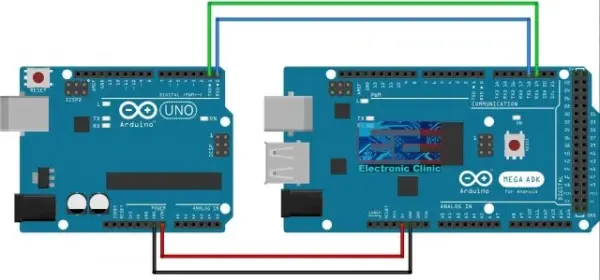
The Arduino Mega’s RX1 links to the Arduino Uno’s TX0, while the Arduino Mega’s TX1 connects to the Arduino Uno’s RX0. Additionally, the 5V output from the Arduino Mega is linked to the Vin pin on the Arduino Uno, allowing the Arduino Uno to be powered by the Arduino Mega’s 5 volts. It’s crucial to connect the ground pins of both Arduino boards. I suggest completing the wiring after uploading the codes.
Arduino Mega Code, Sender:
Arduino Mega, Sender code explanation:
Within the setup() function of the Arduino Mega code, I’ve initialized two Serial Ports with a baud rate of 9600 each. One of these ports is designated for receiving commands, while the other transmits these commands to the Receiver.
“`cpp
void setup() {
Serial.begin(9600);
Serial1.begin(9600);
}
“`
The loop() function begins by defining two String variables: readString and Q.
“`cpp
void loop() {
String readString;
String Q;
“`
The code then checks Serial1 port for incoming data. It reads and stores any available data from this port.
“`cpp
while (Serial1.available()) {
delay(1);
if(Serial1.available() > 0){
char c = Serial1.read();
Serial.print(c);
if (isControl(c)){
break;
}
}
}
“`
Subsequently, the program monitors Serial0, the default Serial port, responsible for receiving commands via the serial monitor. It accumulates characters typed on the serial monitor into the readString variable to form a complete message.
“`cpp
while (Serial.available()) {
delay(1);
if (Serial.available() > 0) {
char c = Serial.read(); //gets one byte from serial buffer
if (isControl(c)) {
break;
}
readString += c; //constructs the readString
}
}
“`
The message from readString is then stored in the Q variable.
“`cpp
Q = readString;
“`
Using conditional statements, the code checks if the variable Q contains “on” or “off” and sends “1” or “2” accordingly.
“`cpp
if(Q == “on”) {
Serial1.print(“1”);
Serial.println(“Sent: On”);
}
if(Q == “off”) {
Serial1.print(“2”);
Serial.println(“Sent: Off”);
}
}
“`
To summarize, Serial1 is responsible for transmitting data from the Arduino Mega to the Arduino Uno, while Serial0 facilitates command input through the Serial Monitor.
Arduino Uno Code, Receiver:
Arduino Uno Receiver Code Explanation:
In the setup() function, I configured pin 13 of the Arduino Uno as an output, as this pin is linked to the onboard LED. Additionally, I initialized the Serial communication, specifying a baud rate of 9600. It’s crucial to maintain uniformity in baud rates between the Sender and Receiver; otherwise, the communication may not function properly.
void setup() {
// put your setup code here, to run once:
pinMode(13,OUTPUT);
Serial.begin(9600);
}
void loop() {
// put your main code here, to run repeatedly:
String readString;
String Q;
The subsequent set of instructions is employed to monitor the Arduino Uno’s Serial port. If data has been received from the Arduino Mega, it retrieves a single byte from the serial buffer and stores it in a character variable, ‘c.’ This process involves accumulating the received characters into the ‘readString’ variable to construct a message.
Here’s a rephrased version:
“`cpp
// Read characters from the Serial buffer
while (Serial.available()) {
delay(1);
if (Serial.available() > 0) {
char c = Serial.read(); // Retrieve a byte from the serial buffer
if (isControl(c)) {
// Serial.println(“it’s a control character”);
break;
}
readString += c; // Append character to the readString
}
}
Q = readString;
// Determine the command received: 1 for turning ON the LED, 2 for turning OFF the LED
// Check Serial Read
if (Q == “1”) {
digitalWrite(13, HIGH); // Turn ON the LED
}
if (Q == “2”) {
digitalWrite(13, LOW); // Turn OFF the LED
}
“`
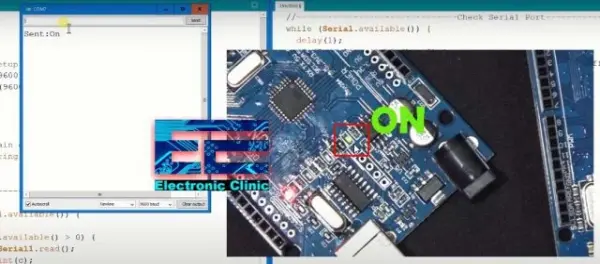
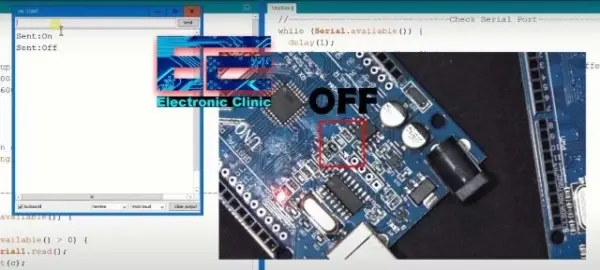
After uploading both programs and connecting the circuit as per the provided diagram, I established the connection between the Arduino Mega and the laptop. By opening the serial monitor and entering commands like “on” and “off,” I successfully controlled the onboard LED of the Arduino Uno, as shown in the accompanying images.
“on” command
“off” command:
Serial Communication between two Arduino boards to control LEDs using Push Buttons:
Let’s elevate our project further. In this iteration, we’ll control LEDs connected to the Receiver Arduino Board by using push buttons linked to the Transmitter Arduino board. I’ve created a Proteus simulation for your convenience. If you don’t have physical LEDs and Arduino boards, you can utilize the Proteus simulation to gain practical experience and explore the project.
Serial Communication between two Arduino’s Proteus Simulation:
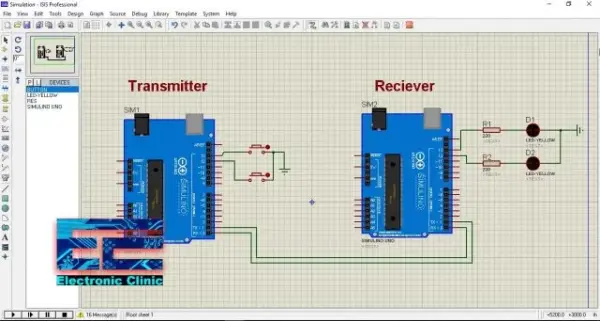
Download Proteus Simulation:
The two Arduino boards are linked in a serial connection. The Transmitter Arduino’s TX is linked to the Receiver Arduino’s RX, while the Transmitter Arduino’s RX is connected to the Receiver Arduino’s TX. Although in simulation, the grounding of both Arduinos may not seem necessary, in practical setups, it’s essential to establish a connection between the grounds of both Arduinos.
Two push buttons are attached to the Transmitter Arduino’s pins 12 and 13. These buttons serve the purpose of controlling LEDs connected to the Receiver Arduino’s pins 12 and 13. The connections for this setup are uncomplicated and direct.
Serial Communication between two Arduino boards, Transmitter Code:
Serial communication between two Arduino boards, Receiver Code:
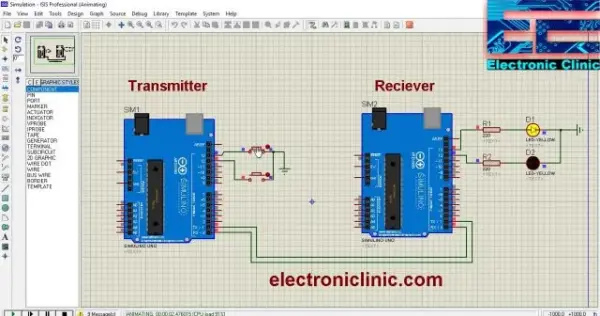
If you’re unfamiliar with generating hex files, you can utilize the hex files available in the simulation folder accompanying the Arduino codes. You’ll find the download link provided above. After adding these hex files, I successfully managed to regulate the LEDs using the push buttons, as evident in the provided images.
This concludes my article about establishing Serial Communication between two Arduino boards. I trust that you’ve gained new insights and knowledge from this piece.
- How do you wire two Arduino boards for serial communication?
Connect TX of one board to RX of the other and RX to TX, and join the grounds of both boards; use three male-to-male jumper wires. - Can one Arduino power another in this setup?
Yes, the article shows connecting 5V from one Arduino to the Vin of the other to power it. - What functions are used to send and receive serial data between Arduinos?
The article uses Serial.write to send data and Serial.readBytes or Serial.read to receive data. - How do you send a simple text message from one Arduino to another?
Define a character array like Mymessage, initialize Serial at 9600, then use Serial.write(Mymessage,5) in loop with a delay. - How does the Arduino Mega control the Uno LED via serial?
The Mega reads commands from Serial Monitor, translates on/off to numeric codes, and sends them over Serial1 to the Uno, which sets pin 13 HIGH or LOW based on received codes. - What baud rate should be used between sender and receiver?
Use the same baud rate on both boards; the examples use 9600. - How can push buttons on a transmitter control LEDs on a receiver?
The transmitter reads button states and Serial.write sends '1' or '2'; the receiver reads Serial and writes HIGH to corresponding LED pins when characters are received. - Does the article provide a simulation option?
Yes, a Proteus simulation is provided so users without hardware can test the project.