
Summary of DC Motor featuring 4Duino-24
This article explains how to control a DC motor's speed and direction using a 4Duino microcontroller, an L293D driver IC, and PWM signals via Workshop 4 software. It details the circuit setup, including power supply connections, and outlines the programming steps required to upload code for motor operation.
Parts used in the DC Motor Control Project:
- 4Duino
- DC motor rated between 4.5V – 12V (N20 Micro Metal Gear Motor)
- L293D quad half-h drivers IC
- Jumper cables
- AA batteries (4–6 units)
- Battery holder
- Micro USB cable
- µSD card
In this project, we will learn how to control the speed and direction of a DC motor via I/O ports with PWM output capability, a L293D quad half-h drivers IC and 4D Workshop widgets.
In its simplest form, a DC motor has two wires which is connected to a power supply. Depend on whichever way current flows in the DC motor, this will determine the direction in which the motor will spin.
Motors are often used in conjunction with a motor driver to allow speed and direction control via a microcontroller. To fully explain the functionality of the motor driver, we will have a look at a screenshot of the datasheet below. (From Texas Instruments)
There are four input and output channels in the IC itself (1A, 1Y makes one channel). To drive a motor in forward and reverse we would require the use of two channels. You would use the #A pins to input signals from your microcontroller to the driver, while the #Y pins will output an amplified signal. The EN pins are used to open and close two channels at one time, and their main purpose is to stop any currents going to the motor completely. The EN pin in this project will be connected to a PWM enabled pin on the 4Duino to control the speed of the motor.
How it works
Components
- 4Duino
- 1 x DC motor rated between 4.5V – 12V (N20 Micro Metal Gear Motor used in this project)
- 1 x L293D IC
- Jumper cables
- AA batteries (about 4 – 6 will be sufficient)
- Battery holder
- Micro USB cable
- µSD card
Implementation
Step 1: Build
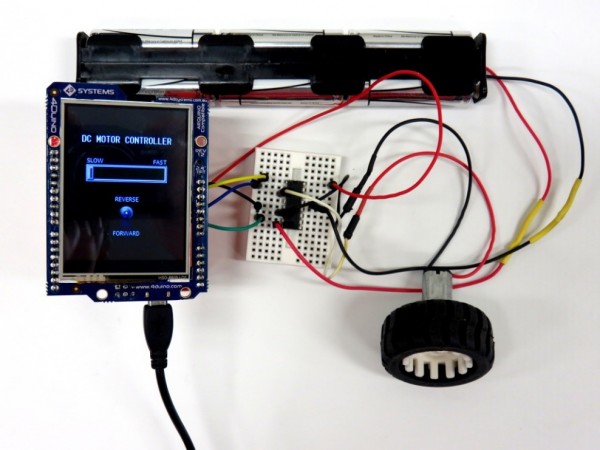
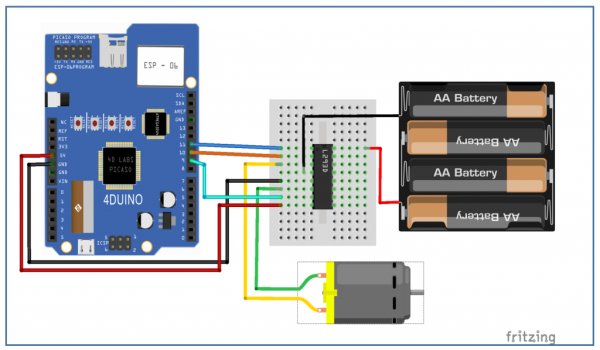
Build the circuit as shown in the following diagram and schematic.
Step 2: Program
Workshop 4 – 4Duino Basic Graphics environment is used to program this project.
This project requires the Arduino IDE to be installed, as Workshop calls the Arduino IDE for compiling the Arduino sketches. The Arduino IDE, however is not required to be opened or modified to program the 4Duino.
Open this file using Workshop 4.
Note: Download the code here.
Step3: Comms Port
Connect the 4Duino to the PC using µUSB cable.
Then navigate to the Comms tab and select the Comms port to which the 4Duino connected.
Step4: Compile and Upload
Finally, go back to “Home” tab and now click on the “Comp’nLoad” button.
Read more: DC Motor featuring 4Duino-24
- How does current flow determine motor direction?
The direction the motor spins is determined by whichever way current flows through its two wires. - What pins are used to input signals from the microcontroller?
The #A pins on the L293D IC are used to input signals from the microcontroller to the driver. - Which pins output the amplified signal to the motor?
The #Y pins will output an amplified signal to drive the motor. - What is the main purpose of the EN pins?
The EN pins open and close two channels at one time to stop any currents going to the motor completely. - How is the motor speed controlled in this project?
The EN pin is connected to a PWM enabled pin on the 4Duino to control the speed of the motor. - What software environment is used to program this project?
Workshop 4 – 4Duino Basic Graphics environment is used to program this project. - Is the Arduino IDE required to be opened during programming?
No, the Arduino IDE is not required to be opened or modified as Workshop calls it for compiling sketches. - What button is clicked to compile and upload the code?
You must click the Comp'nLoad button in the Home tab to compile and upload the code.
