Introduction:
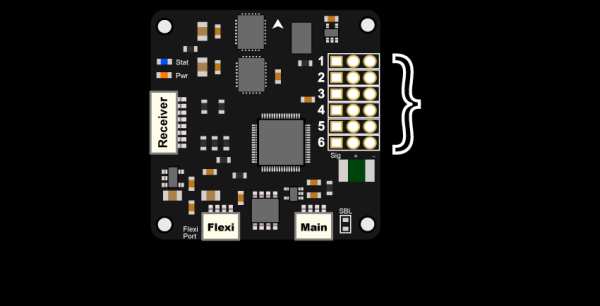
The CC3D is a powerful and affordable flight controller that is very popular to use mainly on mini quad copters due to its small form factor. It has many advanced features that you can use if you add a GPS module, even way point based flight,. However, most users don’t bother with this for mini quad copters and just want the basic setup. This tutorial covers only the basic steps to change the firmware of cc3d Flight Controller.But if you want to know more about the cc3d controller, please ask the google, or for the basic idea please see this link below.
http://www.dronetrest.com/t/cc3d-flight-controller…
Step 1: Changing the Cc3d Firmware to Clean Flight From Openpilot
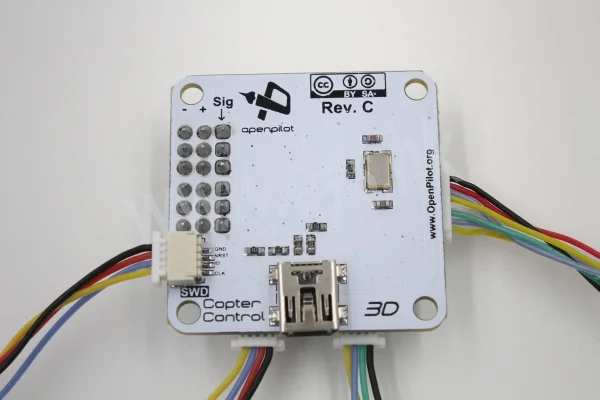
If, you flip the cc3d board you can see a micro usb connection on the cc3d.After connecting the usb to your pc, it might ask you to download drives,then do it. now follow the below steps
- Remove Props and pull apart Quad
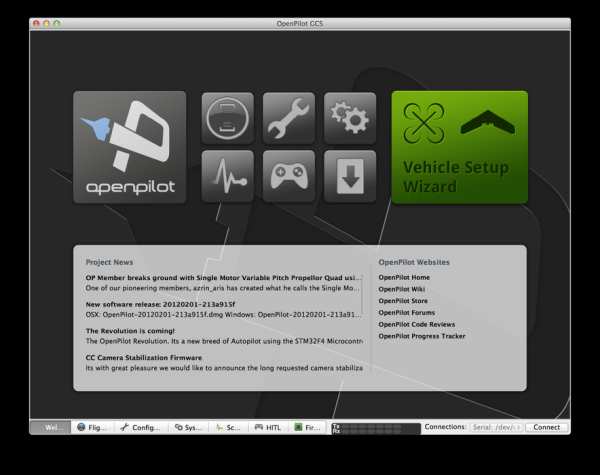
- Download OpenPilot GCS 15.02.02, You may also need the STM32 Virtual Com Port driver.
- Install the Cleanflight Configurator from the Chrome Web Store.Download Cleanflight 1.10 firmware .bin or Latest Betaflight CC3D BIN File fromhttps://github.com/cleanflight/cleanflight/release… (NOTE: You need .bin file – so thats why we have put Cleanflight 1.10 ONLY, versions after this do not have .bin file.)
- For difference on Cleanflight vs Betaflight view this article.
- On openpilot and open the firmware tab.
- Click rescue then plug in your Quad to computer via USB (no power)Click open and select .bin that you downloaded.
- Click the checkbox, I know what I’m doing!
- Click Flash
- WAIT TILL 100%
- IMPORTANT! Leave USB plugged in and power the board via esc inputClick boot (in same firmware window), motors will beep and wait till blue light on the cc3d is steadily blinking
- Close openpilotUnplug everything
- Open cleanflightPower your Quad and plug usb back in now.
- Click connect. (if it fails, try changing the port)
- Congrats! You now are on Cleanflight.
- To connect your Quad to Cleanflight you always need to use power now, plug in your battery!Place Quad on flat surface and under setup, click calibrate accelerometer.
- Change minimum throttle to 50 above what your receiver shows on Receiver tab. (usually 1000, so put 1050)
- Click Save and rebootNow goto your PID tuning.Change PID Controller to LUXFloat
- Click SAVENow
Change the following
- Change roll rate to 0.70
- Change pitch rate to 0.70
- Change YAW rate to 0.40
- TPA should be 0.00
- TPA breakpoint should be 1500
- Now goto receiver tab, and check all your transmitter channels are correct, they usually are different and you will need to reconfigure.
- I have the Avionic receiver, so for me, I had to move the following. Ch 1 moved to Ch3 Ch 3moved to Ch 5 Ch 4 moved to Ch 1 Ch 5 moved to Ch 4 (You may need to swap Ch 2 and Ch 4 around if your pitch and roll is incorrect.
- Now on the right (still receiver tab)
- change throttle to 0.50,
- throttle EXPO to 0.00,
- RC rate to 1.00, RC expo 0.00 – SaveNow
you want to set up your AUX Switches, open the Modes Tab.No mode selected = ACRO+ / Rate mode by default.Altitude mode = Angle Mode Rattitude mode = Horizon Mode If you your switch only has two positions it would look something like this.0 = Horizon Mode 1 = Acro/RateIf you have a switch that has 3 positions it may look like this. 0 = Angle 1 = Acro/rate 2=Horizon
If you have more than six channels you may want to setup ARM as a switch, as well as a buzzer, or lights.Now save your settings.
By moving your switches you should be able to test the setup. Green = mode activated, grey means Acro/Rate mode.Now we need to calibrate ESC, go to the motor tab. remember, you should have removed props at the start, if you didnt, DO THIS NOW.
Unplug batterySlide Master to MAXPlug in battery, wait for beeps.
Slide Master to MINESC Calibration is now complete, however you must test that it has worked corectly.
Arm copter, and all motors should spin at 0 throttle.
If only some do, you need to redo the above steps until they are all spinning correctly.
You now need to swap motor configuration as cleanflight configuration is different as per below.
LEFT is openpilot RIGHT is Cleanflight Copy and paste the below into the CLI tab.
mixer custommmix resetmmix 0 1.0, 1.0, -0.93, -1.0 mmix 1 1.0, -1.0, -0.93, 1.0 mmix 2 1.0, -1.0, 0.93, -1.0 mmix 3 1.0, 1.0, 0.93, 1.0
saveYour cc3d will reboot. Give it a test flight!
Make sure you are open space in case you missed a step and it crashes.
Step 2: Changing the Cc3d Firmware From Cleanflight to Openpilot
In the previous Step, i’ve already explained the procedure to changing firmware from open-pilot to clean-flight.If you are not satisfied with the flight experience of the cc3d after flashing cleanflight, then getting back to again openpilot might be the only option, even i struggled with cleanflight with motor/dropout issues, then again i cam back to openpilot, if you want too….. then follow the below steps.
1. Load the boot loader into the cc3d FC ,you can get it below
https://drive.google.com/file/d/0B-Vn6E73-uHxUXhPY…
2.Connect usb cable to your FC.
3.Burn the hex code.
4.Now to update firm ware, go to open pilot gui, click on update and erase the board options like.
5.Disconnect usb cable and it (open pilot) will ask you to connect the cable again.
6.Now it will load the latest firmware automatically.