Summary of Building a DIY Digital Voltmeter with Arduino: A Beginner’s Guide
This article details building a DIY digital voltmeter using an Arduino and a 16x2 LCD. It explains how the Arduino's internal ADC converts analog signals to digital values (0-1023) for voltage calculation based on a 5V reference. The guide covers wiring connections, including a potentiometer for brightness control and a voltage divider method for measuring voltages exceeding 5V. A provided code snippet utilizes the LiquidCrystal library to display real-time voltage readings on the screen.
Parts used in the Digital Voltmeter:
- Arduino board
- 16x2 Liquid Crystal Display (LCD)
- Potentiometer
- Jumper wires
- LiquidCrystal library
Creating a straightforward digital voltmeter with an Arduino and a 16×2 liquid crystal display (LCD) is a straightforward process.
Measuring voltages with an Arduino is relatively uncomplicated. The Arduino provides multiple analog input pins that link to an internal analog-to-digital converter (ADC). The Arduino ADC, which is a ten-bit converter, produces output values ranging from 0 to 1023. The analogRead() function allows us to retrieve this value. With knowledge of the reference voltage—in this instance, set at 5 V—it becomes simple to calculate the voltage at the analog input.
For showcasing the measured voltage, we’ll incorporate a liquid crystal display (LCD) featuring two lines, each accommodating 16 characters. LCDs are commonly employed for data display in various devices such as calculators, microwave ovens, and numerous other electrical appliances.
This project will also guide you on measuring voltages surpassing the reference voltage using a voltage divider.
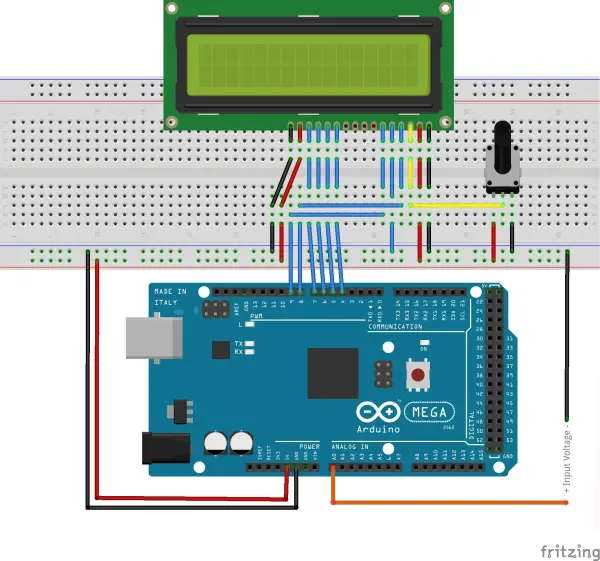
Wiring Diagram
The 16×2 LCD employed in this experiment is equipped with a total of 16 pins. As illustrated in the table provided, eight of these pins function as data lines (pins 7-14), two are designated for power and ground (pins 1 and 16), three are employed to regulate the LCD’s operation (pins 4-6), and one is dedicated to adjusting the brightness of the LCD screen (pin 3). The remaining two pins (15 and 16) are responsible for powering the backlight.
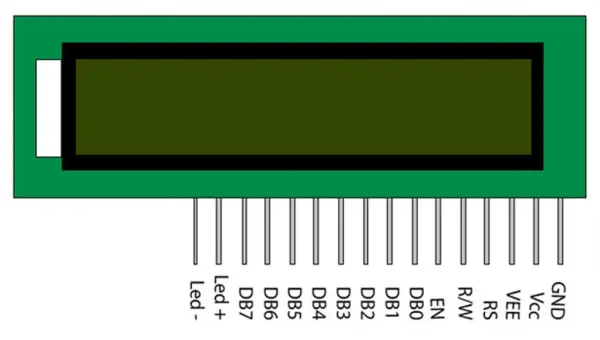
Examine the provided diagram below for guidance on connecting the LCD to the Arduino. Take note that the potentiometer links to the 5V source and GND, with its central terminal establishing a connection with pin 3 of the LCD. Adjusting this potentiometer alters the LCD brightness. The four data pins (DB4-DB7) are affixed to Arduino pins 4-7. The Enable (EN) pin connects to pin 9 of the Arduino, while RS is linked to pin 8 of the Arduino. RW is grounded. Additionally, the backlight LED is connected to both 5V and ground. The subsequent table delineates the specific pin connections:
| LCD Pin | Arduino Connection |
|———–|———————|
| Potentiometer (Middle Terminal) | Pin 3 of LCD |
| DB4 | Pin 4 of Arduino |
| DB5 | Pin 5 of Arduino |
| DB6 | Pin 6 of Arduino |
| DB7 | Pin 7 of Arduino |
| RS | Pin 8 of Arduino |
| Enable (EN) | Pin 9 of Arduino |
| RW | Ground |
| Backlight LED (5V) | 5V |
| Backlight LED (Ground) | Ground |
For brevity, the shorthand notation for the connections is also presented:
– DB4 to pin 4
– DB5 to pin 5
– DB6 to pin 6
– DB7 to pin 7
– RS to pin 8
– Enable (EN) to pin 9
Code
The provided program utilizes the LiquidCrystal library, encompassing all essential functions for LCD writing.
Within the loop, the analog input is read, and given the 5V reference voltage, the program multiplies the analog value by 5 and divides it by 1024 to derive the actual voltage. Subsequently, this calculated voltage value is then written to the LCD.
The accompanying photo displays a standard representation of the output on the LCD.
#include "LiquidCrystal.h"

LiquidCrystal lcd(8, 9, 4, 5, 6, 7);

float input_voltage = 0.0;
float temp=0.0;


void setup()
{
   Serial.begin(9600);     //  opens serial port, sets data rate to 9600 bps
   lcd.begin(16, 2);       //// set up the LCD's number of columns and rows:
   lcd.print("DIGITAL VOLTMETER");
}
void loop()
{

//Conversion formula for voltage

   int analog_value = analogRead(A0);
   input_voltage = (analog_value * 5.0) / 1024.0;


   if (input_voltage < 0.1)
   {
     input_voltage=0.0;
   }
    Serial.print("v= ");
    Serial.println(input_voltage);
    lcd.setCursor(0, 1);
    lcd.print("Voltage= ");
    lcd.print(input_voltage);
    delay(300);
}
Videos
Source: Building a DIY Digital Voltmeter with Arduino: A Beginner’s Guide
- How does the Arduino measure voltage?
The Arduino uses its internal ten-bit analog-to-digital converter which outputs values from 0 to 1023. - What is the reference voltage used in this project?
The reference voltage is set at 5 V. - Can this project measure voltages higher than the reference voltage?
Yes, the project guides users on measuring voltages surpassing the reference voltage using a voltage divider. - Which pins connect the data lines of the LCD to the Arduino?
The DB4 through DB7 data lines connect to Arduino pins 4, 5, 6, and 7 respectively. - How is the LCD brightness adjusted?
A potentiometer links to the 5V source and GND, with its central terminal connected to pin 3 of the LCD. - What formula calculates the actual voltage in the code?
The program multiplies the analog value by 5.0 and divides it by 1024.0. - Which library is required for the LCD writing functions?
The program utilizes the LiquidCrystal library. - What happens if the input voltage is less than 0.1?
The code sets the input voltage variable to 0.0.