
Summary of Bubblesteen Bubble Machine using an Arduino
This project describes the Bubblesteen Bubble Machine: a spherical, servo-driven bubble orb with robotic edge detection built around an Arduino and motor shield, using servos and a DC motor to create and track bubbles for interactive play. The author explains components, construction tips, and references code and resources for assembly.
Parts used in the Bubblesteen Bubble Machine:
- Arduino Duemilanove
- Motor shield (Adafruit motor shield)
- Micro servos (Hextronik HXT 500 used)
- DC toy motor (3V–12V range)
- Bubble mix
- Perforated metal tape
- Nuts and bolts (various sizes)
- Diamond plate (platform)
- Aluminum channel
- Threaded rod hanger/plate
- Earthquake putty or museum wax
- 5 minute epoxy
- 1/4 inch acrylic sheet (approximately 6" x 6")
- Acrylic adhesive
Is it a 3D Spherical Atmosphere Encapsulated Phosphorous Printer? YES!
Is it a CNC Anti Gravity transparent Orb Machine! YES!
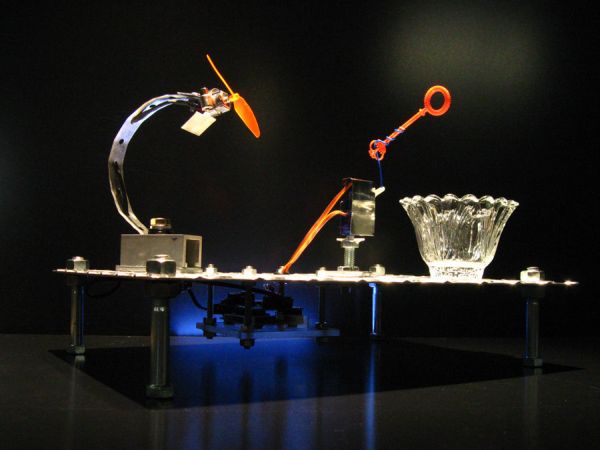
Its The Bubblesteen Bubble Machine! The spherical miracle that kids and cats have been waiting for. It comes complete with robotic edge detection( when a bubble hits an edge it pops, thus the edge has been detected).
Turn up the sound and watch Lester the cat battle it out with the Bubblesteen!
* No animals were harmed during testing.
This project came about after playing around with pan and tilt using servos. Most of the pan and tilt senereos I saw involved using webcams or some type of camera, which pan and tilt is perfect for. There are some good instructables and how-to’s on the web for this very thing.
I may not have an available camera, but I did have some bubble mix 🙂
Step 1: Things you will need
This list is mostly for the electronic and mechanical stuff. How you create your own Bubblesteen will depend on your creativity and what you have laying around.
I will also include small tips on the materials I used and things to be careful of
- 1. Arduino Duemilanove $30.00
- 1 motor shield $19.50 (www.adafruit.com) * It is made to fit the Duemilanove
- 2 micro servos- I used Hextronik HXT 500 $3.50 each (www.hobbyking.com)
- 1 DC toy motor- something between 3v and 12v – easy to find, motor shield docs will help you decide if what you may already have will work.
- 1 thing of bubble mix. – find at CVS or a dollar store. Some work better than others
These things I used, but are not critical. This is where your own creativity will need to come to play.
- 1 roll of perferated metal tape- any hardware store
- nuts and bolts of various sizes – thread count not critical 🙂
- diamond plate- local scrap yard
- aluminum channel- local scrap yard
- 1 threaded rod hanger/ plate
- earthquake putty or museum wax
- 5 minute epoxy
- 1/4″ acrylic sheet- about 6″ x 6″ worth
- acrylic adhesive
The tools you need will once again depend on what you build yours out of.
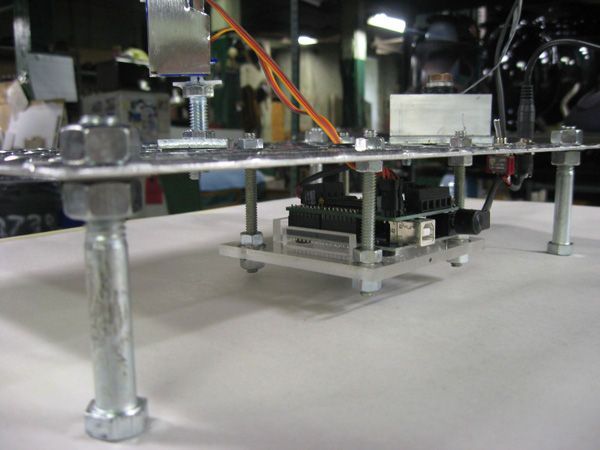
Step 2: Dealing with the micro controller
I will say that Ladyada’s site www.adafruit.com is great for tutorials and buying arduino related stuff. In fact, you should refer to her site about using the Adafruit motor shield anyway.
The instructions on using the motor shield will tell you where to hook in the servo and DC motor, so I will not go into those details.
The code I used is posted below.
It is not the most elegant and for the most part hobbled together, but it works. Make sure you have the library for the motor shield
 bubble_servo_DCMotor_april24b.pde
Step 3: Putting it together
I had some diamond plate at the shop, so this became the platform.
Tip # 1 – The reason the arduino will be mounted below the platform is so it won’t get wet. I am pretty positive a wet microcontroller doesn’t work very well. Stuff will spash around!
- 1. Arduino Duemilanove
- 1 motor shield
- 2 micro servos
For more detail: Bubblesteen Bubble Machine using an Arduino
- Is the Bubblesteen a 3D spherical bubble device?
Yes; it is described as a spherical bubble machine called the Bubblesteen. - Does the project use an Arduino?
Yes; it uses an Arduino Duemilanove as the microcontroller. - Do I need a motor shield for this project?
Yes; the project uses a motor shield made to fit the Duemilanove (Adafruit motor shield). - Are servos required for the pan and tilt mechanism?
Yes; two micro servos are used for pan and tilt control. - Does the project include edge detection for bubbles?
Yes; it has robotic edge detection that pops bubbles when they hit an edge. - Is a DC motor part of the build?
Yes; a DC toy motor (between 3V and 12V) is used. - Can I protect the Arduino from water exposure?
Yes; the Arduino is mounted below the platform to avoid getting wet. - Is bubble mix necessary for operation?
Yes; bubble mix is required and different mixes perform differently. - Is the Adafruit site recommended for help?
Yes; Ladyada's Adafruit site is recommended for tutorials and motor shield guidance.