This project I wanted to build a better and more full-featured version of my present automatic soap dispenser.
This one can be improved a lot, and you left excellent suggestions in the video comments which I would like to incorporate in this version.
Full Project Video:
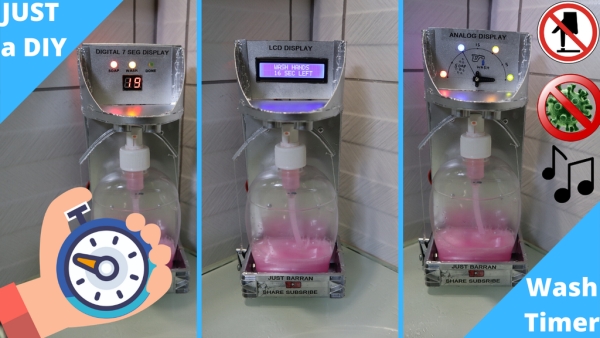
V2.0 Features:
- Automatically dispense soap when hand detected
- Hand wash timer
- Interchangeable displays
- LCD display
- Digital 7 segment display
- Speedometer type display
- Audio Feedback
- Plays Music
- Low voltage warning < 6
- 6-12V input
- Easy to change the bottle
You can check out my full project video below:
Supplies
Optional Frame parts:
- Old DVD, GAME CD cases X 4 (Plexi can also work)
- Super stacker crayon box
- IC DIP Tubing
- 3m Nylon Standoff https://amzn.to/2UfvQf8
- Fishing line Clear
- 1/2 inch Gypsum screws X 6
- nut and bolts
You could basically use anything you have for the frame.
Electronics:
- Arduino nano https://amzn.to/2AannTw
- Arduino Nano (clone) https://amzn.to/375Bu8H
- Micro Servo for Dispenser https://amzn.to/3743v0u
- Male Headers https://amzn.to/2UgOseF
- Solderable breadboard https://amzn.to/2MzXq2p
- Mini Solderable Breadboard https://amzn.to/3eU6riX
- Solid core wire https://amzn.to/3cGlAmq
- Buzzer https://amzn.to/2Mw8oGc
- 6v regulator https://amzn.to/3eTwJ4N
- ribbon wire https://amzn.to/2Y5bIxx
- Ultrasonic Sensor https://amzn.to/3h0Ol0I
- JST Connectors https://amzn.to/2MBiYeZ
- LEDs X 4 (any colours) (3 for 7 Seg display, 4 for analog display) https://amzn.to/3h1Pfd4
- ~220 Resistors to protect LEDs X 4 https://amzn.to/377BmG4
- 10K ohm resistors x 2 https://amzn.to/377BmG4
- I2c 2 line LCD display (optional) https://amzn.to/2UfWtk8
- 7 segment display (optional) https://amzn.to/2BEUm2T
- Micro Servo for Analog display (optional) https://amzn.to/3743v0u
- 2s Lipo Battery (optional) https://amzn.to/2MAkRsE
- Libo Charger https://amzn.to/2Y7z5Gt
Tools and equipment:
- Solder iron
- glue gun
- geometry set
- carving knife
- Silver spray paint
- Markers
This post contains affiliate links, which help support my channel.
If you purchase through one of my links I may earn a small commission; at no extra cost to you.
Step 1: The Frame
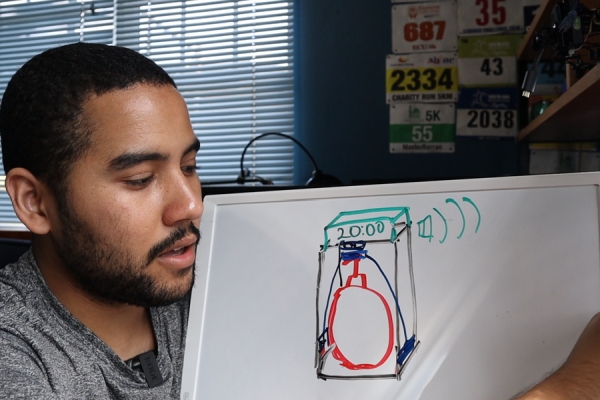
Starting off with the design, I wanted this version to have a minimal footprint. I would have the wash timer and sensor to the top and have the electronics to the back.
I am using my usual super stacker crayon box for the base. You can get these at Walmart for a dollar, and they make great electronic project boxes.https://www.walmart.com/ip/Super-Stacker-Plastic-C…
For the structure, I am using some DIP IC tubes and some old DVD and XBOX CD cases. Cause who used DVDs anymore. Wood or anything else would have worked.
My soap dispenser is about 7 inches high, adding about a half-inch would give you enough room for the ultrasound sensor and dispensing mechanism.
I cut the IC tubing in half to provide me with two 10 inch lengths for the back support, which gave me an extra 2 and a half inches for a display at the top. I used some half in gypsum screw to secure the tubing to the base.
I originally planned to used pencils to add support for the top, but it was a tight fit for the dispenser.
I measured the size of the base to cut a piece of the DVD case for the top deck.
Super Stacker Crayon Box Dimensions: L x W x H 4.25 x 3.25 x 1.25 inches
This deck had to have a sensor to detect a hand, so I made sure to extend an extra inch out.
Top Deck: L x W 4.25 x 4 inches
I cut everything to size and used hot glue to secure everything in place. I then removed the pencils. I added triangular support to hold the top deck. I pulled in the sides to make a rounded better-looking top and use a thin piece of plastic to finish the look. I then made holes for the ultrasound distance sensor and started working on the electronics.
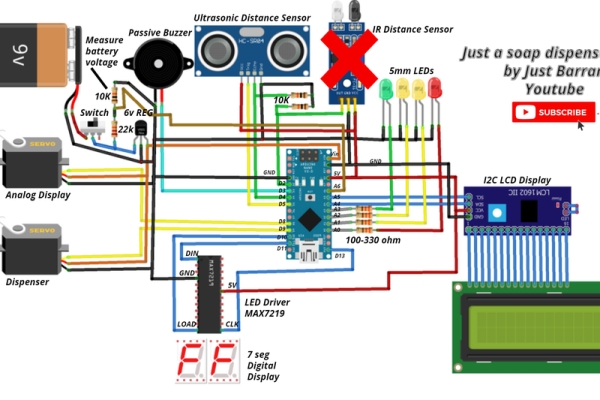
Step 2: Circuit Diagram
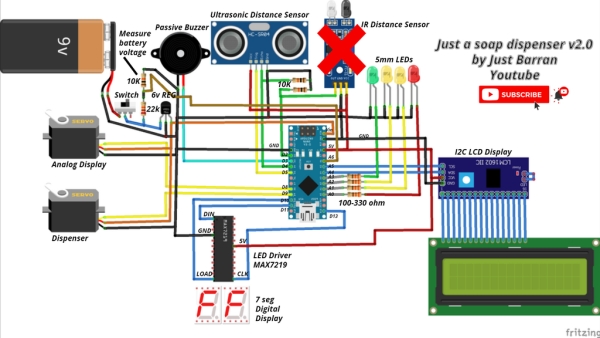
I decided to use an Arduino nano as the brain of this project since it is small and it could fit nicely on a breadboard.
With this Circuit Diagram, I would be able to run the 3 different displays all at once.
- I added a buzzer for the audio feedback.
- A voltage divider to check if the battery is low.
Max input 16V
R1 = 22K
R2 = 10K
Output = 5K
http://www.ohmslawcalculator.com/voltage-divider-c…
- 6v regulator to power the servos
- power switch
- lots of LEDs.
To make the 7 Segment display: https://www.maximintegrated.com/en/products/power/…
I left a few extra control pins to add other elements in the future. I really would like to control the tap from this, but that’s for another project.
Step 3: Code
If you get any problem programming the nano, You may have to change the processor to Old bootloader. You can learn more about Arduino from my videos.
To get the display to work, you need the LiquidCrystal_PCF8574 library by Matthias Hertel. This can be found in the Arduino library manager.
For the Digital 7 segment display, I built this from scratch and used the MAX7219 led display driver. You can also buy this online ready-made. You need the LEDControl Libary by Eberhard to drive this display; this is also found in the Arduino library manager.
Code: https://github.com/justbarran/Automatic-soap-dispe…
Needed Libraries:
LedControl By Eberhard Fahle http://wayoda.github.io/LedControl/
LiquidCrystal_PCF8574 By Matthias Hertel http://www.mathertel.de/Arduino/LiquidCrystal_PCF8…
If you do not know your i2c LCD address, you can use this I2C Scanner
https://playground.arduino.cc/Main/I2cScanner/
Code Settings:
#define lcd_addr 0x3f //LCD i2c ADDRESS
#define voltage_const 1.5 //I am using a R1=22k and R2=10k for 16V -> 5V VOLTAGE devider // (R1+R2)/R2 #define voltage_low 7.0 //Low voltage value
#define dispense_time_ms 3000 //How long to wait to get more soap
#define soap_time_s 3 //soap up time
#define wash_time_s 20 //Washing hands time
#define red_led_1 A3 // Red LED pin
#define yellow_led_1 A2 //Yellow LED pin (I changed this to a blue LED)
#define yellow_led_2 A1 //Second Yellow LED Pin
#define green_led_1 A0 //Green LED pin
#define battery_pin A6 //Battery voltage sensor pin
#define pir_pin 2 // Not used – use if you want to us a IR distance sensor
#define buzzer_pin 3 //Buzzer pin
#define echo_pin 4 // Ultrasound echo pin
#define trig_pin 5 // Ultrasound trig pin
#define servo_timer 8 // Servo pin for analog display
#define servo_soap 9 //Servo pin for dispenser
#define servo_soap_angle 220 //My Servo wasnt accurate. Ajust servo angles
#define servo_wash_angle 130 //Ajust servo angles
#define max_DIN 11 //MAX din pin
#define max_LOAD 10 //max load pin
#define max_CLK 13 //max clock pin
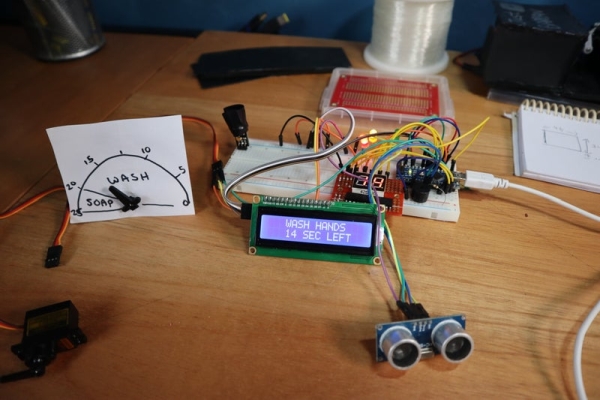
Step 4: Circuit Board
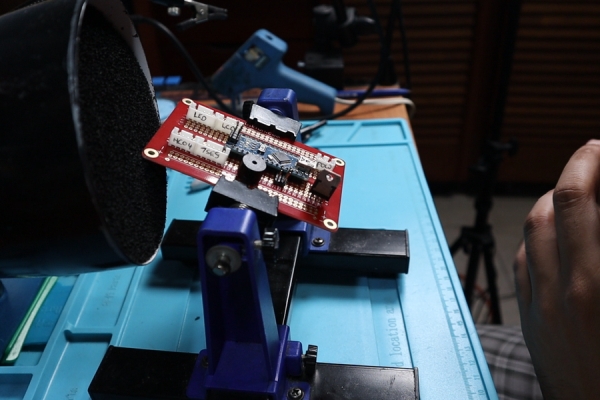
Moved over to the solder station to put everything on a solderable breadboard. These are really cool for making your projects permanent. I am using female headers to jack in the nano and JST connectors for the various other devices. 3 pin male headers for the servo pins. So everything would be modular. I plan to use a 2S lipo to power the dispenser so I added a 3 pin JST connector for that also.
Step 5: Dispenser
Now I needed to find a way to secure the micro servo to the side of the base. Using a Dremel, I filed down a side of the base to make a spot for the servo, making sure that the arm of the servo is inline with the centre of the base. I then cut a piece of the harder Xbox CD case plastic to clamp the servo between two 1 inch screws which I secured with nuts. Again making sure I am not restricting the movement of the arm or affecting the dispenser.
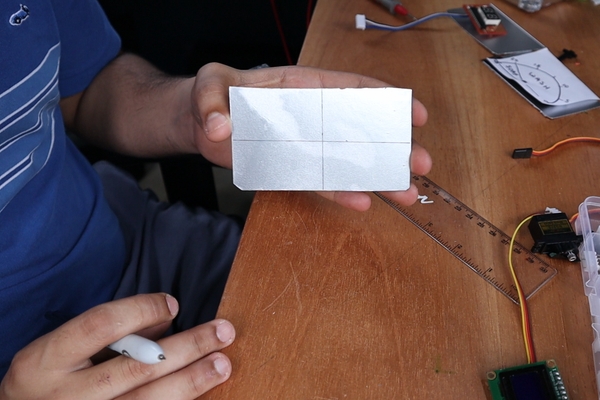
Next, how to display the displays. I wanted these displays to be interchangeable, so everyone could get a good idea of which one they liked best. So I figure out I and use to pieces of plastic to make a slide-in and out system. I really outdid myself here. Once that was done I cut about 5 pieces these where about 4 inches by 2 1/2 inches. Give me a lot of display real estate. I also cut a piece of plastic to cover the top of the ultrasonic sensor. Now It was time for the paint job. For this version, I am going with silver spray paint, and I must say it came out great.
Next, I used some M3 nylon standoff to secure the circuit board to the back of the dispenser.
Step 6: Wiring Up
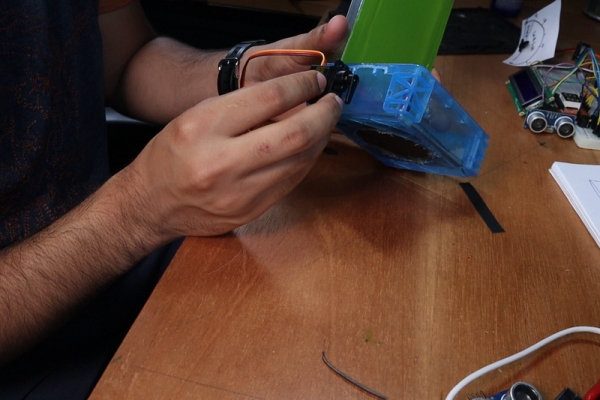
I soldered ribbon wires to the ultrasonic sensor. This had to be long enough to reach the connector on the main circuit board. I then crimped a 4 pin female JST connector to the other end. Using hot glue, I stuck the top plate down covering to the ultrasonic sensor.
Step 7: LCD Display
I then drew centre lines on the back of one of a sliding plate. I measure the LCD display screen and used a carving knife to cut a rectangle for the display. This was then secured with hot glue. Like the ultrasonic sensor, I wired up the LCD like in the circuit diagram and added a JST connector to the end.
Source: Automatic Soap Dispenser With Hand Wash Timer