Summary of Arduino Ping Pong Ball Cannon
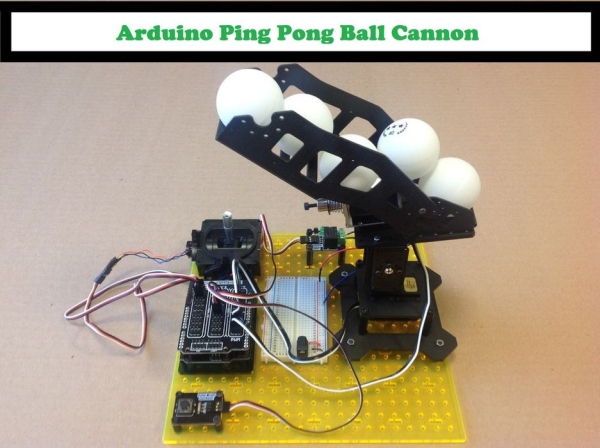
This article details building an Arduino-controlled ping pong ball cannon using a Trossen Robotics Pan and Tilt kit. The system features joystick-based aiming and a pushbutton-activated solenoid for firing, powered by a 24V supply and controlled via a relay.
Parts used in the Arduino Ping Pong Ball Cannon:
- Arduino board (RobotGeek Geekduino)
- Trossen Robotics Pan and Tilt Kit
- Solenoid (Medium Solenoid)
- Relay
- Three pin sensor cables
- 2.1mm barrel jack
- 24 volt power supply
- Joystick
- Pushbutton
- Arduino mount
- Sensor shield
- Breadboard
- U bracket
- Large metal servo arm
- Standoffs (10mm or 20mm)
Overview:
This instructable uses a Trossen Robotics Pan and Tilt kit to construct an Arduino controlled ping pong ball cannon. The project also uses several other components from Trossen Robotics including a medium solenoid, a relay and various items from one of their Robotics Grab Bags. A joystick controls the aiming of the cannon and a pushbutton controls the solenoid that fires the cannon.
Step 1: List of Materials
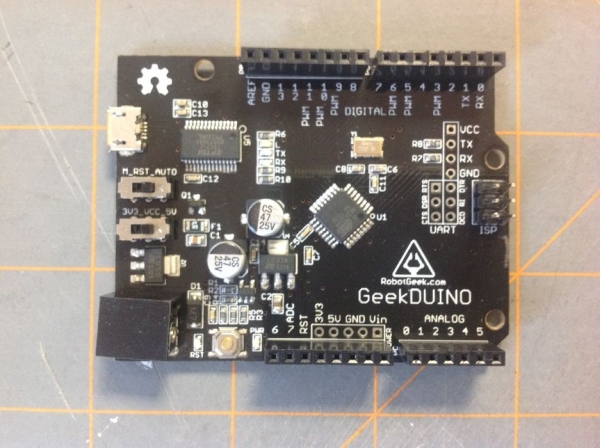
Arduino board (I used the RobotGeek Geekduino)
Trossen Robotics Pan and Tilt Kit
2.1mm barrel jack
24 volt power supply
Workbench
Joystick
Pushbutton
Arduino mount
Sensor shield
Breadboard
U bracket
Large metal servo arm
The last eight items I obtained from a Robotics Grab Bag.
Step 2: Build the Pan and Tilt Kit
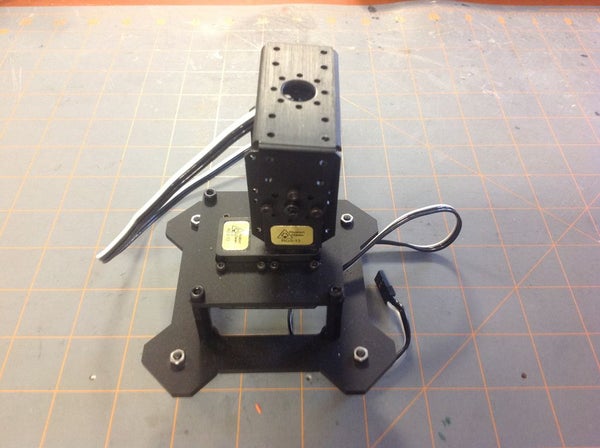
Detailed step by step instructions are available at the manufacturer’s website.
Step 3: Cannon Construction
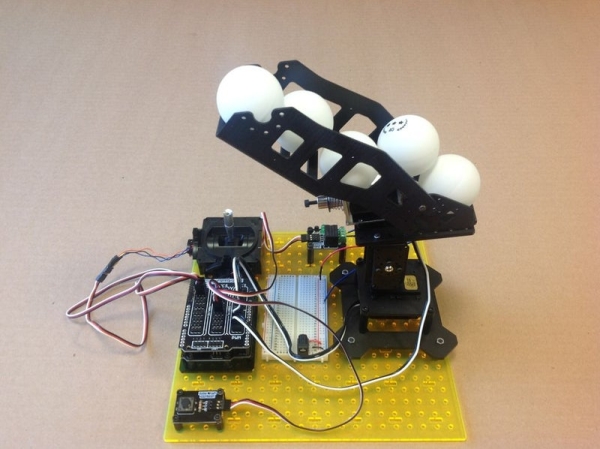
The pan and tilt kit, relay, Arduino mount and pushbutton attach directly to the workbench with 10mm or 20mm standoffs. Most Trossen Robotics kits come with extra standoffs and spacers and even more can be obtained with a standoff variety pack. The half breadboard can be adhered to the workbench or just set loosely in place. My 24 volt power supply has a 2.1mm connector which I attach to the breadboard with the 2.1mm barrel jack with jumpers supplying power to the positive and negative breadboard rails. The solenoid and U bracket were screwed directly to the pan and tilt platform. Two small spacers allowed the large servo arm to connect to the U bracket to form the ping pong ball loader. (See the figures above.) When fully loaded, gravity loads the next ball after one is fired. Trial and error was used to determine the best angle for ball loading. One solenoid wire is connected to the normally open contact on the relay and the other solenoid wire is connected to the negative rail of the 24 volt power supply. The common contact on the relay is connected to the positive rail of the 24 volt power supply. All connections to the Arduino are made with three pin sensor cables. The pan and tilt servos are attached to pins 10 and 11, the relay to pin 7, the pushbutton to pin 2 and the joystick to analog pins 0 and 1.
Step 4: Arduino Code
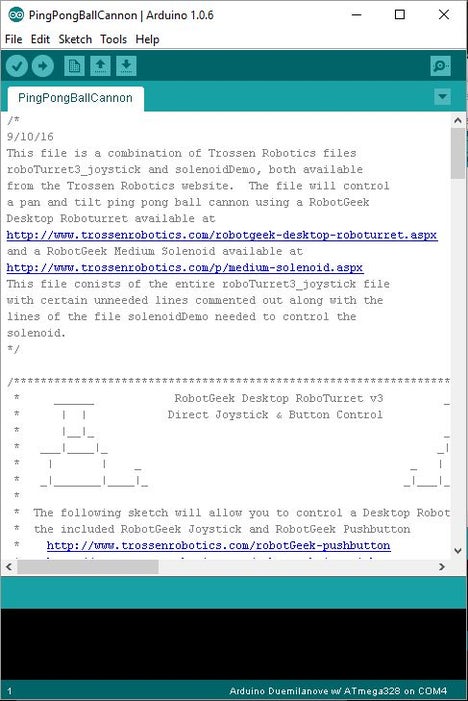
If you cut and paste the code below, be aware that some commented lines have wrapped around, so you may have to do some minor editing to get it to compile. For some reason I wasn’t able to upload the .ino file. The next step (Step 5) contains the exact same code without any comments, which may be easier to cut and paste, but harder to read.
/*
9/18/16
This file is a combination of the Trossen Robotics files
roboTurret3_joystick and directControlSolenoid. The file will
control a pan and tilt ping pong ball cannon using a RobotGeek
Pan and Tilt Kit available at
http://www.trossenrobotics.com/robotgeek-pantilt.a…
and a RobotGeek Medium Solenoid available at
http://www.trossenrobotics.com/p/medium-solenoid.a…
This file consists of the entire roboTurret3_joystick file
with certain unneeded lines commented out along with some
lines of the file directControlSolenoid (with renamed variables) added to
control the solenoid. The roboTurret3_joystick file is actually for a
different product, the RobotGeek Desktop Roboturret,
but it worked fine with the Pan and Tilt kit.
*/
/***********************************************************************************
* ______ RobotGeek Desktop RoboTurret v3 ______
* | | Direct Joystick & Button Control | |
* |__|_ _|__|
* ___|____|_ _|___|___
* | | _ _ | |
* _|_______|____|_ _|___|_______|_
*
* The following sketch will allow you to control a Desktop RobotTurret v3 using
* the included RobotGeek Joystick and RobotGeek Pushbutton
* http://www.trossenrobotics.com/robotGeek-pushbutt…
* http://www.trossenrobotics.com/robotgeek-joystick…
*
* Wiring
* Pan Servo – Digital Pin 10
* Tilt Servo – Digital Pin 11
* Laser – Digital Pin 2
* Pushbutton Servo – Digital Pin 4
* Joystick(Horizontal)- Analog Pin 0
* Joystick(Vertica)l- Analog Pin 1 (erroneously marked as 2 in original file)
* Jumper for pins 9/10/11 should be set to ‘VIN’
*
* Control Behavior:
* The Horizontal Joystick will move the Pan Servo
* The Vertical Joystick will move the Tilt Servo
* The Pushbutton will toggle the laser mofule on/off
*
* External Resources
*
***********************************************************************************/
//Includes
#include
//Defines
#define PAN_PIN 10 //Pan Servo Digital Pin
#define TILT_PIN 11 //Tilt Servo Digital Pin
#define H_JOY_PIN 0 //Horizontal Joystick Analog Pin
#define V_JOY_PIN 1 //Vertical Joystick Analog Pin
// #define LASER_PIN 2 //Laser Digital Pin
#define PUSHBUTTON_PIN 4 //Pushbutton Digital Pin
//deadband values for the joysticks – values between DEADBANDLOW and DEADBANDHIGH will be ignored
#define DEADBANDLOW 480 //lower deadband value for the joysticks
#define DEADBANDHIGH 540 //upper deadband value for the joysticks
//max/min puse values in microseconds to send to the servo
#define PAN_MIN 600 //full counterclockwise for RobotGeek 180 degree servo
#define PAN_MAX 2400 //full clockwise for RobotGeek 180 degree servo
#define TILT_MIN 600 //full counterclockwise for RobotGeek 180 degree servo
#define TILT_MAX 2400 //full clockwise for RobotGeek 180 degree servo
int speed = 10; //alter this value to change the speed of the system. Higher values mean higher speeds 5-500 approximate recommended range
Servo panServo, tiltServo; // create servo objects to control the pan and tilt servos
int horizontalValue, verticalValue; //variables to hold the last reading from the analog pins for the horizontal and vertical joystick
int horizontalValueMapped, verticalValueMapped;//variables to hold mapped readings from the vertical values. These mapped readings will be appropriate to work with servo values
int panValue = 1500; //current positional value being sent to the pan servo.
int tiltValue = 1500; //current positional value being sent to the tilt servo.
//State Variables
int laserState = LOW; //The current state of the laser module
int buttonState; // the current state of the pushbuton
int lastButtonState = LOW; // the previous reading from the input pin
//Timing variables for button debouncing
long lastDebounceTime = 0; // the last time the output pin was toggled. This variable is a ‘long’ because it may need to hold many milliseconds, and a ‘long’ will afford more space than an ‘int’
int debounceDelay = 50; // the amount of time that that a button must be held, for a reading to register (in milliseconds)
//Solenoid control variables
const int fireButtonPin = 2; // Push button to fire cannon
const int relayPin = 7; // Solenoid relay control pin
int fireButtonState = 0; // variable for reading push button
void setup()
{
//initialize servos
panServo.attach(PAN_PIN, PAN_MIN, PAN_MAX); // attaches/activates the pan servo on pin PAN_PIN and sets lower/upper limits that can be sent to the servo
tiltServo.attach(TILT_PIN, TILT_MIN, TILT_MAX); // attaches/activates the tilt servo on pin TILT_PIN and sets lower/upper limits that can be sent to the servo
//initalize digital pins
pinMode(PUSHBUTTON_PIN, INPUT); //set the PUSHBUTTON Pin to an Input
// pinMode(LASER_PIN, OUTPUT); //set the LASER Pin to an output
// initialize the push button and relay pins
pinMode(fireButtonPin, INPUT);
pinMode(relayPin, OUTPUT);
//Analog pins do not need to be initialized
//write initial servo positions to set the servos to ‘home’
panServo.writeMicroseconds(panValue); //sets the pan servo position to the default ‘home’ value
tiltServo.writeMicroseconds(tiltValue);//sets the tilt servo position to the default ‘home’ value
}
void loop()
{
// read the state of the fire button:
fireButtonState = digitalRead(fireButtonPin);
// check if the pushbutton1 is pressed.
// if it is we turn on the relay/solenoid
if (fireButtonState == HIGH) {
// turn relay on:
digitalWrite(relayPin, HIGH);
}
// When we let go of the button, turn off the relay
else if ((fireButtonState == LOW) && (digitalRead(relayPin) == HIGH)) {
// turn relay off
digitalWrite(relayPin, LOW);
}
/**************Button Reading and Debouncing / Laser Control *******************************/
//In this sketch the Pushbutton will be used to toggle the laser on and off.
//When a user makes/breaks electrical contacts by pushing/releasing the pushbutton,
//the signal can ‘bounce’ between LOW and HIGH. This may cause erratic behavior,
//in this case toggling the laser on/off multiple times. To combat this, the sketch
//will ‘debounce’ the button by reading multiple times over a period of time. If a
//button is read as ‘high’ for multiple successive reads, then the signal was an
//actual button event.
//See http://arduino.cc/en/Tutorial/Debounce
int reading = digitalRead(PUSHBUTTON_PIN); //read from the digital pin PUSHBUTTON – keep in mind that a HIGH reading might be a false reading, so it must be filtered through the debounce code
//check if the current digitalRead() is different from the previous button state
if (reading != lastButtonState)
{
lastDebounceTime = millis(); //a change was detected, so reset the debouncing timer by setting it to the current time
}
//check if the amount of time that has passed between now and the lastDebounceTime is more than the
//debounceDelay
if ((millis() – lastDebounceTime) > debounceDelay)
{
//check if the button state has changed:
if (reading != buttonState)
{
buttonState = reading; //the last digitalRead was correct, so set the butonState to the value of reading
//check if the button’s current state is HIGH(which signals the program to toggle the laser)
if (buttonState == HIGH)
{
laserState = !laserState; //set the laserState to the opposite of what it was set to before
}
}
}
// digitalWrite(LASER_PIN, laserState); // set the Laser based on the lateset laser state
lastButtonState = reading; //set the lastButtonState to the value of reading for the next loop
/**************Servo Positions *******************************/
//read the values from the analog sensors/joysticks
horizontalValue = analogRead(H_JOY_PIN);
verticalValue = analogRead(V_JOY_PIN);
//check that the joystick is outisde of the deadband. Movements in the deadband should not register
if(horizontalValue < DEADBANDLOW || horizontalValue > DEADBANDHIGH)
{
//horizontalValue will hold a value between 0 and 1023 that correspods to the location of the joystick. The map() function will convert this value
//into a value between speed and -speed. This value can then be added to the current panValue to incrementley move ths servo
horizontalValueMapped = map(horizontalValue, 0, 1023, -speed, speed) ;
panValue = panValue + horizontalValueMapped; //add the horizontalValueMapped to panValue to slowly increment/decrement the tiltValue
//even though the servos have min/max value built in when servo.attach() was called, the program must still keep the
//panValue variable within the min/max bounds, or the turret may become unresponsive
panValue = max(panValue, PAN_MIN); //use the max() function to make sure the value never falls below PAN_MIN (0 degrees)
panValue = min(panValue, PAN_MAX); //use the min() function to make sute the value never goes above PAN_MAX (180 degrees)
}
//check that the joystick is outisde of the deadband. Movements in the deadband should not register
if(verticalValue < DEADBANDLOW || verticalValue > DEADBANDHIGH)
{
//horizontalValue will hold a value between 0 and 1023 that correspods to the location of the joystick. The map() function will convert this value
//into a value between speed and -speed. This value can then be added to the current panValue to incrementley move ths servo
verticalValueMapped = map(verticalValue, 0, 1023, -speed, speed) ;
tiltValue = tiltValue + verticalValueMapped; //add the verticalValueMapped to tiltValue to slowly increment/decrement the tiltValue
//even though the servos have min/max value built in when servo.attach() was called, the program must still keep the
//tiltValue variable within the min/max bounds, or the turret may become unresponsive
tiltValue = max(tiltValue, TILT_MIN);//use the max() function to make sure the value never falls below 0
tiltValue = min(tiltValue, TILT_MAX);//use the min() function to make sute the value never goes above 180
}
panServo.writeMicroseconds(panValue); // sets the servo position based on the latest panServo value
tiltServo.writeMicroseconds(tiltValue); // sets the servo position based on the latest tiltServo value
delay(15); // waits for the servo to get to they’re position before proceeding
}
Read more: Arduino Ping Pong Ball Cannon
- How is the cannon aimed?
The pan and tilt servos are controlled by a joystick connected to analog pins 0 and 1. - What component fires the ping pong balls?
A medium solenoid is activated by a pushbutton to fire the cannon. - How is the solenoid powered?
The solenoid is connected to a 24 volt power supply through a relay. - Which Arduino pins control the servos?
The pan servo uses digital pin 10 and the tilt servo uses digital pin 11. - What controls the relay operation?
The relay is triggered by a pushbutton connected to digital pin 2. - How does the ball loader work?
Gravity loads the next ball after one is fired once the large servo arm is positioned correctly. - Can the code be found in the article?
Yes, the article provides the full Arduino code with comments in Step 4. - What is the purpose of the deadband values?
Deadband values ignore small joystick movements between 480 and 540 to prevent erratic servo behavior.