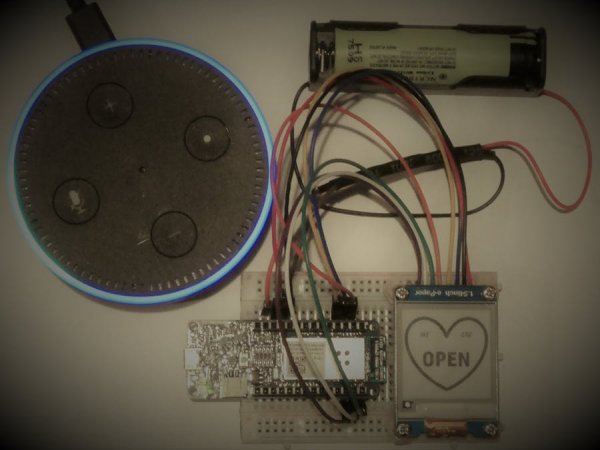
Use Alexa to tell your door sign what message to display.
Things used in this project
Hardware components |
||||||
 |
|
× | 1 | |||
|
× | 1 | ||||
|
× | 1 | ||||
|
× | 1 | ||||
 |
|
× | 1 | |||
Software apps and online services |
||||||
 |
|
|||||
 |
|
|||||
 |
|
|||||
|
||||||
Story
Why?
You are running a small “geek shop” and want to impress the first/last customer of the day? You want to leave your desk for a short break and think telling that to your colleagues – and to Alexa – should be enough effort (why should you leave a note)? Or just to show the world how cool you are? Or just for fun? 😉
Introduction & Disclaimer
This is just a demo, a prototype, a short sketch or quick recipe, how to control an e-paper display connected to an Arduino MKR1000 using Amazon’s Alexa Skills Kit.
If you look for more comprehensive information about
- the Thinger.io platform or
- how use a Waveshare 1.54 inch e-Paper Module
you are encouraged to read the associated documentation for this platforms/products.
Prerequisites
- Hardware components (see BOM)
- Arduino Desktop IDE setup for Arduino MKR1000 (see here)
- Latest WiFi firmware update for the Arduino MKR1000 (see here )
- AWS account (AWS Free Tier)
- Thinger.io account
- Optional: Amazon Echo device
About costs:
For the hardware (MKR1000 & e-paper module) you may have to spent about 50 bucks.
For developing the Alexa skill, you need an Amazon Developer account, which can be registered for free. You also need to create an AWS Lambda function. The compute service AWS Lambda is included in the AWS Free Tier with 1.000.000 requests/month for a unlimited period. To create and use AWS Free Tier resources you have to register to AWS and provide a valid credit card, which won’t be charged if you stay within the limits of the Free Tier program.
Thinger.io offers a free plan for evaluation, learning and testing. For this project you need to configure one of 2 free devices included in this plan and you probably won’t exceed the call rate limits in the free plan.
Thinger.io
Thinger.io offers “a ready to go scalable cloud infrastructure for connecting millions of devices. You can control them with our easy to use admin console, or integrate them in your business logic with our REST API. Open Source.”
The REST API to a device’s endpoints provided by the platform makes it easy to integrate a device into applications on other platforms (here the AWS platform).
First create a device from the cloud console following the documention like this:
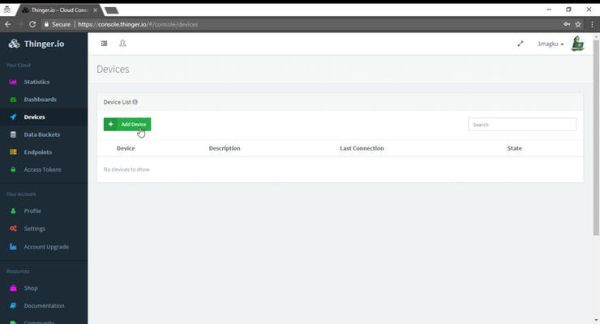 Under the “Devices” section click “Add Device”
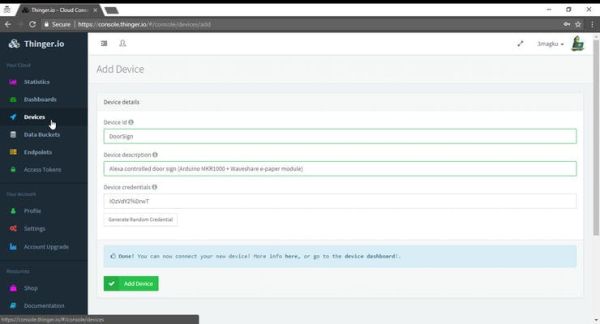
 Pick an ID, enter a description and generate a credential token.
 Note Id and token and click “Add Device”
 Your device is now setup in the platform
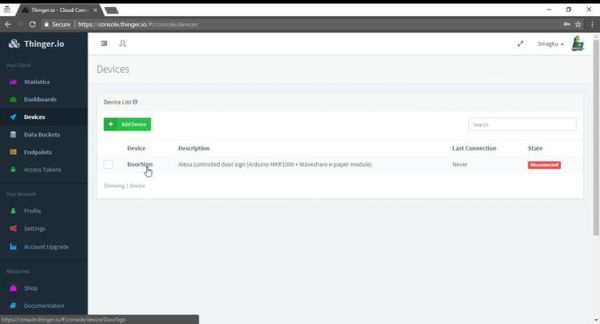 Select the newly created device from the list of your devices.
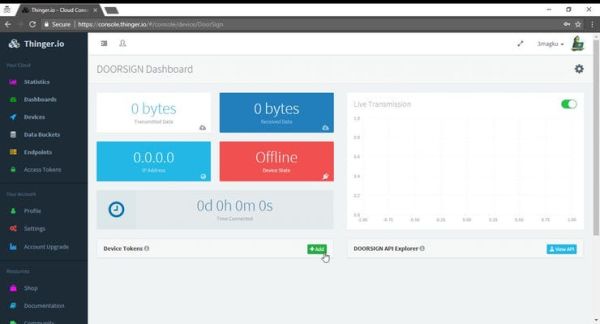 Create an additional device token.
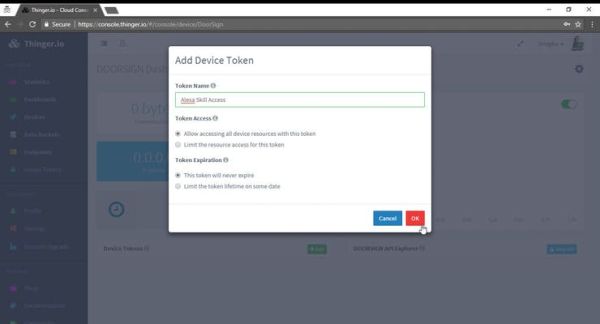 This will be the access token for the Alexa Skill application.
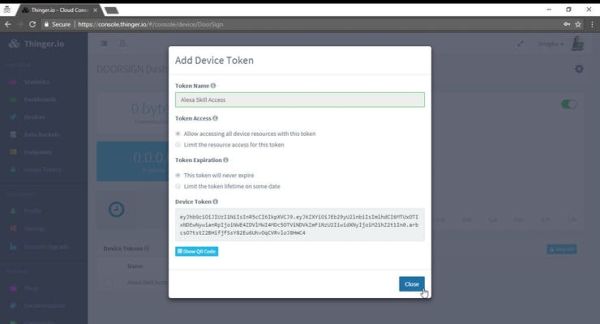 Note the generated token.
Follow these instructions for setting up your Arduino IDE and this section for the Arduino MKR1000. After uploading the customized example sketch…
#define _DEBUG_
#define _DISABLE_TLS_
#include <WiFi101.h>
#include <ThingerWifi101.h>
#define USERNAME "3magku"
#define DEVICE_ID "DoorSign"
#define DEVICE_CREDENTIAL "Iq7OxG4htORD"
#define SSID "yourWifiSsid"
#define SSID_PASSWORD "yourWifiPassword"
#define LED_PIN 6
ThingerWifi101 thing(USERNAME, DEVICE_ID, DEVICE_CREDENTIAL);
void setup() {
 Serial.begin(115200);
 // configure wifi network
 thing.add_wifi(SSID, SSID_PASSWORD);
 pinMode(LED_PIN, OUTPUT);
 // pin control example (i.e. turning on/off a light, a relay, etc)
 thing["led"] << digitalPin(LED_PIN);
 // resource output example (i.e. reading a sensor value, a variable, etc)
 thing["millis"] >> outputValue(millis());
 // more details at http://docs.thinger.io/arduino/
}
void loop() {
 thing.handle();
}
…your device status should look like this in the cloud console:
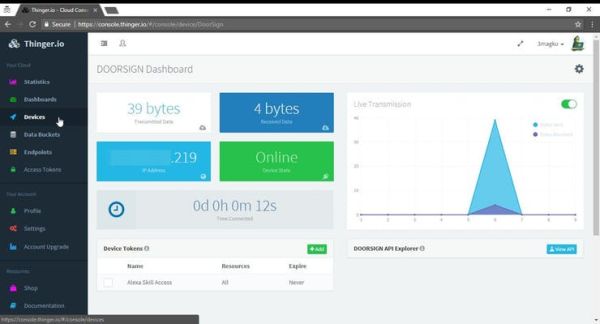 Device online
The Waveshare 1.54 inch e-Paper Module “is an E-paper device adopting the image display technology of Microencapsulated Electrophoretic Display, MED.“
The e-paper screen display patterns by reflecting ambient light and does not require a background light requirement. Once the display pattern is set/updated the module has an extreme low power consumption in standby mode (5 uA = 0.000005 A)
Since the Arduino MKR1000 provides significant more SRAM than the Arduino UNO/Mega and is 3.3 V voltage based, it is a considerable platform for using it with a Waveshare 1.54 inch e-Paper Module. The extreme low power consumption of an e-paper display makes it even more interesting to try to connect it to a board like the MKR1000 when powered by a battery.
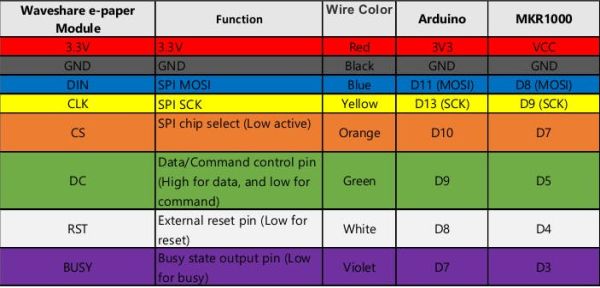
To connect the display module to the MKR1000 and run the vendor’s example program on it, you can basically follow the instructions for “Working with Arduino” from the vendors documentation and consider some differences regarding the pin layout between the MKR1000 and the UNO:
The SPI pins on the MKR1000 are D8 (MOSI), D9 (SCK), and D10 (MISO) – the SPI pins on the UNO are D11 (MOSI), D12 (MISO) and D13 (SCK).
Following the instructions from the Waveshare Wiki Page the two SPI signals SCK and MOSI must be remapped to D9 and D8 for the MKR1000. The remaining signals like CS, DC, RST and BUSY can be freely mapped to the other digital signals of the MKR1000.
This is the extend mapping table for wiring the module with the MKR1000:
The resulting wiring looks like this:
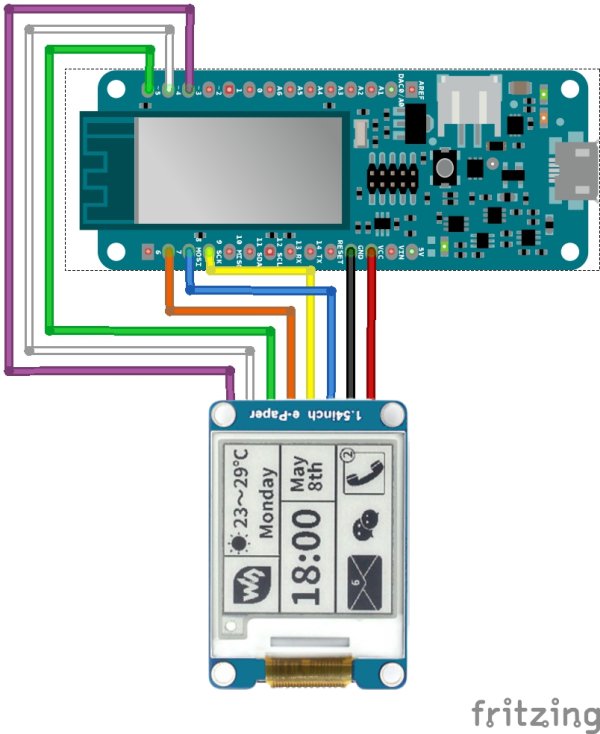 Wiring (Schema)
And the real prototype setup looks like this:

To run the vendor provided example and your own sketches, some minor changes to the provided library code are necessary:
- Download code and library from https://www.waveshare.com/wiki/File:1.54inch_e-Paper_Module_code.7z and extract the package.
- Copy the files from thedirectory arduino/libraries of the demo package to documents/arduino/libraries, the actual path can be determined by Arduino IDE –> File –> Preferences –>Sketchbook location.
- In the file libraries/ep1in54/epdif.h make the following changes to reflect the modified pin mapping for the MKR1000:
#ifndef EPDIF_H
#define EPDIF_H
#include <arduino.h>
/* COMMENT OR REMOVE THIS SECTION:
// Pin definition
#define RST_PIN 8
#define DC_PIN 9
#define CS_PIN 10
#define BUSY_PIN 7
*/
/* ADD THE FOLLOWING SECTION: */
// Custom pin definition (MKR1000)
#define RST_PIN 4
#define DC_PIN 5
#define CS_PIN 7
#define BUSY_PIN 3
class EpdIf {
- Compile and upload the demo sketch epd1in54-demo to test the module and your setup.
Door Sign – Application
The door sign application is a simple combination of the two example sketches from the previous sections: The sketch for testing the Thinger.ioconnectivity and the ep1in54-demo sketch provided by Waveshare.
For this demo we basically:
- create three small (200 x 200 px) monochrome bitmaps and convert these images to C byte arrays – see the “How to display an image” section in the Waveshare wiki.


- include these bitmap arrays in a sketch:
/* "imagedata_open.h" */
extern const unsigned char IMAGE_DATA_OPEN[];
/* "imagedata_open.coo" */
#include "imagedata_open.h"
#include <avr/pgmspace.h>
const unsigned char IMAGE_DATA_OPEN[] PROGMEM = {
/* 0X00,0X01,0XC8,0X00,0XC8,0X00, */
0xff,0xff,0xff,0xff,0xff,0xff,0xff,0xff,0xff,0xff,0xff, ...
// Image data for "We are open", "Sorry, we are closed" and "Be right back" ...
#include "imagedata_open.h"
#include "imagedata_closed.h"
#include "imagedata_brb.h"
- define an input resource and a handler for thinger.io to receive a parameter to select which image to display:
// Handle for "image" resource:
 thing["image"] << [](pson &in) {
   boolean clean = in["clean"];
   int number = in["number"];
   displayImage(clean, number);
 };
// Handler called function for displaying images:
void displayImage(boolean clean, int number)
{
 if (clean) { ePaperClear(); }
 const unsigned char *image_data;
 switch (number)
 {
   case 0:
     image_data = IMAGE_DATA_OPEN;
     break;
   case 1:
     image_data = IMAGE_DATA_AWAY;
     break;
   case 2:
     image_data = IMAGE_DATA_CLOSED;
     break;
 }
 ePaperShowImage(image_data);
}
// Clear e-ink display:
void ePaperClear()
{
 epd.ClearFrameMemory(0xFF);   // bit set = white, bit reset = black
 epd.DisplayFrame();
 epd.ClearFrameMemory(0xFF);   // bit set = white, bit reset = black
 epd.DisplayFrame();
 epd.Init(lut_partial_update);
}
// Display image on e-ink display:
void ePaperShowImage(const unsigned char image_data[])
{
 epd.SetFrameMemory(image_data);
 epd.DisplayFrame();
 epd.SetFrameMemory(image_data);
 epd.DisplayFrame();
 epd.Init(lut_partial_update);
}
The full code can be found here.
After compiling, uploading and running the code, the device should be shown as Online in the thinger.io device status board and after clicking on the View API button you should see the previously defined input resource as image – Private in the DOORSIGN API. When you expand this item you’ll see the input parameters and you’ll be able to send a request to your device:
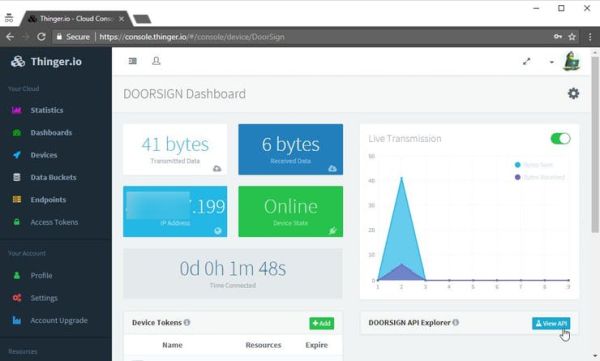 DOORSIGN Dashboard
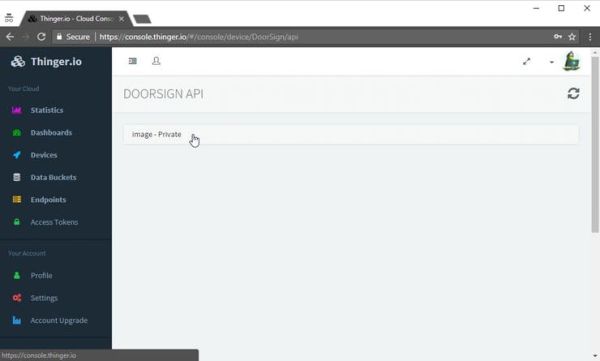 Doorsign Api

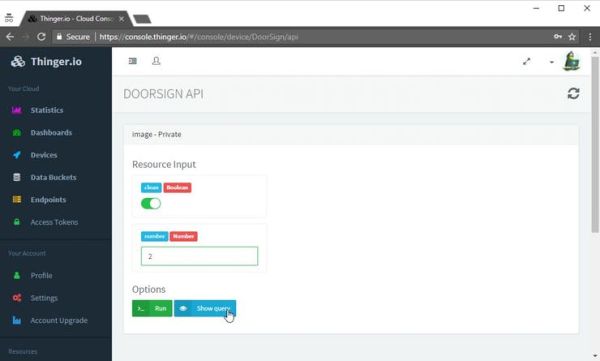
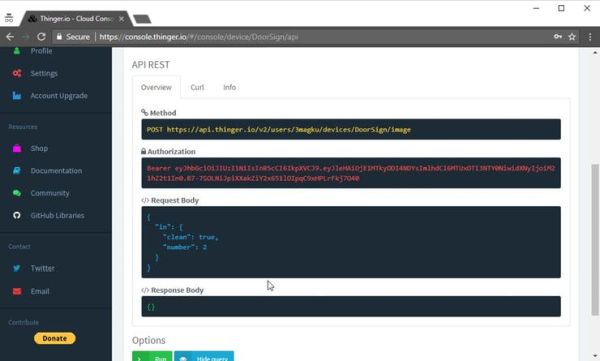
The REST call shown if you select Show query will be used later in the AWS Lambda function.
More information on the thinger.io Server API can be found here.
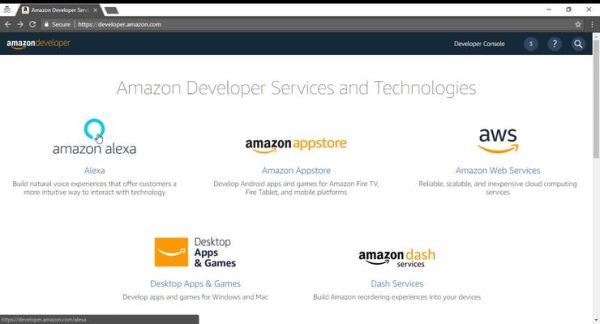
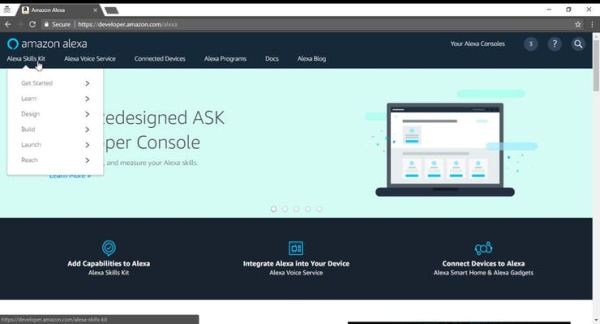
Alexa Skill
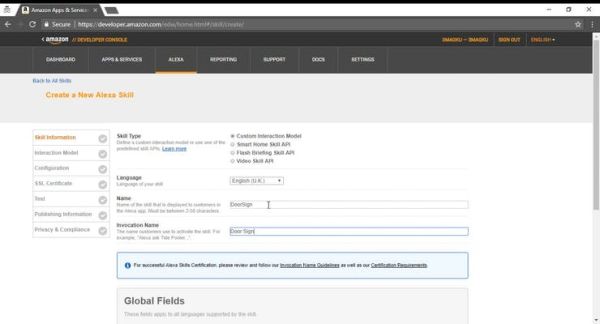
Create the Alexa Skill starting at the Amazon Developer Console:
- Leave the Skill Type as Custom Interaction Model.
- If your device uses English(U.K.) change the language to English(U.K.).
- Pick a Name, e.g. “Door Sign”.
- Leave all other Global Fields to No.
- Save.
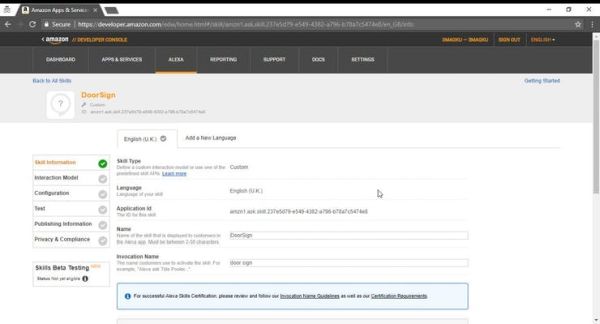
- Note the newly created Application ID on the next screen.
- Click Next.

Next define
- an Intent Schema (see below)
{
 "intents": [
    {
 "slots": [
        {
 "name": "Status",
 "type": "STATUS_TYPE"
        }
      ],
 "intent": "ShowStatus"
    },
    {
 "intent": "AMAZON.HelpIntent"
    },
    {
 "intent": "AMAZON.StopIntent"
    }
  ]
}
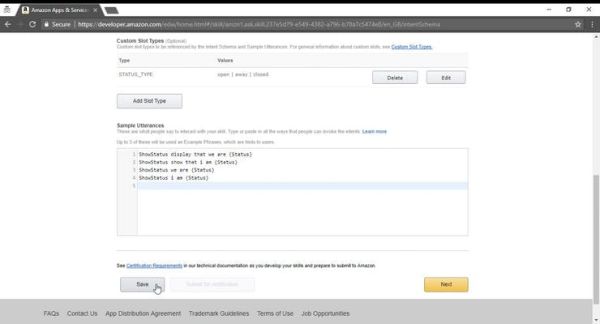
- a custom Slot Type “STATUS_TYPE” with values “open”, “away” and “closed”
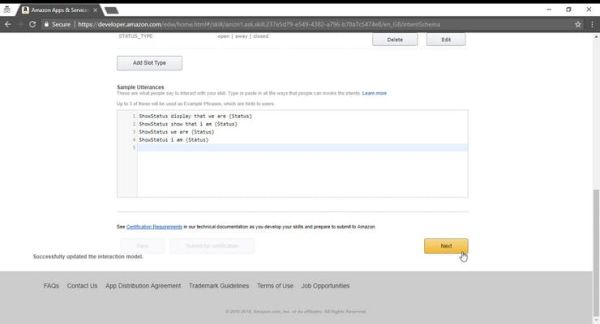
- and Sample Utterances (see below)
ShowStatus display that we are {Status}
ShowStatus show that i am {Status}
ShowStatus we are {Status}
ShowStatus i am {Status}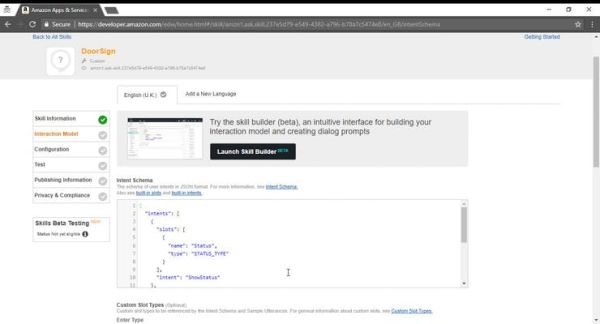 Interaction Model: Intent Schema
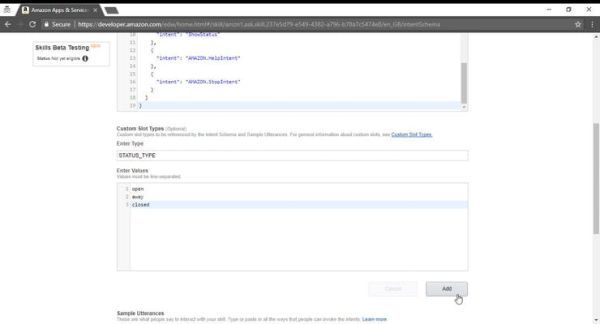
AWS Lambda
As endpoint for the Skill, we create an AWS Lambda function.
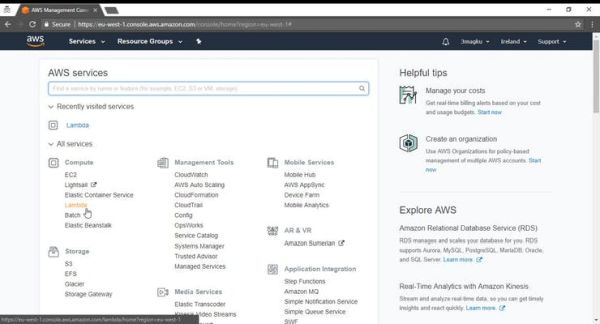
- Sign-in to the AWS Management Console,
- Select All Services > Compute > Lambda
- Select Create Function
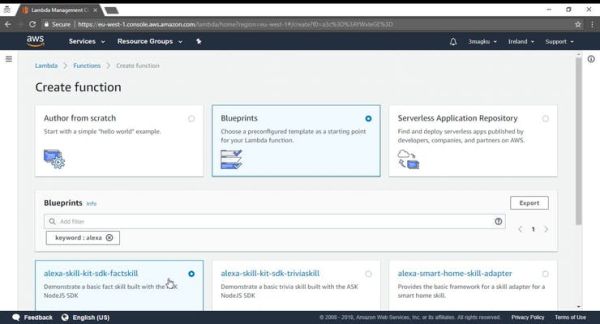
- Choose Blueprints and filter by entering “alexa”
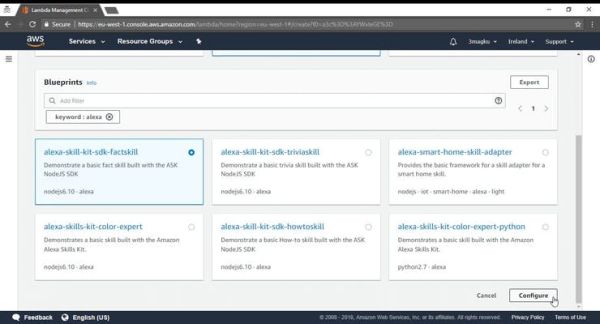
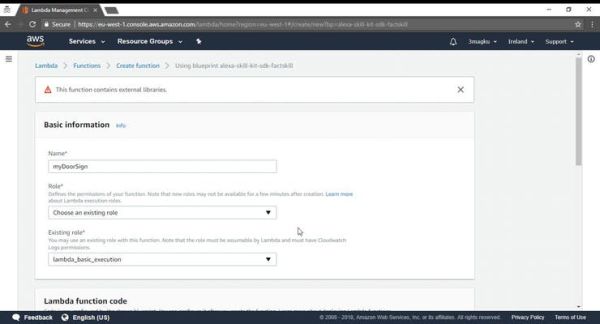
- Choose any blueprint e.g. the alexa-skill-kit-sdk-factskill (Node.js) and click Configure
- Pick a name for your function e.g. myDoorSign
- Select an existing role or define a new one (see here)
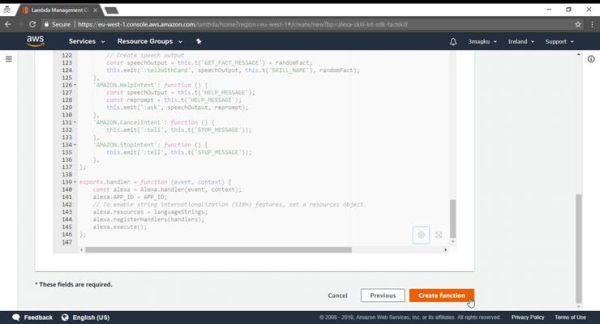
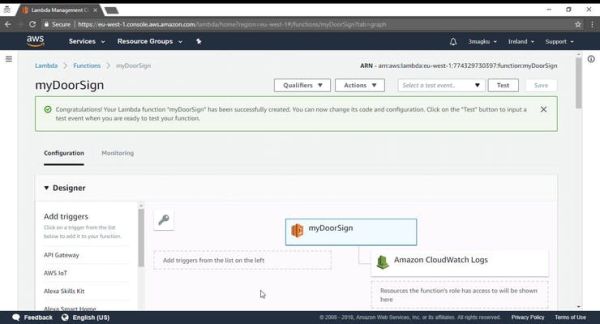
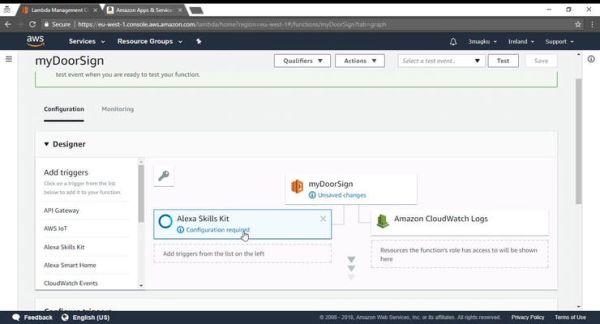
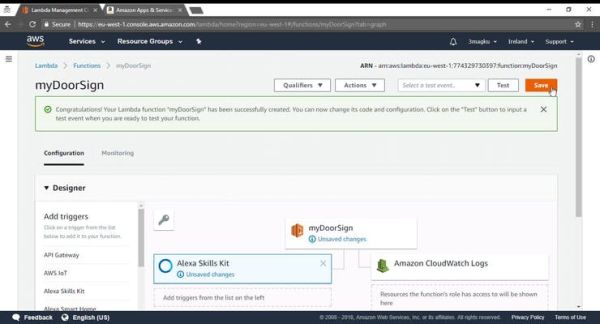
- After the function has been created successfully:
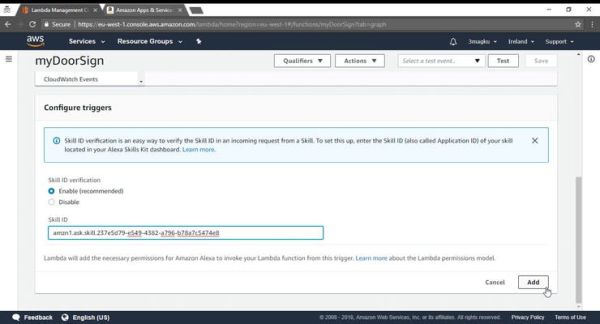
- Add a trigger of type Alexa Skills Kit and configure it by entering the Application Id of the previously created Alexa Skill.
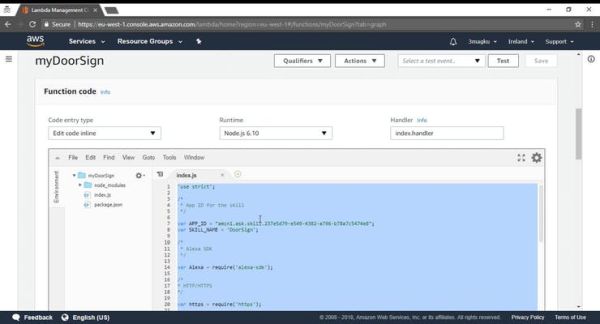
- In the Function code section select all code in the inline editor for the file index.js and replace it by pasting the following code:
'use strict';
/*
 * App ID for the skill
 */
var APP_ID = "REPLACE_ME__ALEXA_APP_ID";
var SKILL_NAME = "REPLACE_ME__ALEXA_SKILL_NAME";
/*
 * Alexa SDK
 */
var Alexa = require('alexa-sdk');
/*
* HTTP/HTTPS
*/
var https = require('https');
/*
 * Thinger.io device
 */
const ti_user = "REPLACE_ME__THINGER_IO_USER";
const ti_device = "REPLACE_ME__THINGER_IO_DEVICE_ID";
const ti_token = "REPLACE_ME__THINGER_IO_ACCESS_TOKEN";
const ti_api_host = "api.thinger.io"
const ti_api_port = 443;
const ti_api_base_path = "/v2/users/" + ti_user + "/devices/" + ti_device + "/";
/*
 * Register handlers
 */
exports.handler = function (event, context, callback) {
 var alexa = Alexa.handler(event, context);
 alexa.appId = APP_ID;
 alexa.registerHandlers(handlers);
 alexa.execute();
};
var handlers = {
 /*
     * The "ShowStatus" intent:
     */
 "ShowStatus": function () {
 var myHandler = this;
 var speechOutput;
 var cardTitle;
 var statusSlot = this.event.request.intent.slots.Status;
 var status = "open";
 var imageNumber = 0;
 // Get slot(s):
 if (statusSlot && statusSlot.value) {
 status = statusSlot.value.toLowerCase();
        }
 // Determine image number from status:
 switch (status) {
 case "open":
 imageNumber = 0;
 break;
 case "closed":
 imageNumber = 2;
 break;
 case "away":
 imageNumber = 1;
 break;
 default:
 imageNumber = 0;
 break;
        }
 // Build path:
 var ti_api_path = ti_api_base_path + "image";
 // Build request body:
 var ti_input = { in: {
 clean: true,
 number: imageNumber
            }
        };
 // Build POST request:
 var request_body = JSON.stringify(ti_input);
 var request_headers = {
 "Authorization": "Bearer " + ti_token,
 "Content-Type": "application/json",
 "Content-Length": Buffer.byteLength(request_body)
        }
 var request_options = {
 host: ti_api_host,
 port: ti_api_port,
 path: ti_api_path,
 method: "POST",
 headers: request_headers
        }
 console.log("REQUEST - HEAD:" + JSON.stringify(request_options));
 console.log("REQUEST - BODY:" + JSON.stringify(request_body));
 // Handle POST request:
 var request = https.request(request_options, function (r) {
 console.log("RESPONSE - STATUS:" + r.statusCode);
 r.on('data', function (d) {
 console.log("RESPONSE:" + d);
 var d_json = JSON.parse(d);
            });
 r.on('end', function () {
 console.log("END: returning speech output ...");
 speechOutput = "The door sign has been updated successfully! The new status shown is '"+ status+"'.";
 cardTitle = "Success";
 myHandler.emit(':tellWithCard', speechOutput, cardTitle, speechOutput);
            });
 r.on('error', function (e) {
 console.log("ERROR:");
 console.error(e);
 speechOutput = "Sorry, there was problem - I could not update the door sign!";
 cardTitle = "Error";
 myHandler.emit(':tellWithCard', speechOutput, cardTitle, speechOutput);
            });
        });
 // Send POST request:
 request.write(request_body);
 request.end();
    },
 /*
     * Built-in intents:
     */
 "AMAZON.HelpIntent": function () {
 this.emit(':ask', "You can say tell door sign 'we are open', or, you can say exit... What can I help you with?", "What can I help you with?");
    },
 "AMAZON.StopIntent": function () {
 var speechOutput = "OK";
 this.emit(':tell', speechOutput);
    },
 'Unhandled': function () {
 this.emit(':ask', "What can I do for you?", "What can I do for you?");
    }
};
and replace the strings:
- REPLACE_ME__THINGER_IO_USER with your thinger.io username
- REPLACE_ME__THINGER_IO_DEVICE_ID with the Id of the previously registered device at thinger.io
- REPLACE_ME__THINGER_IO_ACCESS_TOKEN with the previously created additional access token for your device at thinger.io
- REPLACE_ME__ALEXA_APP_ID with the Application Id of the previously created Alexa Skill
- REPLACE_ME__ALEXA_SKILL_NAME with the name of the previously created Alexa Skill
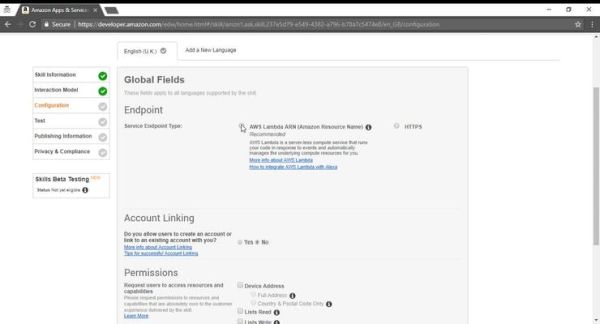
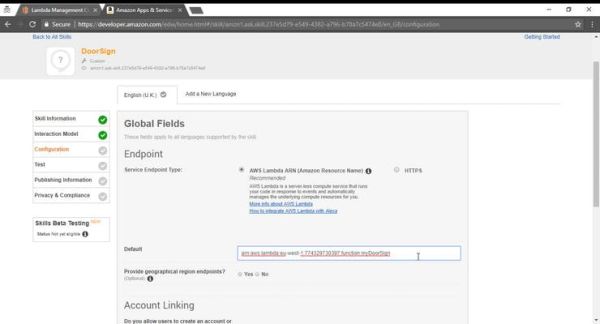
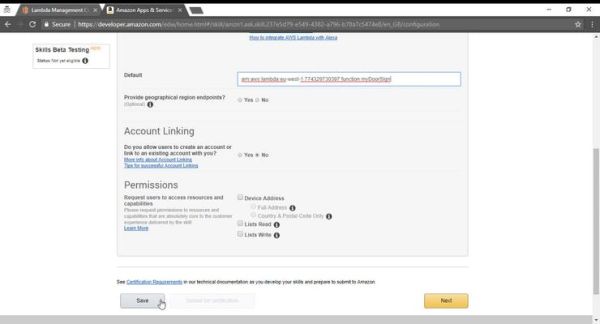
In the Configuration section of your Alex Skill:
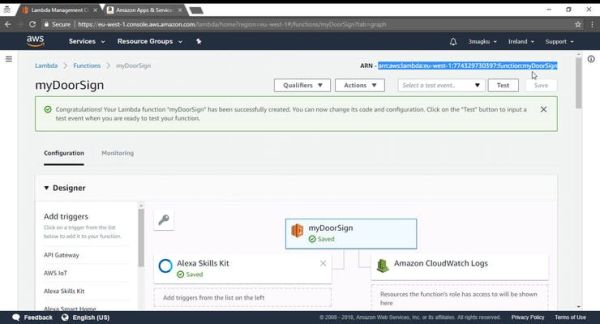
- Select AWS Lambda ARN (Amazon Resource Name) as Service Endpoint Type
- and enter the ARN of this Lambda function in the Default field.
 AWS management control
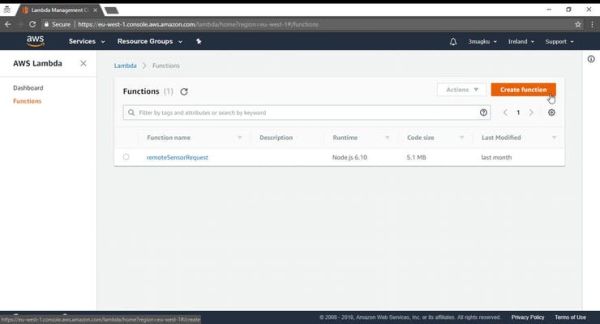

Sewing It All Together
Now you should have connected your device to the thinger.io platform (via username, device Id and device token), linked your device to an AWS Lambda function (via username, device Id and access token) and linked the AWS Lambda function to an Alexa Skill (via Skill Application Id and the Lambda function’s ARN).
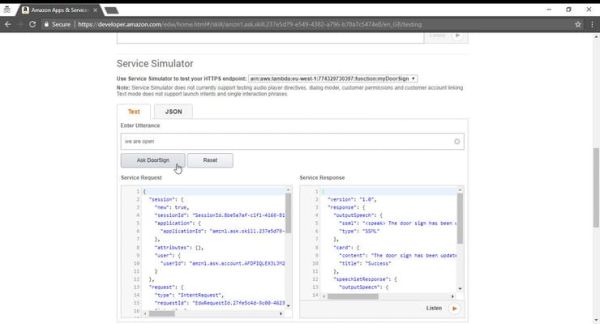
If all steps have been performed correctly, you can test your setup.
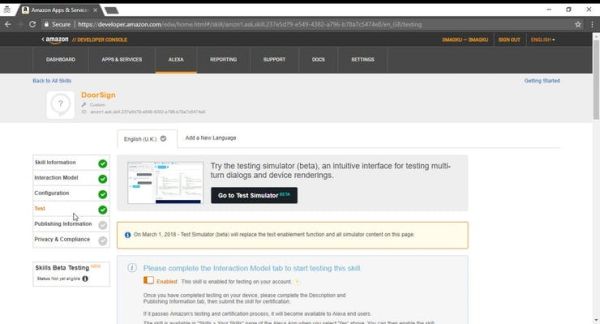 Test
Test
 Test
Test
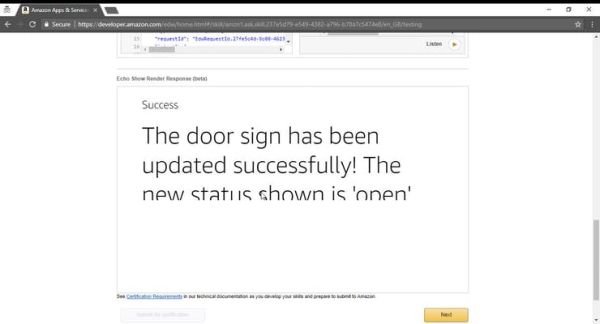 Test
Test
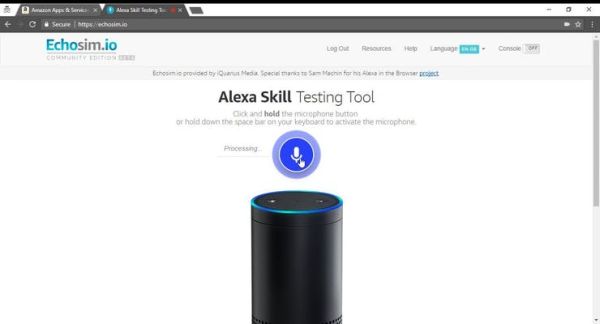 Test
Test
Final test with Echo Dot
Improvements, Changes & To Do
- A nice encasement
- A more sophisticated, less power consuming communication setup (e.g. MQTT with an reconnecting algorithm facilitating longer sleeping periods)
- A bigger display
- If you can’t (or don’t want to) get a hold of an Arduino MKR1000, any Arduino code compatible device (e.g. an ESP8266 type board) with SPI hardware support should do too, if you adapt the pin mapping a little bit.
Schematics

Code
Source : Alexa Controlled Door Sign Demo