Multipurpose like a traffic light, this one keeps you warm and blinks to make you more visible in the night. Stop traffic with this fun scarf worn around your neck.
Repurpose a dollar-store bicycle safety flasher to embed in the scarf. Simulates the light changing pattern and does other fancy sequences. No arduino needed.
The technology is borrowed from the earlier Lithium Rain Radiant Beacon of Righteousness (Blinking I-hoodie).
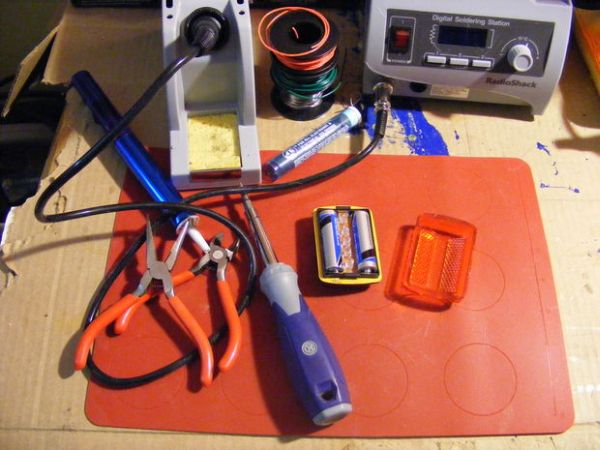
Step 1: Stuff to make it
This scarf is made from the remants of my stash of robo-fleece. I think I had bought about 3 yards of it for various projects and it still hasn’t all been used up.
You can use any soft fabric that doesn’t stretch too much as long as it is comfortable to touch when you wear it.
You need something that equates to a strip of fabric about 12″ wide by 60″. The fabric is doubled over lengthwise for a finished scarf width of about 6 inches. It can be shorter or longer as you like.
Use remnants to piece together the scarf for a more varied look.
The electronics in this scarf is based on a dollar-store bicycle safety flasher. It is a self contained unit to house the batteries, has a switch to cycle the light patterns and contains 5 red LEDs.
You will need to mod it to add yellow and green LEDs. Some flashers may have all white LEDs which you can adjust by the filter material but you will still need to mod the flasher unit to extend the LED from the circuit board. Soldering skills are required.
You will need some clear plastic adhesive shelf liner paper.
You will need a plastic shopping bag in red, yellow, and green to use as color filter material. Come to think of it, none of them are really “green”.
You can hand sew this but a sewing machine is much more efficient. I also use a serger which is great for simple projects like this.
Step 2: Mod the blinker
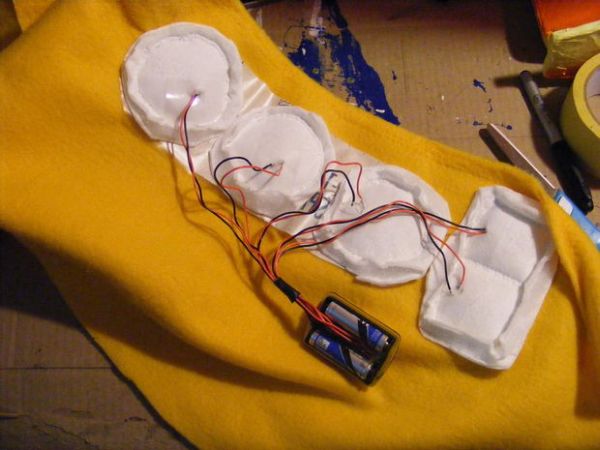
You will need to extend the wires of the LEDs so that they can be placed in position on the scarf.
Since they on the circuit board, the LEDs need to be desoldered and extention wires added.
LEDs need to be wired up to the correct polarity in order to work. Figure out if the larger piece inside the LED goes to hot or positive and solder it. If it doesn’t work then you have to switch the leads. It is hard to tell with diffused LEDs or leads that are already clipped off.
These cheap import units seem to use some junk quality of solder on them because it seemed to flake off and was grainy when heated up to pull out the LEDs. I had difficulty in resoldering new wires since the slightest application of heat seemed to pull off the original copper trace on the circuit board. I had to scratch the resin coat to expose some copper in the surrounding area on that trace in order to connect the new wires.
I had an assortment pack of LEDs from the Shack so I had to find the similarly rated LEDs to replace the ones I pulled out. White light LEDs seemed to draw to much power and did not work. I was finally able to get the tinest LEDs – green and yellow – to work as replacements.
I had planned on a color scheme of red, yellow, green, red, yellow. Three LEDs to simulate the traffic light and the other two for a walk/don’t walk sign.
Step 3: Cut to the chase
The bottom of my scarf would have something that resembled a walk/don’t walk sign.
I made up a graphic 2″ x 4″. It can be anything you want. One side will blink red and the other yellow.
Laminate the graphic with the clear plastic adhesive shelf liner paper.
Cut it out a little larger to give it a border to sew around.
CAUTION: Know the capabilities of your sewing machine. Sewing materials other than fabric probably voids your warranty. Broken needles can occur if you try to sew something not intended to put through the machine. Always experiment on your mom’s sewing machine first.
Double the fabric lengthwise to see where you will be creating the stoplight.
The final product is sewn like a tube that is turned inside out.
Position your graphic on the backside of the piece near the bottom of your scarf.
Sew a straight seam to outline your graphic.
On the finished side, pinch the area inside the sewn boundary. Clip it so you have a hole to poke the scissor in to cut the fabric out.
This should expose the graphic. Trim around the inside edges.
Go over with some kind of zigzag stitch to give it a finished look.
For more detail: Traffic Light Stoplight LED Scarf – Safety Scarf of Righteousness