I recently bought an Arduino Diecimila board. It’s awesome and the applications, you can use it for or with is almost unlimited. However there’s a problem when you want to use it in portable applications. You can use the Liquidware lithium backpack, which is a good way to power the Arduino. There’s a problem with the backpack though, cause when the battery dies, you’ll have to find an USB port or another external power source to charge it. You can’t just replace the battery. You can also choose to power your arduino with a 9V battery and the built-in regulator of the Arduino board. The problem with this setup is that 9V batteries doesn’t have a very high capacity, so they’ll die faster.
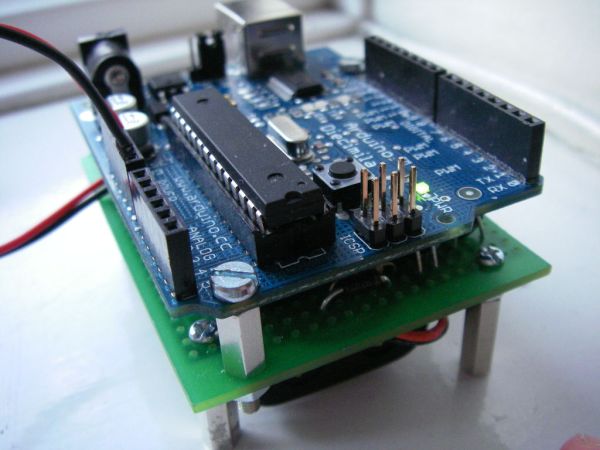
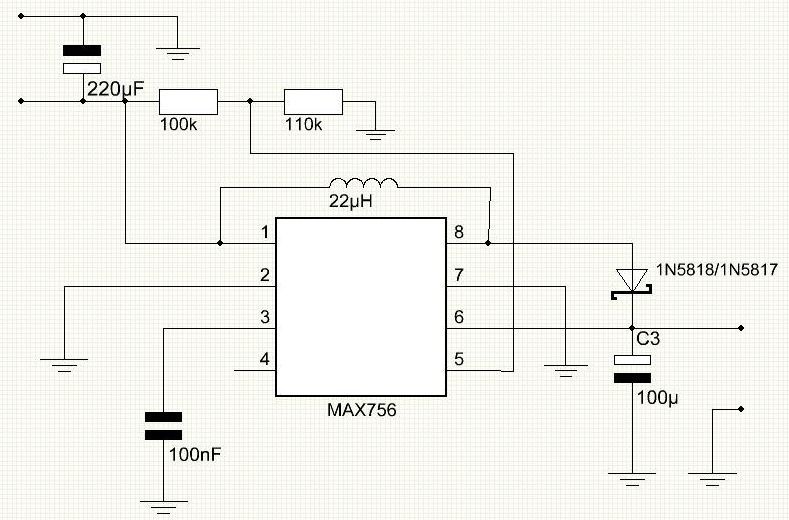
That’s why, I came up with the AA Undershield. It uses 2 AA batteries and boosts the voltage up to 5V, using a MAX756 IC to power the Arduino.
You may ask why I’m not simply using 3 or 4 AA batteries to power the Arduino. The reason why, I’m not using batteries to drive my Arduino directly, is that they’re not regulated. Right after, you’ve recharged your battery, it may supply 1.4V, even though it’s rated for 1.2V, so there’s a risk of supplying your Arduino with too high or too low voltage.
Here is a video of the Arduino Diecimila and the Adafruit Waveshield attached to the AA Undershield. I’ve uploaded an example code, that changes the playback speed, when you turn a potentiometer. Other analog sensors will also work.
I apologize for the poor sound quality in this video. The mic in my camera is really bad.
The AA Undershield can also be used with many other 5V devices.
Step 1: Get the parts
Here is a list of the parts, you’ll need to make an AA Undershield.
- A prototyping PCB that has the same size as your Arduino board.
- A battery holder.
- A MAX756 Integrated Circuit. There is a lot of boost converters out there, but I used the MAX756, cause I had a couple of them lying around.
- A 8 pin IC socket
- A 22uH coil.
- A 1N5817 or 1N5818 schottky diode.
- A 220uF Electrolytic capacitor.
- A 100uF Electrolytic capacitor.
- A 100nF Ceramic capacitor.
- A 100kohm resistor.
- A 110kohm resistor (I didn’t have one, so I connected a 10k and a 100k in series).
- Two spacers to make space between your Arduino board and your shield.
- Two screws for the spacers.
- Two nuts for the spacers.
- Four spacers to make space between the undershield and the surface, you’re placing it on (These are only needed if you choose to mount your battery holder underneath the shield).
- Four screws for the spacers (These are only needed if you choose to mount your battery holder underneath the shield).
- An Arduino or Freeduino board. I used a Diecimila, but it should work with the other boards just as well.
- Two AA batteries.
- An on/off switch (optional).
Step 2: Drill the holes in the PCB
In this step, I’ll show you where to drill the holes in your PCB. Start by placing your Arduino board on top of your prototyping board. When you buy a new Arduino board, it comes with two mounting holes. mark those holes on your prototyping PCB using a pen or permanent marker. then drill the holes. I used M3 screws (M3 means that they’re 3mm in diameter), so I used a 3mm drill.
If you choose to mount the battery holder underneath the shield, you should drill 4 holes in each corner of your PCB for the spacers.
[box color=”#985D00″ bg=”#FFF8CB” font=”verdana” fontsize=”14 ” radius=”20 ” border=”#985D12″ float=”right” head=”Major Components in Project” headbg=”#FFEB70″ headcolor=”#985D00″]
- A prototyping PCB that has the same size as your Arduino board.
- A battery holder.
- A MAX756 Integrated Circuit
[/box]
For more detail: The Arduino AA Undershield