Introduction
If you completed any of the buzzer projects, you will know by now that there is much fun to be had in making the Arduino create noises. The only issue you might have had is with the quality of the sound. Since MIDI is a serial protocol and the Arduino can generate messages on the serial port, we can use an Arduino to send MIDI signals to a PC and have the PC play the noises using a MIDI synthesizer.
You Will Need
- 1 x 220 Ohm Resistor
- 1 x MIDI Jack
- Jumper Wires
- USB MIDI Adapter
I used a MIDI jack with pins for mounting on PCBs and soldered it, a resistor and some headers to a small piece of stripboard. Some people solder the wires and resistor directly to the pins – also a nice solution.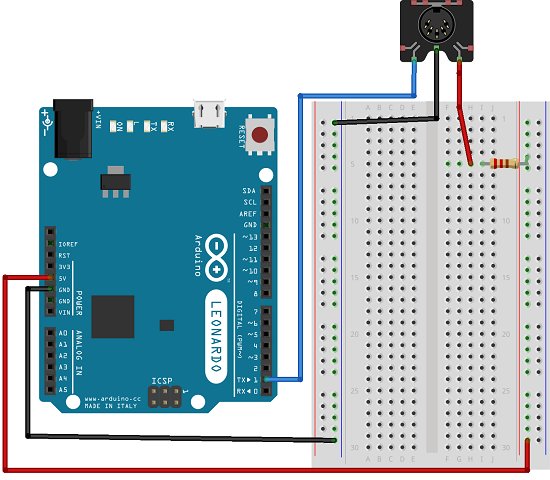
Making The Circuit
Connect the MIDI in cable of the USB adapter to the MIDI connector and plug in the USB cable.
Programming The Arduino
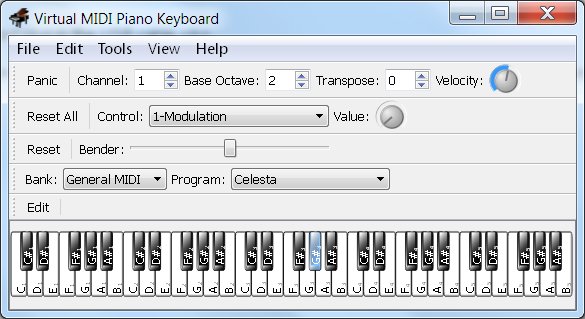
In order to hear the notes, you will need to install some software to your PC. I used Virtual Midi Piano Keyboard to view/hear the MIDI playing. Once installed, you will need to make sure that you set up the software to receive MIDI input. With the USB adapter connected and drivers installed (automatic usually), go to the Edit menu and choose MIDI Connections. Complete as shown below,
I also changed the base octave setting in the main window to 2. The code will then play all of the notes you can see on the screen with all other settings at their default values.
At this point, it is best to close VMPK. In fact, always close VMPK when you are uploading a sketch to the Arduino or pull out the jumper you have in pin 1. VMPK receives some strange messages if you don’t and you will miss what is really happening.
The following code plays all of the notes you can see on the screen in order and repeats the sequence when done.
void setup() {

// Set MIDI baud rate:

Serial.begin(31250);

}
void loop() {
for (int note = 0x18; note < 0x53; note ++) {
//Note on channel 1 (0x90), some note value (note), middle velocity (0x45):
noteOn(0x90, note, 0x45);
delay(300);

//Note on channel 1 (0x90), some note value (note), silent velocity (0x00):

noteOn(0x90, note, 0x00);

delay(100);
}}
// cmd is greater than 127, or that data values are less than 127:
void noteOn(int cmd, int pitch, int velocity) {
Serial.write(cmd);
Serial.write(pitch);
Serial.write(velocity);
}
The key part of the sketch is the noteOn procedure and the key parameter is the one labelled pitch. These values are expressed in hexadecimal in this sketch – most references seem to use hex. The value is from 0 – 127 (a 7 bit value) with each number representing a note.
For more detail: Sending MIDI Messages