In present time almost all the people are familiar with robots. Robots play a very important role in human life. Robots are a machine which reduces the human efforts in heavy works in industries, building etc. and makes life easy. We are here with our next robot that is Mobile or DTMF Controlled Robot.
DTMF controlled Robot runs over mobile DTMF technology that exists in Dial tone. DTMF stands for Dual Tone Multiple Frequency. There are some frequencies that we use to create DTMF tone. In simple words by adding or mixing two or more frequencies generates DTMF tone. These frequencies are given below:
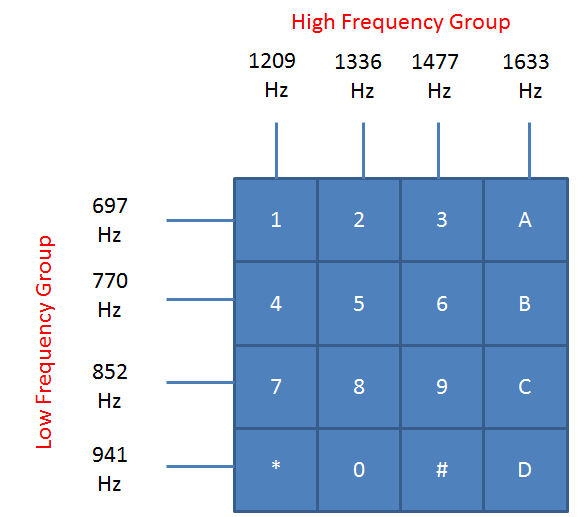
In given figure we can see two groups of different frequencies. When one upper and one lower frequencies mixed then a tone is created and that tone we call Dual Tone Multiple Frequency.
Required Components
- Arduino UNO
- DC Motor
- Mobile Phone
- DTMF decoder Module
- Motor Driver L293D
- 9 Volt Battery
- Battery Connector
- Aux wire
- Robot Chasis with wheel
- Connecting wires
What is DTMF?
DTMF is a Dual Tone Multiple Frequency decoder module which has a MT8870 DTMF decoder IC which decodes DTMF tone signal to digital signal that are acceptable for arduino digitally. Here an aux wire is needed for connecting DTMF module to phone.
Block Diagram for DTMF Controlled Robot using Arduino
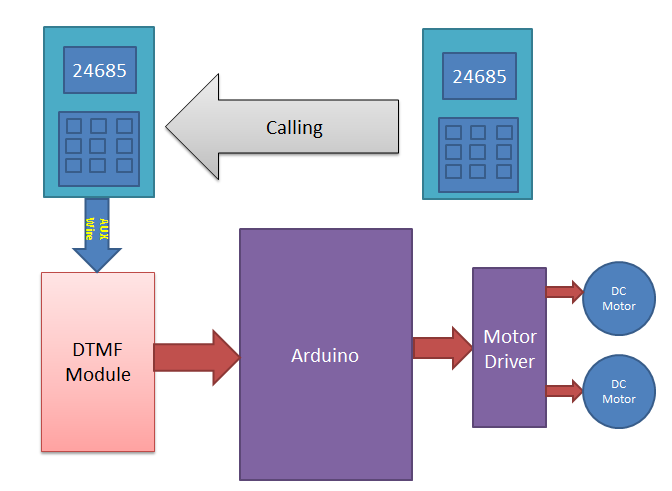
Remote section: This section’s main component is DTMF. Here we get a tone from our cellphone by using aux wire to DTMF Decoder IC namely MT8870 which decodes the tone into digital signal of 4bit.
Control Section: Arduino UNO is used for controlling whole the process of robot. Arduino reads commands sent by DTMF Decoder and compare with define code or pattern. If commands are match arduino sends respective command to driver section.
Driver section: driver section consists motor driver and two DC motors. Motor driver is used for driving motors because arduino does not supply enough voltage and current to motor. So we add a motor driver circuit to get enough voltage and current for motor. By collecting commands from arduino motor driver drive motor according to commands.