Summary of The Touch module – a robotic dog toy
The project is an Arduino-based robotic toy with three touch levers that dispense treats, record scores, and increase difficulty by lighting an LED above the correct lever. It trains a dog to associate lever touches with rewards, uses a separate Zevro dispenser driven by a geared DC motor, and relies on Arduino Mega with an ArduMoto shield. The creator stresses supervised play, stepwise training, and open-source sharing of designs and code.
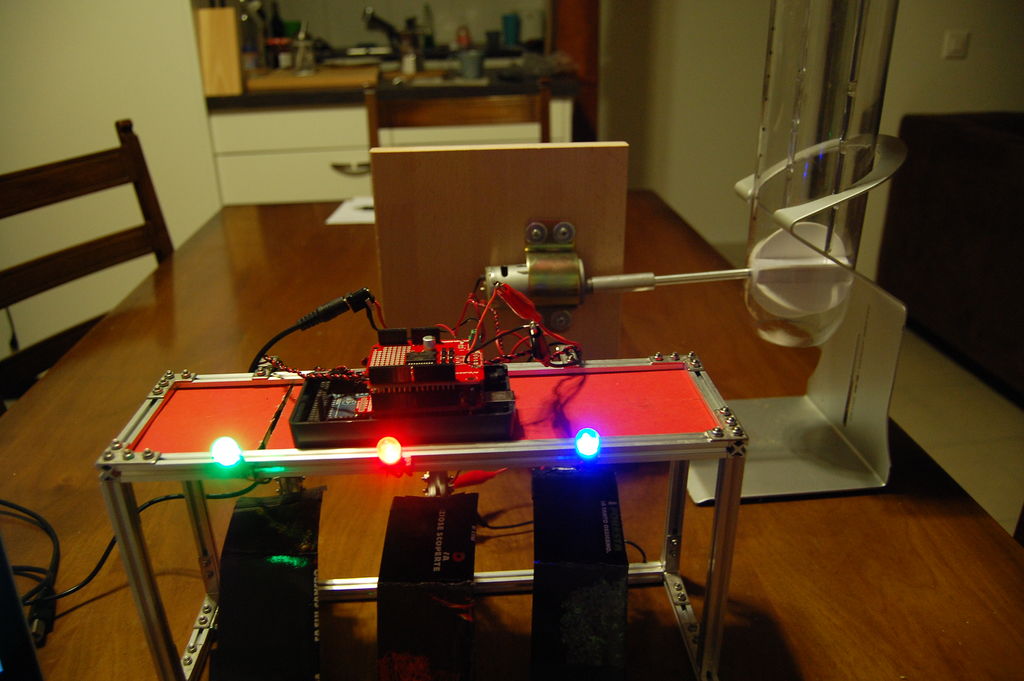
Parts used in the Touch module:
- Three Flex Sensors (2.2")
- Super Bright LEDs - Red, Blue, and Green 10mm
- Breadboards for testing
- Arduino MEGA 2560 (also tested with Arduino UNO)
- ArduMoto Shield
- Arduino ProtoShield
- Zevro Smartspace Cereal Dispenser
- 12 V DC geared motor and coupling shaft
- MakerBeam kit
- Wire, jumper wire, resistors, etc.
- Postcards and electrical tape
- Hardware for clamping down the motor (mast clamp, L-brackets, wood shelf)
- A dog
At first, as soon as the dog touches one of the levers, treats are delivered. Eventually the dog should begin to associate the action of pushing the levers with the rewarding stimulus, a tasty treat. Depending on your dog and what really gets him going, you can use light storebought treats, chopped up hot dogs, shredded chicken, or you can use this as a way to make mealtime more interesting for dogs with problems eating. At its most advanced, an LED lights up above one of the three levers and the dog must touch the correct lever in order to get a treat. It is designed to get more and more complex during a single playing event, and after every reset, the dog has to start over. A small counter would track his overall high-score of levers in-a-row, if he could ever actually hit two in-a-row…
There are some pretty widely-accepted theories on the intelligence of dogs generally used to classify dogs. The theory identifies three types of intelligence: instinctive intelligence which describes the activities the dog was bred for, adaptive intelligence, a metric for problem-solving, and working intelligence, or the ability to learn from human interaction. I wanted to come up with a robot that could work with all three types of intelligence for some mental stimulation. Plus, tossing treats at Henry was getting a bit boring and we needed to spice it up.
The larger scheme for the idea of robotic dog toys is to have a centralized treat-delivery system that wirelessly communicates with several toys of varying design, so this ‘Touch’ module with the levers could just be a single toy in a group. Before I get into the specifics, check out this video of my dog Henry, playing with the finished prototype, so you can get an idea of how it works.
This is the current stage of Henry’s interaction with the toy, and now I am working on him using the machine without me around.
The last and most important advice is to SUPERVISE YOUR DOG and do not leave them unattended with any of the items in this instructable. It is not meant to be an autonomous robot that wakes up and plays with your dog, but a game with which you both interact. The fun part for me was teaching Henry how to play with it, watching him systematically improve at the game, only to completely forget everything the next day.
The whole thing took about two months to complete and in the meantime I was able to spend some quality time with my dog and learn that he was pretty quick to pick up how to work the toy!
Step 1: Training the Dog
The dog has to be very comfortable around the toy for it to have any success. At the stage before I added any electronics I handfed Henry his dinner over and under and the around the beams for a few nights.
Yet he is completely motivated by food and after a few days he would be excited as soon as he saw the toy.
So first I just worked with him on touching the levers:
Since Henry already knew how to shake, I put the machine between us and tried to make him ‘shake’ my hand under the area of the scaffolding where the levers would go. Eventually I put my hand further and further back until he was slapping the postcards just by accident. Anytime his paw touched a postcard I gave him a tasty treat. I worked like that for a few nights and eventually just could tap the levers for him to ‘touch’ them. After a few times like that, all I had to do was hold the treat up and he would slap the levers.
Check it out:
You can watch Henry in the video to get a good idea of some of the challenges for this project. At one point he just double slaps two levers and leaves his paws resting on them while the Flex Sensors underneath are fully strained. So that’s when I decided to separate the treat dispenser from the toy itself, so that after a tap on the levers the dog has to move a bit to collect the food.
Eventually Henry graduated to the first level of difficulty on the game. That is where we are at now because he has some trouble grasping that he should push a certain lever under whichever light was on, so I am trying to think of a way to get him to learn how to do that.
If you want to give a shot at making one yourself, there are detailed instructions and code. If you want to borrow some aspects of the module and creating something new, all I ask is that you keep it open-source!
Step 2: Materials
The body of the toy is made with MakerBeam, a fantastic open-source t-slot hardware which is perfect for prototyping small designs like this. Of course an eventual improvement for a commercial robotic dog toy would be to use dog safe materials, or just plain larger materials for any dog bigger than my guy Henry.
Nearly complete list of stuff:
— Three Flex Sensors (2.2″)
— Super Bright LEDs – Red, Blue, and Green 10mm
— breadboards for testing
— Arduino MEGA 2560 (also tested with Arduino UNO which worked exactly the same)
— ArduMoto Shield
— Arduino ProtoShield
— Zevro Smartspace Cereal Dispenser
—12 V DC geared motor and coupling shaft
— MakerBeam kit
— lots of wire, jumper wire, resistors, etc.
— some postcards and electrical tape
— the hardware pictured above for clamping down the motor
— a dog…
Step 3: Dog Treat Delivery System
I have to give credit for the dog treat delivery idea to a guy Matt Newton at this site.
He had the idea to use the Zevro cereal dispense with this particular motor connected. He also goes in a different direction that might be interesting for some people reading this instructable, an internet-enabled pet feeder.
He talks about the problems with turning the rubber blade and how he decided to take the geared motor route, for high torque and low speed. His idea works perfectly and the slow turning of the blade enables you to deliver a nice little batch of treats at a time. He also designed and posted a design for a custom made coupling and shaft to connect the motor to the Zevro dry food dispenser, which I also made. But the similarities end after the type of motor and the Zevro, because I used the Arduino MEGA and the ArduMoto shield to run the motor.
For the wood piece and hardware:
I went to the local hardware store and purchased several pieces. The pictures included in this step pretty clearly illustrate what I did. I first bought a cheap wooden shelf and a saw and a few L-brackets to make a stand to connect the motor to. Then I found a ‘mast clamp,’ a piece to fix the motor to the board. You will have to find one that matches the size of the motor you buy. (I used a high torque gearbox motor for reasons discussed above). Once you make the coupling and shaft or find an alternate solution, you can screw everything together.
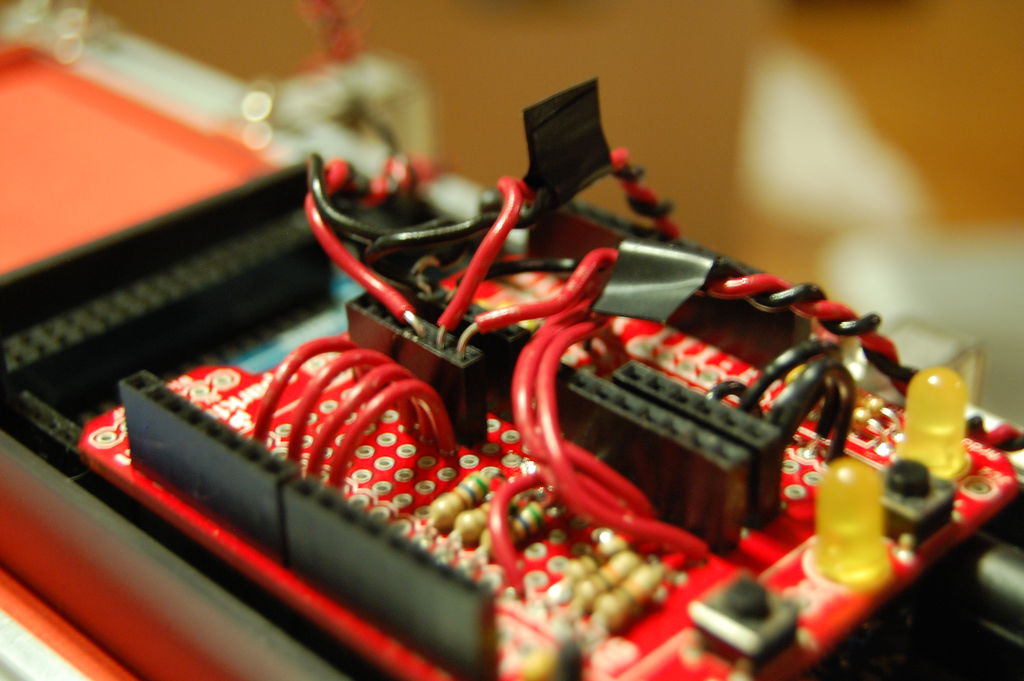
For the motor and the Arduino setup/code:
First, I followed this very detailed Sparkfun tutorial to test the ArduMoto shield. Once you have completed it, you should have a working idea of the sheild. At the time I had no screw terminals to connect to the ArduMoto so I just soldered two wires directly into the B terminal 3 and 4. Then I then connected those two wires by jumper cable to the 12 V 4 RPM DC motor. The order of the wires never matters because swapping them only changes direction of the motor, which can control through the ArduMoto shield. For the ArduMoto terminal B, the direction pin is hard-wired to Pin 13 and the pulse-width modulation pin is on Pin 11.
For more detail: The Touch module – a robotic dog toy
- How does the toy deliver treats?
Treats are dispensed from a Zevro Smartspace Cereal Dispenser driven by a 12 V geared motor controlled via the ArduMoto shield and Arduino. - Can I use Arduino UNO instead of Arduino MEGA?
Yes, the article states the UNO was tested and worked exactly the same as the MEGA. - What sensors detect the dog touching the levers?
Three 2.2 inch flex sensors placed under the levers detect touches. - How is the motor controlled in the system?
The motor is controlled by the ArduMoto shield; terminal B uses a hard-wired direction pin on Pin 13 and PWM on Pin 11. - Does the project require supervision when the dog plays?
Yes, the article explicitly advises supervising the dog and not leaving them unattended with the toy. - What materials form the toy body?
The body is constructed from MakerBeam t-slot hardware and common hardware store materials like wood, L-brackets, and mast clamps. - How does the game increase difficulty?
An LED lights above one of the three levers and the dog must touch the correct lever to receive a treat; complexity grows during a session and resets require starting over. - Why separate the treat dispenser from the lever unit?
The dispenser was separated so after a tap the dog has to move to collect food, preventing resting paws from continually triggering sensors.