This would be the continuation of my previous project Programming ATtiny85 with Arduino Uno. Now with cheaper ATtiny85 in place I was looking for cheaper ways to transmit the sensor data. Which brought me to nRF24L01+ a cheap, low power RF transceiver. This seemed to be the better solution for me. But there was one problem, limitation in number pins in ATtiny85. I can’t connect both nRF24L01+ and the sensor in it. So I was looking out for solutions and came across “nrf24l01+ control with 3 ATtiny85 pins“. Here I discuss how I implemented it.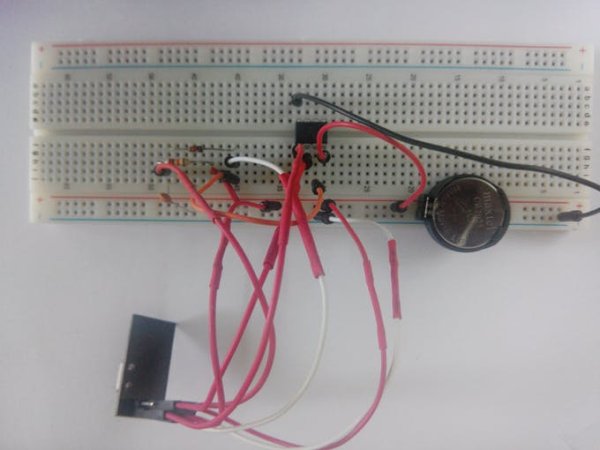
Modules
There will be two modules in here transmitter and receiver. The transmitter would be a ATtiny85 sending some data and the receiver would be Arduino Uno receiving the data via nRF25L01+. I utilize the RF24 library (http://tmrh20.github.io/RF24/). Follow the instructions given there and add it to Arduino IDE before getting started with this. I won’t be explaining much about RF24 as there is a very good documentation on it.
Transmitter
The transmitter transmits a incrementing number every second. The ATtiny85 will send the data via nRF24L01+ using only 3 pins. I follow the instructions given by Ralph Doncaster on implementing it.
The components required would be
- ATtiny85
- nRF24L01+
- Ceramic Capacitor – 10nF
- Carbon Film Resistor – 22kΩ
- Switching Diode – 1n4148
Upload the below code to ATtiny85 (refer my previous project Programming ATtiny85 with Arduino Uno if you want to know how)
If this is not clear refer the fritzing file attached with this project. Though rest of the nRF24L01+ ‘s pins are 5v tolerant you should always give 3v3 power to the Vcc or else you will damage it.
When power source is connected the transmitter will start sending sequence of number every 1 second.
Receiver
The receiver receives the data sent by the transmitter and received data can be seen in the Serial Monitor.
The components required would be
- Arduino Uno
- nRF24L01+
- nRF24L01+ Socket Adapter (Optional)
Upload the below code to Uno
Connect the components as shown below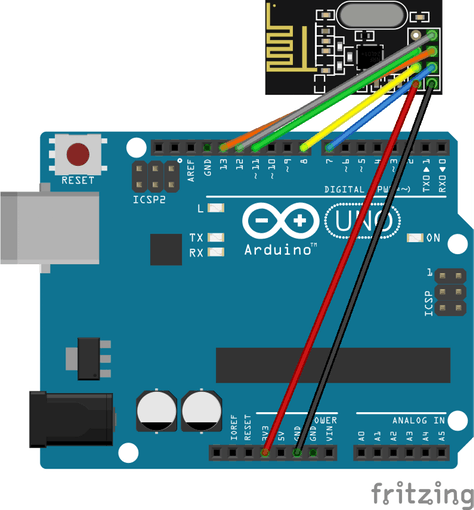
If this is not clear refer the fritzing file attached with this project. Please note that Vcc should be always 3v3. In some Arduino Uno clones the 3v3 power might not have enough current which results in nRF24L01+ not working. Any one of the below methods are recommended to resolve this
For more detail: nRF24L01+ with ATtiny85 3 Pins