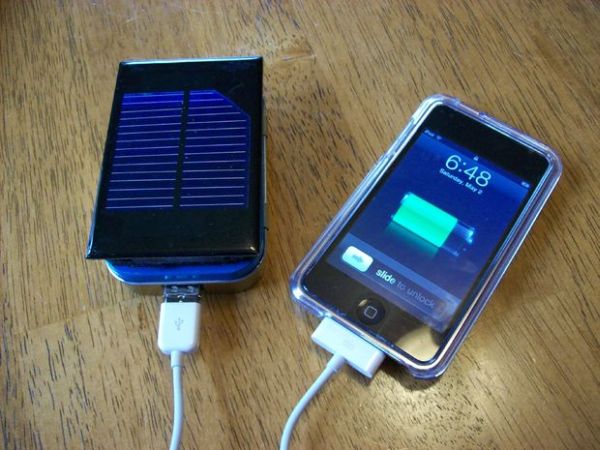
I wanted a charger for my iPodTouch and the MintyBoost was definitely my first choice. I wanted to take it a bit further and make it not only rechargeable but also solar powered. The other issue is that the iPhone and iPodTouch have large batteries in them and will deplete the two AA batteries in the MintyBoost rather quickly so I wanted to increase the battery power as well. What I really wanted was a MightyMintyBoost!
Apple has sold over 30 million iPodTouch/iPhone units- imagine charging all of them via solar power…. If every iPhone/iPodTouch sold was fully charged every day (averaging the battery capacity) via solar power instead of fossil fuel power we would save approximately 50.644gWh of energy, roughly equivalent to 75,965,625 lbs. of CO2 in the atmosphere per year. Granted that’s a best case scenario (assuming you can get enough sunlight per day and approximately 1.5 lbs. CO2 produced per kWh used.) Of course, that doesn’t even figure in all the other iPods, cell phones, PDAs, microcontrollers (I use it to power my Arduino projects) and other USB devices that can be powered by this charger- one little solar cell charger may not seem like it can make a difference but add all those millions of devices together and that’s a lot of energy!
There are some really nice features about this charger:
It’s solar powered!
It’s small.
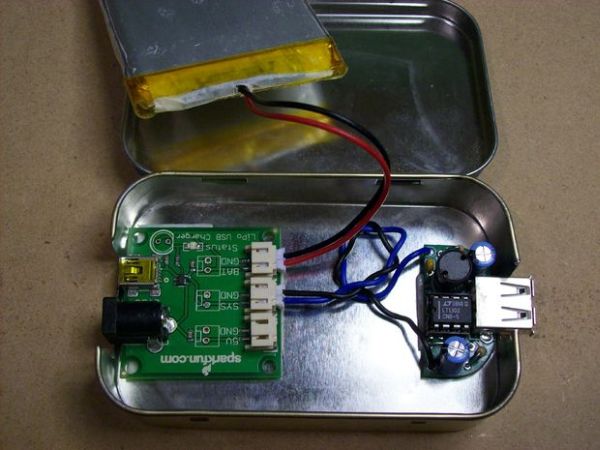
Large battery capacity- 3.7v @2000mAh
On board charger charges via solar, USB or wall wart. Accepts input power from 3.7v to 7v.
Remove the solar cell after charging and you have a nice compact USB power supply.
Unplug the solar cell and use the Velcro to secure the MightyMintyBoost inside a backpack or messenger bag- now plug in a larger solar cell attached to your bag for even faster charging. Using a slightly larger solar cell (6v/250mAh) you can generate enough power to fully charge an iPhone in about 5.5 hours and an iPod Touch in 4 hours.
Building this is really easy and straightforward- it only took me around an hour so follow along and build one for yourself!
Safety note and general disclaimer: Be careful cutting the Altoids tin as it can have some really sharp edges- file them smooth if necessary. Assemble this at your own risk- while it is really easy to build, if you mess something up there is the potential to damage the electronic device you are trying to charge. Be careful in your assembly and soldering work and follow good safety practices. Only use a type of battery charger specifically designed for the type of battery you are using. Please read through the entire Instructable before asking questions- if there are are any questions just ask and I’ll help out as best as I can!
Step 1: Tools and materials
Here’s what you’ll need to build your own MightyMintyBoost:
Tools:
Soldering iron
Scissors
Wire cutters
Pliers (or muiltitool)
Multimeter
Metal shears
Clear packing tape
Materials:
MintyBoost kit
Lithium polymer battery charger (the original one specified was discontinued)
For better performance use the Adafruit Solar Lithium charger (connections are similar but it’s slightly larger- see update below)
3.7v 2000mAh Lithium Polymer battery
JST connector/wire
Small solar cell
2″ x 3″ adhesive backed Velcro
Small double sided adhesive squares
Altoids tin
7/10/10 UPDATE: Adafruit now also sells all the parts you need to make this a bit more mighty. Have a look here!
http://www.adafruit.com/blog/2010/07/09/how-to-make-a-solar-mintyboost-a-solar-power-charger-for-your-gadgets/
7/18/11- ANOTHER UPDATE: Adafruit recently introduced a new LiPo charger that is specifically designed for solar charging that has much better performance. It’s not as small but the performance gains make it worth it. Have a look and read about the design here-
https://www.adafruit.com/products/390
Some notes:
The single cell Lithium Polymer charger can accept input power that ranges from 3.7 to 7v maximum. When the cell reaches full charge the charger will automatically switch to trickle charging. When charging using the mini USB port, the charging current is limited to 100mA. When charging using the barrel plug jack, the charging current is limited to 280mA.
The solar cell maxes out at approximately 5v @ 100mA in bright sunlight. If you need faster charging simply use a larger solar cell- a 6v cell @ 250mA would work very well and they are easily obtainable and inexpensive. I used the size of solar cell that I did because I wanted it to be super compact.
I could not find out from the manufacturer if the solar cell I used has a blocking diode. A blocking diode is used in many solar charging systems to prevent the solar cell from draining the battery during low light conditions. Instructables member RBecho pointed out that the charging circuit used negates the need for a blocking diode in this application. You can tell when the solar cell is producing enough power because the little red LED on the charger will come on during charging.
For more detail: How to make a solar iPod/iPhone charger -aka MightyMintyBoost