Summary of IR Calculator
This article guides readers in building an IR remote-controlled calculator using an Arduino UNO and a 16x2 LCD. The project replaces a standard keypad with an infrared receiver to enable calculations from a distance. Key features include simultaneous calculation support, decimal point usage, backspace functionality, and bug fixes for invalid operator sequences. The guide details component selection, wiring schematics, specific library requirements, and the code necessary to map custom remote codes to calculator functions.
Parts used in the RC Calculator:
- Arduino UNO R3
- 16x2 LCD RG1602A
- IR Receiver
- 220 Ohm resistor
- 2x1k Ohm resistor
- IR Remote Control
Hey, welcome to my first instructable where I will be helping you create a calculator. It’s basically made up of a 16×2 LCD, with an Arduino UNO that you can use in order to make quick calculations from far distances. I know, it doesn’t make sense right, well I did not have a keypad but I did have an IR Remote and Receiver so I thought, why not I should use my remote as my keypad. Now that’s not where it ends, the code I have written for this calculator does not include any kind of bugs that I have seen in most Arduino calculators.
Here is a list of features that I have added in this calculator:
- Make simultaneous calculations
- Use decimal point
- Erase the last character
- Gotten rid of bugs that take place during runtime, like having multiple operators or decimal points, etc.
Now of course you can edit the code and make it work with the help of a keypad, and use the Arduino Nano to create your whole calculator in a small package, but since this is my first instructable, I decided to keep this as raw as possible. I hope you like this instructable, all the necessary stuff required are listed down below so without any further ado, let’s make an RC calculator XD.
Step 1: Components
The first thing to do when beginning with any project is gathering the required components. The required components for this project are as follows:
- Arduino UNO R3
- 16×2 LCD RG1602A
- IR Receiver
- 220 Ohm resistor
- 2x1k Ohm resistor
And of course, do not forget your IR Remote Control, if you don’t have one like the one I do in the video, you can simply use your TV or AC remote.
Libraries:
- IRremote by shirriff, z3t0, ArminJo – v2.5.0
- LiquidCrystal by Arduino, Adafruit – v1.0.7
Make sure you are using these packages and have installed the same version, in some future versions some of the functionality of the packages used in this project like IRremote or LiquidCrystal might be deprecated, which might lead to unexpected errors.
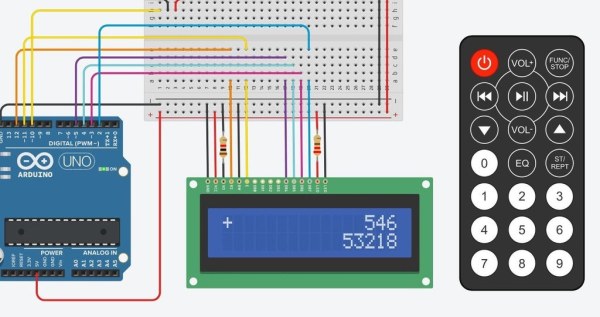
Step 2: Schematics
Now here is the circuit diagram for the hardware we are building for the RC calculator. Make sure that you have an IR remote with you or else it may not work at all.
Here is a table representing where to connect which pin to where on the Arduino board and the components, take a look at it carefully:
https://github.com/Jaagrav/IRcalculator/
Step 3: Coding
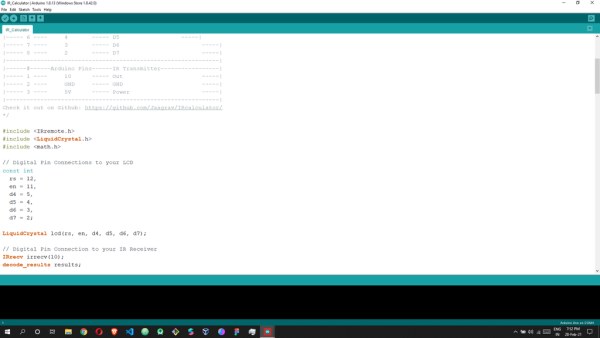
Here’s the code you’re going to need in order to make your IR Calculator work. Simply just copy and paste the code to your arduino, now I have left some comments in the code that you might want to take a look at before blindly copying the pasting the code. I’ll explain that anyway in the next step.
/*
This is an IR Remote Controlled Calculator.
I have tried to get rid of all the bugs that I have seen
in other calculators made using an arduino. This calculator
can be used like a normal calculator, you can make
simultaneous calculations with this, add points, etc.
The LCD Display used here is a RG1602A,
you may refer to this article to understand how to use the display,
https://create.arduino.cc/projecthub/najad/interfacing-lcd1602-with-arduino-764ec4
All you need to do is connect the wires in the corresponding
pins written down below and edit the IR Codes:
|------#------Arduino Pins------LCD RG1602A--------------------|
|----- 1 ----     GND     ----- VSS,V0 (With 2K ohm),RW,K -----|
|----- 2 ----     5V      ----- VDD, A (With 220 ohm)     -----|
|----- 3 ----     12      ----- RS                        -----|
|----- 4 ----     11      ----- E                         -----|
|----- 5 ----     5       ----- D4                        -----|
|----- 6 ----     4       ----- D5      	          -----|
|----- 7 ----     3       ----- D6                        -----|
|----- 8 ----     2       ----- D7                        -----|
|--------------------------------------------------------------|
|------#------Arduino Pins------IR Transmitter-----------------|
|----- 1 ----     10      ----- Out                       -----|
|----- 2 ----     GND     ----- GND                       -----|
|----- 3 ----     5V      ----- Power                     -----|
|--------------------------------------------------------------|
Check it out on Github: https://github.com/Jaagrav/IRcalculator/
*/

#include <IRremote.h>
#include <LiquidCrystal.h>
#include <math.h>

// Digital Pin Connections to your LCD
const int
  rs = 12,
  en = 11,
  d4 = 5,
  d5 = 4,
  d6 = 3,
  d7 = 2;

LiquidCrystal lcd(rs, en, d4, d5, d6, d7);

// Digital Pin Connection to your IR Receiver
IRrecv irrecv(10);
decode_results results;

String
  number1 = "0",
  number2 = "0",
  optr = "=",
  sixteenString = "                ";

/*
In the below switch-case replace the numbers with the IR codes
from your remote. Make sure you write the code that gets printed
in your serial monitor from line 142.
*/

void acceptInput(int character) {
  Serial.println(character);
  switch(character) {
  	case 2222:
      concatNumbers("1");
    break;
    case -31092:
      concatNumbers("2");
    break;
    case 18888:
      concatNumbers("3");
    break;
    case 10000:
      concatNumbers("4");
    break;
    case -22203:
      concatNumbers("5");
    break;
    case 26666:
      concatNumbers("6");
    break;
    case 6333:
      concatNumbers("7");
    break;
    case -25537:
      concatNumbers("8");
    break;
    case 22222:
      concatNumbers("9");
    break;
    case 12222:
      concatNumbers("0");
    break;
    case 28888:
      concatNumbers(".");
    break;
    case 255:
      number1 = "0";
      number2 = "0";
      optr = "=";
    break;
    case 32222:
      function("+");
    break;
    case -28870:
      function("-");
    break;
    case 24444:
      function("/");
    break;
    case 8444:
      function("x");
    break;
    case 45555:
      if(optr != "=")
        calculate("=");
    break;
    case 4333:
      backSpace();
    break;
    default:
    Serial.println("Invalid Input");
  }
}

void setup() {
  Serial.begin(9600);

  lcd.begin(16, 2);
  irrecv.enableIRIn();
}

void loop() {
  if (irrecv.decode(&results)) {
    unsigned int result = results.value;
    String val = String(result);
    acceptInput(val.toInt());
    irrecv.resume();
  }
  lcd.setCursor(0,0);
  lcd.print(optr + "  " + sixteenString.substring(number1.length() + 3) + number1);
  lcd.setCursor(0,1);
  lcd.print(sixteenString.substring(number2.length()) + number2);
}

void calculate(String op) {
  double no1 = number1.toDouble();
  double no2 = number2.toDouble();
  double calcVal = 0.0;

  if(optr == "+")
    calcVal = (no1 + no2);
  else if(optr == "-")
    calcVal = (no1 - no2);
  else if(optr == "x")
    calcVal = (no1 * no2);
  else if(optr == "/")
    calcVal = (no1 / no2);

  number1 = toString(calcVal);
  number2 = "0";
  optr = op;
}

String toString(double num) {
  return String(num);
}

void function(String e) {
  if(number1 != "0" && number2 != "0") {
    calculate(e);
  }
  else if(number1 == "0") {
    number1 = number2;
    number2 = "0";
  }
  optr = e;
}

void concatNumbers(String num) {
  if(optr == "=")
    number1 = "0";
  if(num != "."){
    if(number2.length() == 1 && number2 == "0")
       number2 = num;
     else
       number2 += num;
  }
  else {
    if(number2.charAt(number2.length()-1) != '.' && number2.indexOf('.') == -1)
      number2 += num;
  }
}

void backSpace() {
  number2 = number2.substring(0, number2.length() - 1);
    if(number2 == "")
      number2 = "0";
}<br>
Step 4: Getting Your Remote’s IR Codes and Replacing Them With the Default Ones
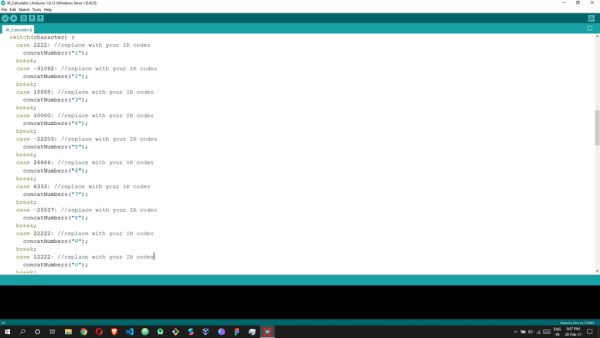
Now as you can see in the image, you need to replace those numbers with the IR codes of the buttons from your remote that you get from your serial monitor. How, you ask? It’s simple but it takes a bit of time.
Once your circuit is ready and the code has been uploaded successfully to your serial monitor, fire up your serial monitor, that’s where you’ll find the codes for your remote once you press any button on the remote.
Follow these steps to get your button codes from your remote,
- Build the circuit, make sure every component is connected to the right pin.
- Upload the code to your Arduino (CTRL + U).
- Open up your serial monitor (CTRL + SHIFT + M)
- Now press the buttons that you want to use as the function buttons (such as 0,1,2,+,-,etc.) on your remote, you’ll notice there are certain codes popping up in your serial monitor everytime you press a button on your remote.
- Open up your notepad and store these codes.
- Replace the codes with the previously written codes respective of their buttons in the Arduino code file.
Source: IR Calculator
- How can I use a TV or AC remote for this project?
You can simply use your TV or AC remote if you do not have the specific one shown in the video. - What libraries are required for this project?
The project requires IRremote by shirriff, z3t0, ArminJo version 2.5.0 and LiquidCrystal by Arduino, Adafruit version 1.0.7. - Can this calculator perform simultaneous calculations?
Yes, the code allows users to make simultaneous calculations and add points without bugs found in other versions. - How do I replace the default IR codes with my own?
Upload the code, open the serial monitor, press your desired buttons, record the printed codes, and replace them in the switch-case section of the code. - Does the calculator support decimal points?
Yes, one of the added features is the ability to use decimal points during calculations. - What happens if I try to enter multiple operators?
The code includes logic to get rid of bugs that take place during runtime, such as having multiple operators. - Can I edit the code to use a physical keypad instead?
Yes, you can edit the code to work with the help of a keypad and use an Arduino Nano for a smaller package. - Which pins on the Arduino connect to the IR receiver output?
The IR transmitter output connects to digital pin 10 on the Arduino board.