Summary of Introducing PETBOT: A node.js Telepresence Robot using arduino
This article details PETBOT, a telepresence robot built by an AppNeta employee to facilitate face-to-face communication across remote offices. The project mounts an iPad on a repurposed "Desert Blaster" RC car chassis. Control is achieved via a web interface using Node.js and Socket.io, allowing users to operate the robot remotely with low latency. The system was upgraded from an Arduino to a Raspberry Pi to leverage WiFi capabilities, enabling operation beyond the original radio transmitter's range.
Parts used in the PETBOT:
- iPad
- Lightweight chassis (Desert Blaster RC car)
- Raspberry Pi
- Radio transmitter
- Node.js server (local and remote on Heroku)
- Socket.io
- Transistors
- Soldering leads
- Multimeter
- Arduino (original prototype component)
- Duino (for Arduino communication)
- Pi-gpio (for Pi communication)
It’s a telepresence robot I built for our office, consisting of an iPad mounted on a lightweight chassis powered by an RC car. To operate it, you open up a video chat session with the iPad, then control the robot from your browser using the web interface.
PETBOT can see, move, talk, and, like any startup employee, play foosball. Or at least try to.
The car is controlled by a radio transmitter wired to a Raspberry Pi running a local node.js server. Commands are sent via socket.io through a web UI & second node.js server hosted remotely on Heroku. The local server connects to the remote server as a socket.io client, thus allowing commands to be sent to the Pi from anywhere in the world with very low latency.
I originally made the circuit and local server for Arduino, but without an expensive wifi shield, PETBOT’s range was limited to the range of the radio transmitter. To remedy this, I wired it up to my wifi-enabled Raspberry Pi instead. Most of the time, the Pi stays plugged into the wall and powers the transmitter from there, but if we want to send PETBOT further away (say, to other floors in the building), we can mount the Pi and transmitter directly on PETBOT and run it off battery power.
The Idea
Here at AppNeta, we have engineering teams in Boston, Providence, and Vancouver, plus remote employees in various locations. Although we’re big on asynchronous communication (via HipChat, Github, etc.), chatting face to face is still important, so we do a lot of videoconferencing. In our Boston office, we share a persistent VSee window with Providence.
Recently our team acquired a couple of iPads. We joked about making our own telepresence robot: duct taping an iPad to a Segway or a Roomba. But while sitting in a meeting one afternoon, it occurred to me that this really wouldn’t be so hard to make. A remote control car could probably be controlled from an Arduino or Raspberry Pi, and it couldn’t be too hard to control the board over the web.
A few weeks ago I stopped into Radio Shack and that’s when I spotted it. The Desert Blaster. A large, sturdy RC car, marked down from $80 to $11. It was a sign. I HAD to build it.
The Circuit
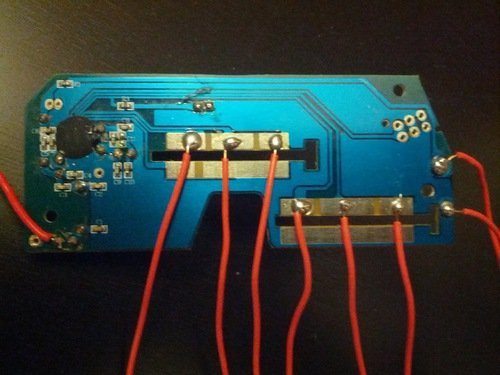
I brought the Desert Blaster home and immediately began dismantling it. Once I got to the board inside the remote I discovered the car’s signals were controlled by sliding switches:
I soldered leads to the connections, then routed them through transistors to translate the action of the sliding switches to the I/O ports of the Arduino or Pi.

Originally I set up the circuit with the Arduino in mind, but it works just as well with the Raspberry Pi’s GPIO pins. Here’s a schematic:
Remotes probably vary for different RC car models, so this may not work for everyone, but it was easy enough to figure out with my trusty multimeter!
The Application
Before going through the trouble of building a case for the car, I wanted to make sure that I could control it over the web with latency comparable to a video chat program. Socket.io on node.js seemed like a good starting point, due to its ease in passing messages between browsers and servers. For the Arduino, I used duino to facilitate PC-to-Arduino communication; for the Pi, i used pi-gpio.
For more detail: Introducing PETBOT: A node.js Telepresence Robot
- What is PETBOT?
PETBOT is a telepresence robot consisting of an iPad mounted on a lightweight chassis powered by an RC car. - How is the robot controlled?
You control the robot from your browser using a web interface that sends commands via socket.io. - Does the robot use a Raspberry Pi?
Yes, the car is controlled by a radio transmitter wired to a Raspberry Pi running a local node.js server. - Can I power the robot with batteries?
Yes, if you want to send the robot further away, you can mount the Pi and transmitter directly on the robot and run it off battery power. - What software is used for communication?
The application uses Node.js and Socket.io to pass messages between browsers and servers with low latency. - How were the RC car signals translated?
The author soldered leads to the sliding switch connections and routed them through transistors to translate actions to I/O ports. - Why was the project switched from Arduino to Raspberry Pi?
The switch was made because the Arduino lacked an expensive WiFi shield, limiting the robot's range to the radio transmitter distance. - Where is the remote server hosted?
A second node.js server is hosted remotely on Heroku to connect with the local server.