Hi guys. In this instructable, I will teach you how to build an obstacle avoiding robot. The robot will be a small and simple 2-wheeled car which will move forward until it detects an obstacle in its path. Upon doing so, it will stop, move a little back and then look towards its left and right.
Then it will compare the distances available ahead on either side and then turn towards the direction where the distance available seems to be more relatively. This way it will be able to move in an environment full of obstacles without colliding with any. This is a small representation of the concept of collision avoidance used in various applications such as warehouse robots, driverless cars etc.
To detect the distance, the robot uses the HC-SR04 ultrasonic sensor. So this sensor sends ultrasonic sound waves, every 10 microseconds, and if any obstacle is ahead, the sensor receives the echo. Based on the travel time, it knows the distance between the sensor and the object. So let’s begin!
Step 1: Gather the Components
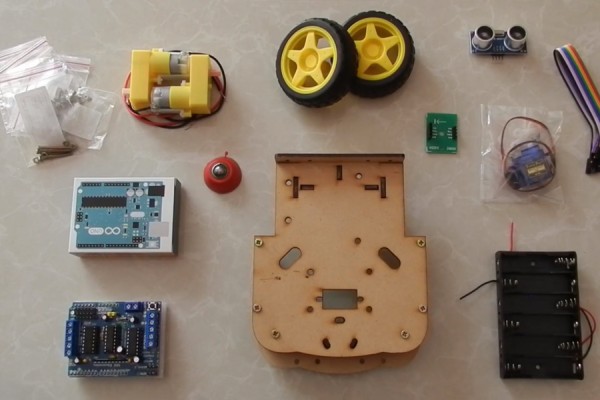
First, to begin with, we obviously need to gather the components and tools required to build the robot. Find the components and the tools required below:
Get components at one place for ease: The Arduino Robotic Kit
Individual Components:
- Arduino UNO
- L293D Motor Shield
- Chassis(including motors and wheels)
- Wires
- Battery Holder
- Micro Servo Motor SG90
- HC-SR04 Ultrasonic Sensor
- Sensor Mount (Optional)
Tools (Optional):
Gather the components and move on to the next step!
Step 2: Attach Motors and Wheels
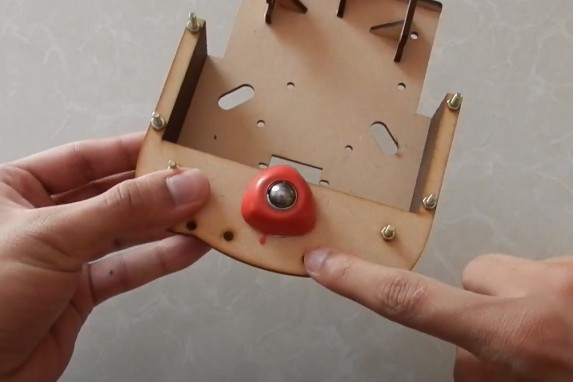
The very first thing I did with the chassis was to add a castor wheel at the front which will act as a supportive third wheel at the front and it can rotate freely as it has 360-degree freedom. This way we can avoid the use of 4 wheels and get away with a 2-Wheeled robot.
Next what we need to do is a classic step in any vehicle-related project. Attach the motors and wheels to the chassis. There is no particular way to do this because everyone might be using a different chassis but I would like to mention one thing here: Ensure that the motors are fixed sturdily and are both levelled the same and also the wheels are pointing exactly forward. Otherwise, you might have some movement-related issue later-on.
Solder wires to the motors and move on to the next step!
Step 3: Attach Arduino and Motor Shield
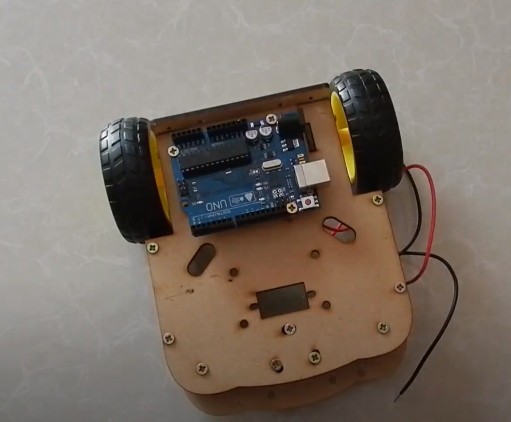
Attach the Arduino board on the top of the chassis. You can attach it in any preferable way. This could be either using a few spacers and screws or directly sticking the Arduino board on the chassis using a piece of double-sided tape. Personally, I always would go with the first method because it gives it a more professional look.
Then just insert the motor shield on top of the Arduino board and you are good to go!
Step 4: Add Servo Motor and Ultrasonic Sensor
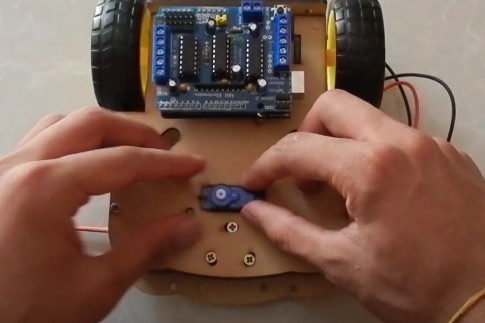
Now we need to add the sensing mechanism of the robot. This includes three components.
- Ultrasonic Sensor for sensing the distance ahead.
- Servo Motor for rotating the sensor towards left and right.
- The sensor-mount to fix the sensor on the servo motor.
My chassis had a cutout for attaching the servo motor so I simply had to insert it in the cutout. If yours too has one then great. If it doesn’t, then just stick it on the front of the chassis using a piece of double-tape.
Then using the sensor-mount, attach the sensor to the servo motor and move ahead to the next step!
Step 5: Wiring
We again have three things here. So, there are three things that we need to take care of while wiring the robot:
- Motors
The motor shield has ports for connecting up to four motors, in the form of screw terminals. Just connect the motors into any two terminals as we are using only two motors.
- Servo Motor
The servo motor has just one plug wire that has three wires in it. Just plug it into the servo terminal on the motor shield namely S1.
- Ultrasonic Sensor
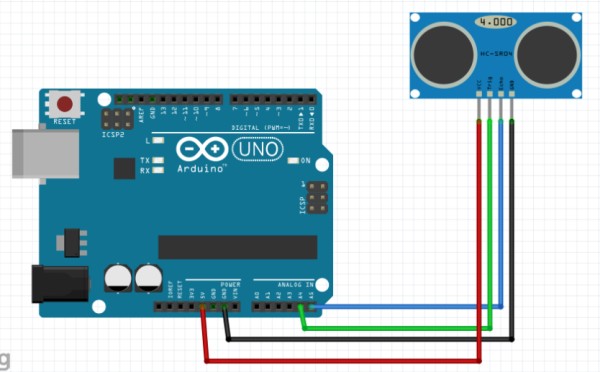
Refer to the image present above for the connections of the ultrasonic sensor to the Arduino board. (or) Connections:
- Sensor GND : Arduino GND
- Sensor VCC : Arduino +5V
- Sensor TRIP : Arduino A4
- Sensor ECHO : Arduino A5
Also, connect the battery holder to the motor shield’s battery screw terminals and move ahead, yet again!
Step 6: Coding Showdown
Now, it is time for the final sheet in the stack. It is time to code the robot and actually see whether the robot will work as it should, or not!
You can try to code the robot on your own for better experience and learning but you can always refer my code present below. I have also uploaded the Arduino Code file. Make sure that you have the Arduino IDE installed before trying to run your code 🙂
Do try to build on of these yourselves and if you do, there is a section below called “I Made It”. Meet me there.
Thank You
////////////////////////////////////////////////////////
  //          Arduino Obstacle Avoiding Robot v2.0      //
 //            By Aarav Garg - 2021                    //
////////////////////////////////////////////////////////

//including the libraries
#include <AFMotor.h>
#include <NewPing.h>
#include <Servo.h>

//defining pins and variables
#define TRIG_PIN A4
#define ECHO_PIN A5
#define MAX_DISTANCE 200
#define MAX_SPEED 200 // sets speed of DC  motors
#define MAX_SPEED_OFFSET 20

#define turn_amount 500

//defining motors,servo,sensor
NewPing sonar(TRIG_PIN, ECHO_PIN, MAX_DISTANCE);
AF_DCMotor motor1(2, MOTOR12_8KHZ);
AF_DCMotor motor2(1, MOTOR12_8KHZ);
Servo myservo;

//defining global variables
boolean goesForward=false;
int distance = 100;
int speedSet = 0;

void setup() {
  Serial.begin(9600);
  myservo.attach(10);
  myservo.write(90);
  delay(2000);
  distance = readPing();
  delay(100);
  distance = readPing();
  delay(100);
  distance = readPing();
  delay(100);
  distance = readPing();
  delay(100);
}

void loop() {
 int distanceR = 0;
 int distanceL =  0;
 delay(40);
 Serial.println(distance);

 if(distance<=15)
 {
  Serial.println("Object Detected");
  moveStop();
  delay(100);
  moveBackward();
  delay(300);
  moveStop();
  delay(200);
  distanceR = lookRight();
  Serial.print("Distance Right = ");
  Serial.println(distanceR);
  delay(200);
  distanceL = lookLeft();
  Serial.print("Distance Left = ");
  Serial.println(distanceL);
  delay(200);

  if(distanceR>=distanceL)
  {
    turnRight();
    moveStop();
  }
  else
  {
    turnLeft();
    moveStop();
  }
 }
 else
 {
  moveForward();
 }

 //reseting the variable after the operations
 distance = readPing();
}

int lookRight()
{
    myservo.write(0);
    delay(500);
    int distance = readPing();
    delay(100);
    myservo.write(90);
    return distance;
}

int lookLeft()
{
    myservo.write(180);
    delay(500);
    int distance = readPing();
    delay(100);
    myservo.write(90);
    return distance;
    delay(100);
}

int readPing() {
  delay(70);
  int cm = sonar.ping_cm();
  if(cm==0)
  {
    cm = 250;
  }
  return cm;
}

void moveStop() {
  motor1.run(RELEASE);
  motor2.run(RELEASE);
  }

void moveForward() {

 if(!goesForward)
  {
    goesForward=true;
    motor1.run(FORWARD);
    motor2.run(FORWARD);
   for (speedSet = 0; speedSet < MAX_SPEED; speedSet +=2) // slowly bring the speed up to avoid loading down the batteries too quickly
   {
    motor1.setSpeed(speedSet);
    motor2.setSpeed(speedSet+MAX_SPEED_OFFSET);
    delay(5);
   }
  }
}

void moveBackward() {
    goesForward=false;
    motor1.run(BACKWARD);
    motor2.run(BACKWARD);
  for (speedSet = 0; speedSet < MAX_SPEED; speedSet +=2) // slowly bring the speed up to avoid loading down the batteries too quickly
  {
    motor1.setSpeed(speedSet);
    motor2.setSpeed(speedSet+MAX_SPEED_OFFSET);
    delay(5);
  }
}

void turnRight() {
  Serial.println("Turning Right");
  motor1.run(FORWARD);
  motor2.run(BACKWARD);
  delay(turn_amount);
  motor1.run(FORWARD);
  motor2.run(FORWARD);
}

void turnLeft() {
  Serial.println("Turning Left");
  motor1.run(BACKWARD);
  motor2.run(FORWARD);
  delay(turn_amount);
  motor1.run(FORWARD);
  motor2.run(FORWARD);
}
Source: How to Make Smart Obstacle Avoiding Robot Using Arduino Uno