Summary of How To Generate Square Wave Using Arduino
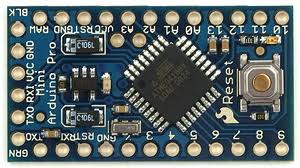
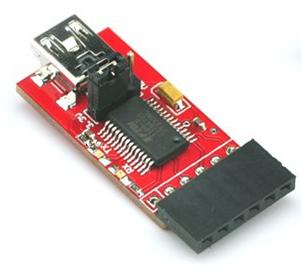
Any AVR-based board that follows the Arduino schematic and bootloader can be programmed with the Arduino IDE. This project uses an Arduino Pro Mini and the tone()/noTone() functions to generate square waves at 10 Hz, 100 Hz, and 1 kHz on pin 8 for 10 seconds each, with an LED on pin 6 and status messages on a 16x2 LCD. A USB–TTL adapter is required to program the Pro Mini. Waveforms are observed on a CRO; the code uses LiquidCrystal library and standard Arduino digital I/O functions.
Parts used in the Pulse Generation Project:
- Arduino Pro Mini
- 16x2 LCD
- LED
- 1K resistor (for LED)
- 10K potentiometer (for LCD contrast)
- USB to TTL converter board
- Breadboard and jumper wires
- CRO (for observing waveform)
Any AVR microcontroller based board which follows the standard Arduino schematic and is flashed with the Arduino bootloader can be called an Arduino board. The Arduino is refered to as open source hardware and the Arduino IDE is also open source and anybody can contribute their libraries to the Arduino. All arduino boards should be compatible with the Arduino IDE which can be used to program the Arduino boards.Since the Arduino board can act as a stand-alone system it should have capabilities to take inputs process the input and then generate a corresponding output. It is through these inputs and outputs that the Arduino as a system can communicate with the environment.The Arduino boards can communicate with other devices using digital input/output analog input/output standard communication ports like USART, IIC, and USB etc.
A microcontroller based system sometimes controls other devices by simply generating pulses of certain frequencies and duty cycle. This normally happens when the connected device has no processors inside it like in the case of LED display system or motor driving system using PWM based circuits or any kind of switching system. This particular project demonstrates how simple is to code the Arduino board to generate the square waves of any required frequency.


Project Source Code
###


/*============================ EG LABS ===================================//


 Demonstration on how to generate square wave using Arduino


 The circuit:

  The circuit:

 * LCD RS pin to digital pin 12

 * LCD Enable pin to digital pin 11

 * LCD D4 pin to digital pin 5

 * LCD D5 pin to digital pin 4

 * LCD D6 pin to digital pin 3

 * LCD D7 pin to digital pin 2

 * LCD R/W pin to ground

 * 10K resistor:

 * ends to +5V and ground

 * wiper to LCD pin 3

 * LED anode attached to digital output 6

 * LED cathode attached to ground through a 1K resistor


//============================ EG LABS ===================================*/


// include the library code:

#include <LiquidCrystal.h>


// initialize the library with the numbers of the interface pins

LiquidCrystal lcd(12, 11, 5, 4, 3, 2);


// give the LED pin a name:

int led = 6;


void setup()

{

  // set up the LCD's number of columns and rows:

  lcd.begin(16, 2);

  // Print a message to the LCD.

  lcd.print("ENGINEERS GARAGE");

  lcd.setCursor(0,1);

  lcd.print("PULSE GENERATION");

  // initialize the digital pin as an output.

  pinMode(led, OUTPUT);

}


void loop()

{

  digitalWrite(led, HIGH);

  tone(8, 10); // generate square wave at 10Hz

  delay(10000);

  digitalWrite(led, LOW);

  noTone(8); // stop the wave

  delay(3000);


  digitalWrite(led, HIGH);

  tone(8, 100); // generate square wave at 100 HZ

  delay(10000);

  digitalWrite(led, LOW);

  noTone(8); // stop the wave

  delay(3000);


  digitalWrite(led, HIGH);

  tone(8, 1000); // generate square wave at 1Khz

  delay(10000);

  digitalWrite(led, LOW);

  noTone(8); // stop the wave

  delay(3000);

}

###
Circuit Diagrams

Project Components
Project Video
Source: How To Generate Square Wave Using Arduino
- Can any AVR microcontroller board be called an Arduino?
Yes, any AVR-based board that follows the standard Arduino schematic and is flashed with the Arduino bootloader can be called an Arduino board. - Which Arduino board is used in this project?
The Arduino Pro Mini is used in this project. - How does the project generate square waves?
The project uses the Arduino tone() function to generate square waves at required frequencies and noTone() to stop them. - What frequencies are generated in the example code?
The code generates 10 Hz, 100 Hz, and 1 kHz square waves. - How long does each frequency run in the code?
Each frequency runs for 10 seconds as implemented with delay(10000). - Which pin outputs the square wave in the project?
Pin 8 is used to output the square wave. - Which pin is the LED connected to in the code?
The LED is connected to digital pin 6. - Is an external adapter needed to program the Pro Mini?
Yes, an external USB to TTL converter board is required to program the Arduino Pro Mini and for serial communication. - Which library is used for the LCD?
The LiquidCrystal library is used to control the 16x2 LCD in 4-bit mode.