Summary of Creating a Fire Detector with Omniverse Replicator and Arduino Nicla
Summary: This proof-of-concept uses TinyML and synthetic data to train a fire detection object detector. Synthetic scenes are generated with NVIDIA Omniverse Replicator, images are auto-labeled using Grounding DINO, the dataset and Pascal VOC annotations are used to train a TinyML FOMO model on Edge Impulse, and the quantized model is deployed to an Arduino Nicla Vision for real-time edge inference.
Parts used in the Fire Detection System:
- NVIDIA Omniverse (Omniverse Code, Omniverse Replicator)
- Omniverse Nucleus Service
- Omni.Flowusd extension (optional for Flow rendering)
- Python (scripted synthetic data generation)
- Grounding DINO (zero-shot object detector for automatic labeling)
- Jupyter notebook (generate_annotation)
- OpenCV and xml.etree.ElementTree (for bounding box validation)
- Edge Impulse platform (FOMO object detection pipeline)
- Arduino Nicla Vision
- OpenMV IDE / MicroPython (to run ei_object_detection.py on Nicla Vision)
- labels.txt and trained.tflite (model files deployed to device)
- USB cable (to connect Arduino Nicla Vision to PC)
This project serves as a proof-of-concept, showcasing the utilization of TinyML and a synthetic dataset for the purpose of fire detection.
Story
The threat posed by fires is of utmost concern to humanity, emphasizing the crucial need for reliable detection. Current flame sensors are constrained by limitations in their ability to detect fires at a distance. To surmount this challenge, I am dedicated to developing a fire detection system that is both lightweight and exceptionally precise, utilizing a machine learning approach.
The complexity intensifies when real-time data processing is imperative or when there is a scarcity of available datasets for training machine learning models. Synthetic datasets play a pivotal role in addressing this predicament. This project serves as a proof-of-concept, illustrating the merits of incorporating synthetic datasets within fire detection systems. Synthetic datasets enable the simulation of scenarios that may be infrequently encountered in real-world situations yet require attention. They offer a remarkably cost-effective substitute to genuine data, a concept increasingly embraced in training deep neural networks for computer vision tasks. Various strategies, such as domain randomization, exist to bridge the disparity between synthetic training data and real-world application.
This guide will navigate you through the process of training an object detection model tailored for fire detection systems. The following diagram provides a comprehensive illustration of the project’s overarching architecture:
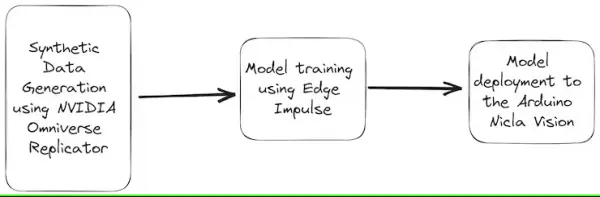
Illustrated in the diagram above, the Nvidia Omniverse tool emerges as a valuable resource for crafting synthetic datasets. This versatile platform boasts photorealistic rendering capabilities and the ability to fashion dynamic scenes, facilitating the generation of exceptionally lifelike scenarios. These encompass a wide array of environmental variables, including light, color, background, and more.
Subsequently, leveraging the Edge Impulse web platform, we can expeditiously train a machine learning model using cloud-based data resources.
Upon the culmination of the training process, the optimized fire detection model is deployed onto the Arduino Nicla Vision. This compact and energy-efficient platform is tailor-made for edge computing applications, which aligns seamlessly with the deployment of the model. This affords real-time fire detection, enabling localized data processing that doesn’t hinge on cloud connectivity.
Furthermore, the machine learning model’s output holds the potential to actuate various responses, such as activating a light source or dispatching notifications to smartphones.
Creating Synthetic Data with NVIDIA Omniverse Replicator
Similar to any machine learning endeavor, the foremost and pivotal step involves dataset preparation. Within the Nvidia Omniverse ecosystem, the Omniverse Replicator serves as a component, constituting a virtual world simulation accessible through the Omniverse Code application.
You can choose to download the application for either Windows or Linux operating systems through this provided link. Once Omniverse is downloaded, access the Exchange tab and initiate the installation process for Omniverse Code.

Next, establish a local Nucleus Service by accessing the Nucleus tab and adhering to the provided instructions.
Once the Nucleus Service is configured, proceed to the Library tab. Launch Omniverse Code from this point to commence its utilization.
![]()
You may encounter the following message:
2023-05-13 10:20:29 [Warning] [rtx.flow.plugin] rtx.flow.plugin failed to load Flow dynamic libraries (error: libnvflow.so: cannot open shared object file: No such file or directory)! Flow rendering will not be available. Try enabling the omni.Flowusd extension.In order to address this concern, it is advisable to activate the autoload feature for the Omni.Flowusd extension. This configuration can be adjusted within the Omniverse application settings. Locate the Omni.Flowusd extension and confirm that the Autoload option is enabled or marked.
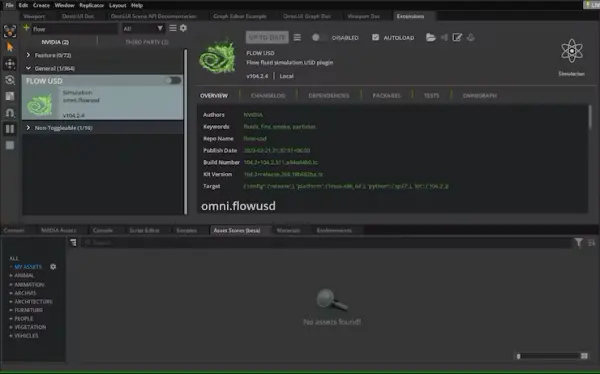
Save the changes to the settings and proceed to restart the Omniverse application.
In the upcoming steps, our objective is to create a synthetic dataset through Python code. This will allow us to generate a wide range of data using two cameras, each capturing frames from distinct angles.
To proceed, kindly access the Script Editor and insert the provided code snippet.
import omni.replicator.core as rep
import datetime
now = datetime.datetime.now()
# Camera1
focal_length1 = 25
focus_distance1 = 1200
f_stop1 = 0.4
pixel_resolution1 = (512, 512)
horizontal_aperture1 = 8.5
camera1_pos = [(0, 270, 500), (500, 270, 500), (-500, 270, 500)]
# Camera2 (Top view)
focal_length2 = 50
focus_distance2 = 5000
f_stop2 = 2.8
pixel_resolution2 = (512, 512)
horizontal_aperture2 = 8.5
camera2_pos = [(0, 1800, 0)]
with rep.new_layer():
# Camera1
camera1 = rep.create.camera(
position=(0, 0, 1200),
rotation=(0, -90, 0),
focal_length=focal_length1,
focus_distance=focus_distance1,
f_stop=f_stop1,
horizontal_aperture=horizontal_aperture1,
name='Camera1'
)
# Camera2
camera2 = rep.create.camera(
position=(0, 1500, 0),
rotation=(-90, 0, 0),
focal_length=focal_length2,
focus_distance=focus_distance2,
f_stop=f_stop2,
horizontal_aperture=horizontal_aperture2,
name='Camera2'
)
# Create a new render_product (1 for each camera)
render_product1 = rep.create.render_product(camera1, pixel_resolution1)
render_product2 = rep.create.render_product(camera2, pixel_resolution2)
# Create the floor plane
floor = rep.create.plane(
position=(0, 0, 0),
rotation=(0, 0, 0),
scale=(50, 50, 50),
semantics=[('class', 'floor')],
name='floor',
)
# Randomize the floor material
def random_Floor_Material():
floor_material = rep.randomizer.materials(
materials=rep.get.material(path_pattern="/Fire/Looks/*"),
input_prims=floor
)
return floor_material.node
rep.randomizer.register(random_Floor_Material)
with rep.trigger.on_frame(num_frames=300):
rep.randomizer.random_Floor_Material()
with camera1:
rep.modify.pose(look_at=(0, 0, 0), position=rep.distribution.sequence(camera1_pos))
with camera2:
rep.modify.pose(look_at=(0, 0, 0), position=rep.distribution.sequence(camera2_pos))
writer = rep.WriterRegistry.get("BasicWriter")
now = now.strftime("%Y-%m-%d")
output_dir = "fire_data_" + now
writer.initialize(output_dir=output_dir, rgb=True)
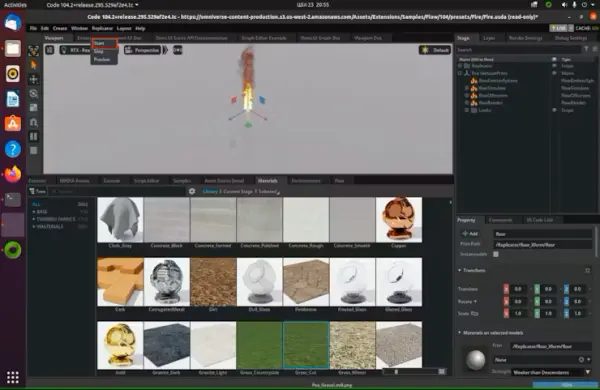
writer.attach([render_product1, render_product2])Drag a fire element from the flow tab and release it onto the scene.
Activate the Run button located within the Script Editor tab. Following this, proceed to drag various materials from the materials tab and drop them onto the scene.
In the provided code snippet, the writer is initialized and connected to the renderer to generate image outputs devoid of annotations.

Let’s initiate the process of generating synthetic data by clicking the “Start” button.
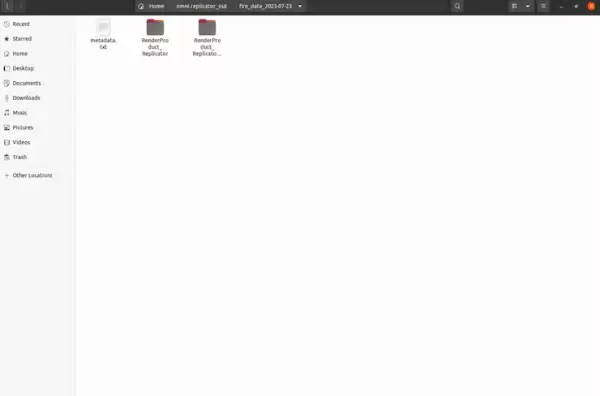
Continuously modifying the floor material contributes to heightened data variability, thereby enhancing dataset diversity. This results in the creation of two distinct folders: “RenderProduct_Replicator” and “RenderProduct_Replicator_01.” The images will be organized within the “img” folder within each of these designated folders.
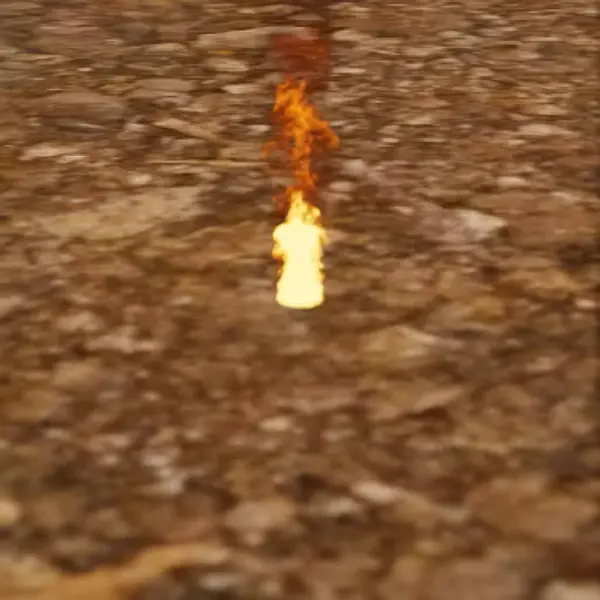
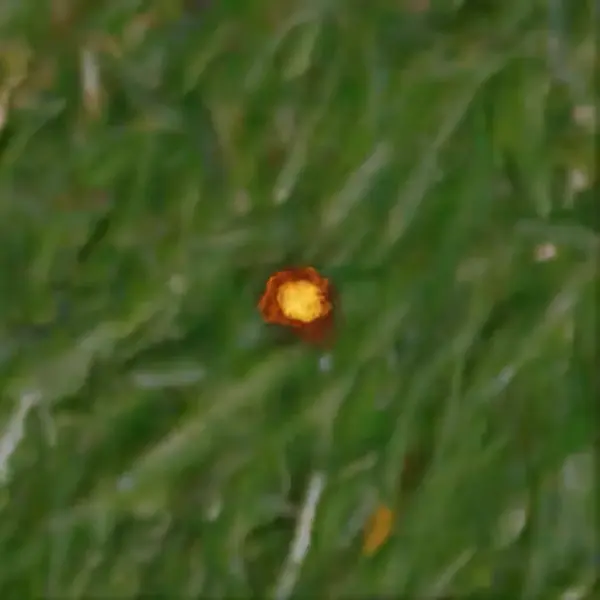
Upon completion of the generation process, you can review the synthetic images within these folders, as depicted below.
Within the directory labeled “Render Product Replicator,” you will find images showcasing a frontal perspective of the fire.
Contained within the directory named “RenderProduct_Replicator_01” are images capturing a top-down view of the fire.
With that, we wrap up the procedure of generating the synthetic dataset.
Given the absence of annotations featuring bounding boxes for the fire, it becomes essential to devise an automated approach for this task. The subsequent section will delve into the details of this step.
Automatic Image Labeling Using Grounding DINO
The significant reality is that data labeling has evolved into a highly expensive and time-intensive undertaking. According to information from the NVIDIA forum, accomplishing output annotation for flow objects using internal tools within NVIDIA Omniverse Code is impractical. As a result, I have unearthed a resolution by harnessing revolutionary zero-shot object detectors like Grounding DINO, which have transformed the landscape of image labeling.
To commence, employ the provided Python code below to aggregate the images from these designated folders into a unified collection.
import os
import shutil

def copy_images(source_folders, destination_folder):
    # Create the destination folder if it doesn't exist
    if not os.path.exists(destination_folder):
        os.makedirs(destination_folder)

    for folder in source_folders:
        # List all files in the source folder
        files = os.listdir(folder)

        for file in files:
            # Check if the file is an image (you can add more image extensions if needed)
            if file.endswith('.png'):
                source_file_path = os.path.join(folder, file)
                destination_file_path = os.path.join(destination_folder, file)

                # If the destination file already exists, rename the file
                counter = 0
                while os.path.exists(destination_file_path):
                    counter += 1
                    new_filename = f"{os.path.splitext(file)[0]}_{counter}.png"
                    destination_file_path = os.path.join(destination_folder, new_filename)

                # Copy the file to the destination folder
                shutil.copy(source_file_path, destination_file_path)

if __name__ == "__main__":
    source_folders  = ["./RenderProduct_Replicator/rgb/", "./RenderProduct_Replicator_01/rgb/"]
    destination_folder  = "./output_folder"
    copy_images(source_folders, destination_folder)
Upon successfully finishing the preceding assignment, proceed to adhere to the subsequent instructions.
Access the “generate_annotation” Jupyter notebook and run the provided code excerpt. Ensure that your Jupyter environment is equipped with the requisite dependencies and libraries to facilitate the smooth execution of the code.
Annotations in the Pascal VOC format will be generated within the export folder, as demonstrated in the illustration below. The Pascal VOC (Visual Object Classes) format is a widely embraced standard for object detection datasets. It encompasses images paired with their respective annotations, encompassing bounding box labels.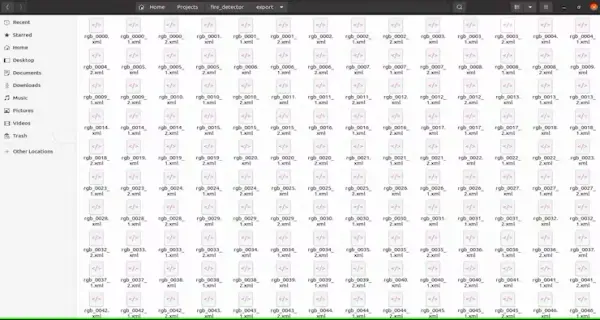
Utilize the provided Python code snippet to validate the accuracy of the bounding box.
import cv2
import xml.etree.ElementTree as ET

def draw_bounding_box(image_path, annotation_path, output_path):
    # Load the image
    img = cv2.imread(image_path)

    # Parse the annotation file
    tree = ET.parse(annotation_path)
    root = tree.getroot()

    for obj in root.findall('object'):
        # Retrieve bounding box coordinates
        xmin = int(obj.find('bndbox/xmin').text)
        ymin = int(obj.find('bndbox/ymin').text)
        xmax = int(obj.find('bndbox/xmax').text)
        ymax = int(obj.find('bndbox/ymax').text)

        # Draw the bounding box on the image
        cv2.rectangle(img, (xmin, ymin), (xmax, ymax), (0, 255, 0), 2)

    # Save the image with bounding box
    cv2.imwrite(output_path, img)

if __name__ == "__main__":
    image_path = "path/to/your/image.jpg"
    annotation_path = "path/to/your/annotation.xml"
    output_path = "path/to/save/output_image.jpg"

    draw_bounding_box(image_path, annotation_path, output_path)
Below, you can see the images.
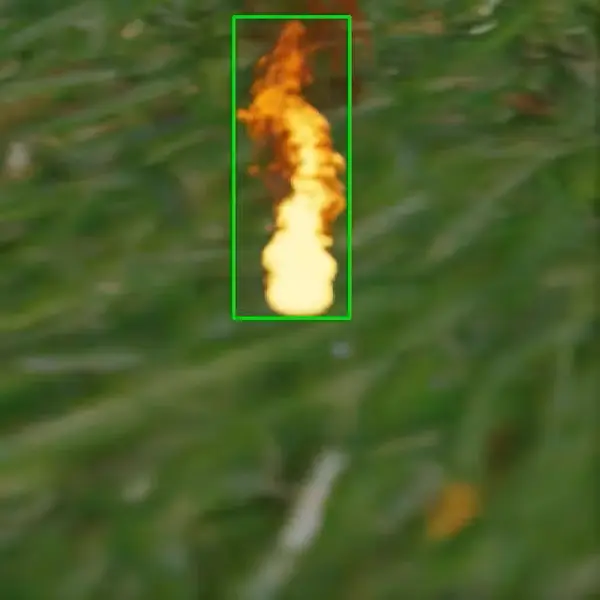
The image labeling task has been successfully accomplished. As evident, the initial image labeling procedure can be swiftly executed in a matter of minutes through the application of the Grounding DINO zero-shot technique.
Moving forward, the subsequent stage involves training the model intended for the fire detection system using Edge Impulse, ultimately culminating in its deployment onto the Arduino Nicla Vision platform.
Training using Edge Impulse platform
Commencing the procedure, it initiates with data collection through IoT devices, succeeded by feature extraction, model training, and ultimately, deployment and optimization tailored for TinyML devices.
Configure the directory structure as depicted below.
.
├── annotations
│ ├── rgb_0000.xml
│ ├── rgb_0001.xml
│ ├── rgb_0002.xml
│ ├── rgb_0003.xml
│ ...
└── images
├── rgb_0000.png
├── rgb_0001.xml
├── rgb_0002.png
├── rgb_0003.png
├── rgb_0004.png
├── rgb_0005.png
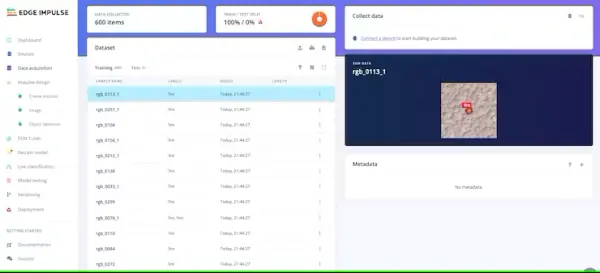
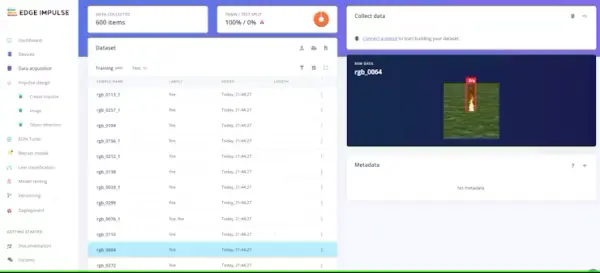
...In my scenario, I uploaded around 600 images alongside their corresponding annotation files.
It is imperative to meticulously label and categorize each image into its respective fire class, ensuring clarity and preventing any potential confusion during the training process.
After you have established and organized your classes within your datasets to your satisfaction, the next step involves training the model. Proceed to the “Create Impulse” section located in the left-hand navigation menu.
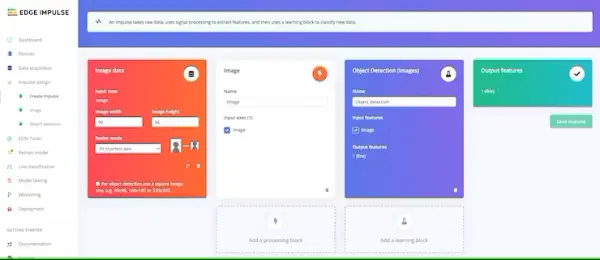
Conclude by clicking the “Save Impulse” button.
Next, proceed to the “Image” section. During this step, you will generate distinctive features derived from the input data. These features encompass distinct attributes that the classification algorithm will utilize to categorize images.
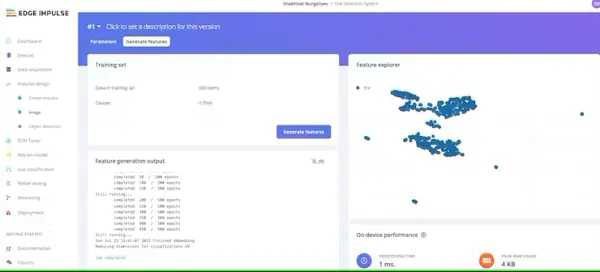
After your exploration with the feature explorer is complete, navigate to the “Object detection” option in the left-hand navigation menu.
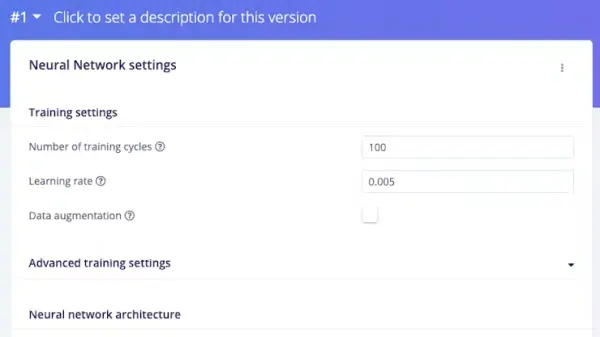
In the context of this project, the training cycle count was configured at 100, and the learning rate was established as 0.005.
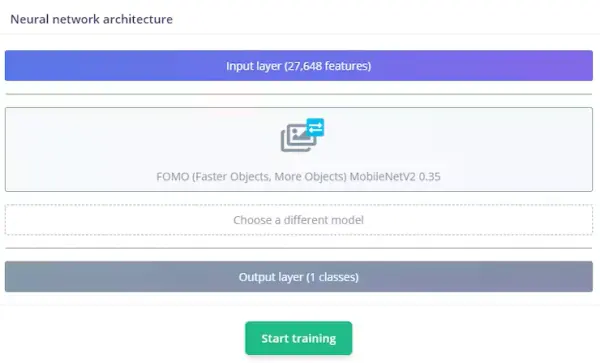
Edge Impulse has created FOMO, an innovative TinyML deep learning framework designed for edge devices. FOMO enables real-time object detection on devices with limited computational and memory capabilities, breaking free from the confines of traditional bounding box detection. Instead, FOMO predicts the center of the detected object. These models are crafted to be under 100KB in size and can be effortlessly deployed onto the Arduino Nicla Vision platform.
The neural network architecture is outlined as follows. Our model will undergo training via transfer learning, leveraging the foundation provided by FOMO.
Initiate model training by clicking the “Start training” button. The duration of this process can vary, typically ranging from 5 to 10 minutes, contingent upon the size of your dataset. Assuming all steps unfold as anticipated, you should observe the following outcome within the Edge Impulse interface.
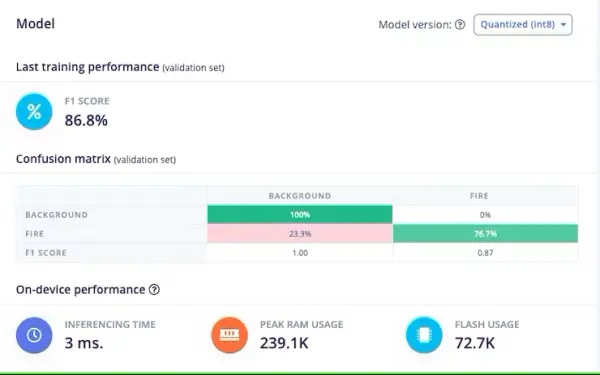
With an F1 score of 86.8%, the model demonstrates a commendable equilibrium between precision and recall, showcasing its effective performance in this object detection undertaking. Upon achieving your desired level of model performance, the subsequent step involves deploying it onto your Arduino Nicla Vision device.

Our quantized model occupies a compact size of 56KB. The Arduino Nicla Vision is constrained by a practical memory threshold of 400 kilobytes (KB), as a portion of the random-access memory (RAM), approximately 1 megabyte (MB), is allocated to the operating system and image buffer. The device is equipped with 2MB of flash memory, supplemented by an additional 16MB of QSPI flash memory to provide extra storage capacity.
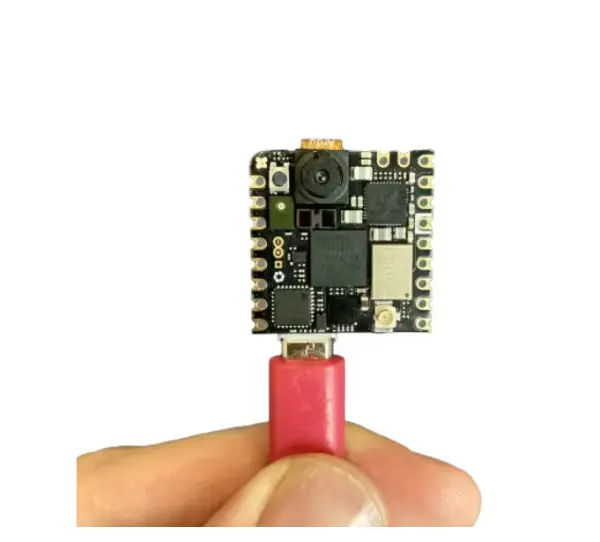
Deploying the Trained Model to Arduino Nicla Vision
Arduino Nicla Vision can be programmed in Micro Python environment using OpenMV IDE. Download it
Afterward, navigate to the Deployment tab within Edge Impulse. Access the deployment options and select the appropriate choice, such as the OpenMV library in my instance.
Towards the lower section of the page, proceed to click the “Build” button. This action will prompt the automatic download of a zip file to your computer, which you should subsequently unzip.

Establish a connection between your computer and the Arduino Nicla Vision device by utilizing a USB cable.
Transfer the files named “labels.txt” and “trained.tflite” to the primary directory of the Arduino Nicla Vision device. Make certain to insert the files directly into the main folder.
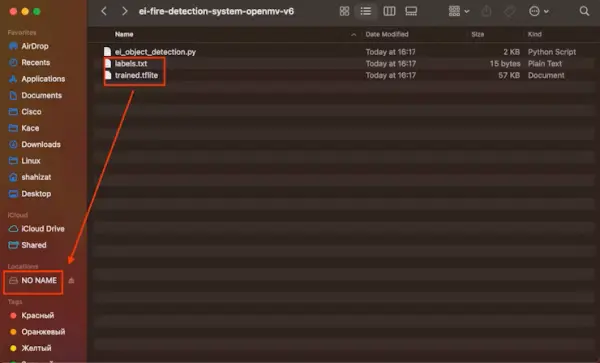
Within the OpenMV IDE, find the Python script named “ei_object_detection.py” responsible for managing the object detection procedure. Ultimately, execute the script.
Presented below is the demonstration video:
Exercise caution when handling lighters and matches, as the lighter was exclusively employed for the purpose of demonstration.
I’ve acquired synthetic training data and trained a model in the cloud through the Edge Impulse platform. Presently, this model is being executed locally on our Arduino Nicla Vision board. While it serves as a proof of concept, the Fire Detection System exhibited here stands as a comprehensive solution. This solution harnesses the capabilities of Nvidia Omniverse Replicator to craft a synthetic dataset, utilizes the advanced machine learning functionalities of the Edge Impulse platform to forge an exceptionally accurate fire detection model, and subsequently deploys this model onto the Arduino Nicla Vision for real-time edge-based fire detection. This tutorial serves as a valuable guide for individuals interested in delving into machine learning using Arduino Nicla boards.
- How is synthetic data created for this project?
Synthetic data is generated using NVIDIA Omniverse Replicator with Python scripts to create cameras, a floor plane, randomize materials, add fire, and render frames from two camera angles. - Can annotations be produced automatically?
Yes; automatic labeling is done using Grounding DINO zero-shot object detection, producing Pascal VOC annotations via a generate_annotation notebook. - What format are the annotations exported in?
Annotations are generated in the Pascal VOC format. - How is the model trained?
The dataset and annotations are uploaded to Edge Impulse, where an impulse is created and an object detection model (FOMO) is trained using transfer learning. - What TinyML framework is used for object detection?
Edge Impulse uses the FOMO TinyML framework for this object detection project. - What model size was achieved after quantization?
The quantized model size reported is 56 KB. - How is the trained model deployed to the Arduino Nicla Vision?
From Edge Impulse deploy options, build an OpenMV library, unzip the download, then copy labels.txt and trained.tflite to the Nicla Vision main directory and run the ei_object_detection.py script in OpenMV IDE. - Does the project support real-time edge inference?
Yes; the trained model runs locally on the Arduino Nicla Vision for real-time fire detection without relying on cloud connectivity. - What tools are used to validate bounding boxes?
OpenCV and xml.etree.ElementTree are used in a validation script to draw and verify bounding boxes from annotations. - Why use synthetic datasets for fire detection?
Synthetic datasets allow simulation of rare or varied scenarios cost-effectively, increasing dataset diversity and helping train models when real data is scarce.