Summary of Calendar- Time – Humidity and Temperature Arduino LCD display
This Instructable describes an Arduino-based desktop display showing day, date, time, humidity, and temperature. It distinguishes itself with a battery-friendly power-saving mode that toggles the LCD backlight via a button. The project extends a previous design by adding calendar and time features using specific sensors. While originally built for a study and living room, it is adaptable for any location needing ambient monitoring without internet connectivity.
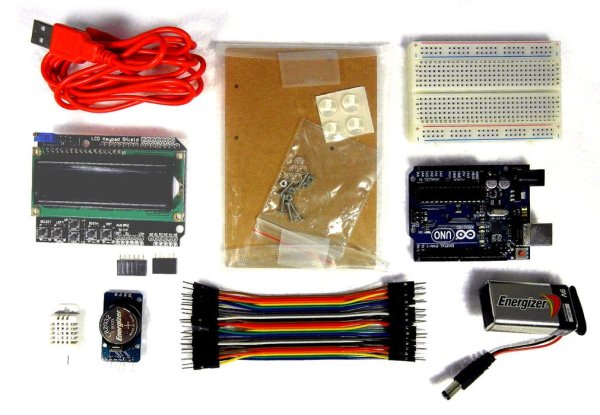
Parts used in the Calendar Time Humidity and Temperature Arduino LCD display:
- Arduino board
- LCD shield with buttons
- DHT22 humidity and temperature sensor
- DS3231 real time clock module
- Battery power source
- Breadboard
The power saving mode here is what sets this Instructable apart from other examples showing day of the week, month, day of the month, time, humidity, and temperature. It is this capability that allows this project to be run from a battery, without the requirement for a “wall wart”.
I had posted an earlier Instructable, Humidity and Temperature LCD Display with Power Saving Mode: Minimal parts, Fun, Quick, and Very Inexpensive, and at the end of that Instructable I presented a picture of an optional modification. That modification included the day of the week, calendar, and time also shown on the same display. I received a number of messages requesting information on that augmented display. Thus, I am posting this Instructable as a modification and extension to that earlier one.
To save readers the problem of having to find the earlier Instructable mentioned, I have duplicated some of the information presented in that Instructable here, and of course am including the augmented information to allow the Day of the Week, Calendar, and the Time to also be presented in addition to Relative Humidity and Temperature. However, some readers may not need the day of the week, calendar, and time, and only need the humidity and temperature displayed. For those readers, that earlier Instructable will work well.
As I mentioned in the earlier Instructable, my study was not always at the best temperature, so I decided it would be useful to display the ambient temperature on my desk. The cost of a sensor that provided humidity, in addition to temperature, was not prohibitive; therefore a humidity display was included in that project.
An additional requirement arose as my spouse frequently asked me for the day of the week and/or the day of the month, so I decided to include these in the display as well. I made two copies of the project shown here. One for my study, and one for the room in our house where my spouse is often found. I used both a (1) real time Clock (RTC) and (2) a humidity and temperature sensor.
Both the DHT11 and DHT22 humidity/temperature sensors I considered provide temperature results in Centigrade. Fortunately it is an easy conversion to Fahrenheit (the format used in the USA, which is my location). The sketch below provides code that can be easily modified to display temperature in Centigrade, if that’s what’s used where you’re located.
I considered both the DHT22 and the DTH11 sensors, and settled on the DHT22, although slightly more expensive. The DHT11 can often be purchased for less than $2, while the DHT22 is often found for less than $5. If purchased directly from China, the cost can be even less. If I only wanted to display temperature, I could have used a TMP36 sensor instead of the DHT22, and realized some savings, and indeed this is how I built an even earlier DIY project of mine. However, I decided to include the display of relative humidity among other items displayed in this project.
The DHT22 is slightly more accurate than the DHT11. So, the slightly higher cost of the DHT22 seemed reasonable. Both DTH devices contain capacitive humidity sensors. These humidity sensors are widely used for industrial and commercial projects. While not extremely accurate, they are capable of functioning at relatively high temperatures and have a reasonable resistance to chemicals in their surroundings. They measure the changes in a dielectric that are produced by the relative humidity of their surroundings. Fortunately, the changes in capacitance are essentially linear in relation to humidity. The relative accuracy of these sensors can be easily seen by placing two of them side-by-side. If this is done it will be seen that for relative humidity they differ by, at most, 1 or 2 percentage points.
The DHT11/22 sensors can easily be substituted for each other. Depending on cost constraints, if any, either sensor can be chosen. They both come in similar 4-pin packages that are interchangeable, and as we will see shortly only 3 of the 4 pins on either package will be needed to build the desktop humidity and temperature display presented here. Although only three pins are needed for use, the four pins provide additional stability when these DHT sensors are placed/mounted on a breadboard.
In a similar manner I considered both the DS1307 and DS3231 RTCs. As the ambient temperature can affect the DS1307, I settled on the DS3231. although the DS1307 can optionally be used. In a variety of tests comparing RTCs in relation to drift (i.e., getting the time wrong), the DS3231 came out as being more accurate, but the difference in using either sensor is not that great.
Of course, if you can easily connect to the internet in your project, you can download time directly and so you do not need a real time clock. However, this project assumes an easy internet connection is not available, and is designed to work without one.
If you are using a “wall wart” extra power consumption may not be of overwhelming importance, but if you are powering the display from a battery it likely is, as reduced power consumption will extend a battery’s life. Thus, this Instructable and the sketch below provides a way, using the “Left” button on the LCD shield, to toggle the backlight on and off to reduce power consumption.
As will be seen in this Instructable, the project requires relatively few components as the majority of the “heavy lifting” is performed by the sensors and the sketch.
I prefer to use an experimental platform for many of my projects, particularly for those that will end up as displays, as this platform allows the projects to be handled and displayed as a single unit.
Read more: Calendar- Time – Humidity and Temperature Arduino LCD display
- What feature allows this project to run from a battery?
The power saving mode that lets users toggle the backlight on and off using the Left button. - Can I use the DHT11 sensor instead of the DHT22?
Yes, the DHT11 and DHT22 are interchangeable 4-pin packages, though the DHT22 is slightly more accurate. - Why did the author choose the DS3231 over the DS1307 RTC?
The DS3231 was chosen because it is more accurate regarding time drift and less affected by ambient temperature changes. - Does this project require an internet connection to work?
No, the project is designed to work without an easy internet connection by using a real time clock. - How can I change the temperature unit to Centigrade?
The provided sketch can be easily modified to display temperature in Centigrade if preferred. - Is a wall wart required for this project?
No, the project is designed to run from a battery, though a wall wart can be used if power consumption is not a concern. - How many pins are needed from the DHT sensor package?
Only three of the four pins on the DHT sensor package are needed to build the display. - What platform does the author prefer for handling displays?
The author prefers using an experimental platform to handle and display projects as a single unit.