Summary of How to Build an Ohmmeter Using an Arduino
This article explains how to build a simple ohmmeter using an Arduino to measure resistance. The device operates on a voltage divider principle where two resistors split the 5V supply, allowing the Arduino to calculate unknown resistance values based on voltage drops governed by Ohm's Law.
Parts used in the Arduino Ohmmeter:
- Arduino
- 1KΩ resistor
- Resistor (whose value you want to measure)
In this project, we will show how you can build an ohmmeter using an arduino.

An ohmmeter is a device that can measure resistance.
Most of the times now, ohmmeters aren’t standalone devices but appear as one of type of measuring device amongst many in a multimeter. An advanced multimeter, today, would have an ohmmeter, voltmeter, ammeter, capacitance meter, continuity tester, and possibly a temperature sensor. For this circuit, we are only going to build an ohmmeter, as to measure resistance.
Using the correct hardware interface and uploaded code, we can turn the arduino into a device that can measure resistance.
Parts Needed
- Arduino
- 1KΩ resistor
- Resistor (whose value you want to measure)
These are all the parts which you will need. The circuit is very basic, as you will see below.
Circuit Schematic
The circuit schematic for the ohmmeter using an arduino is shown below.
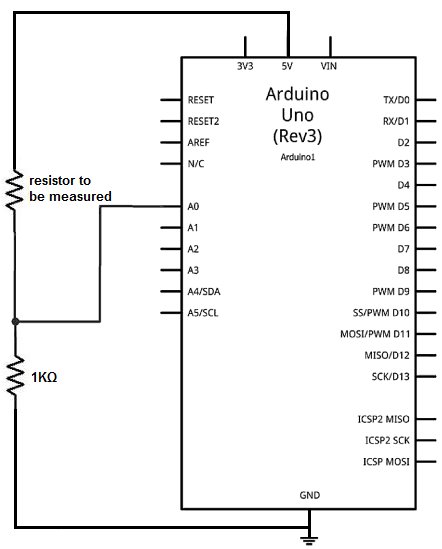
How this ohmmeter circuit works is that the 2 resistors in series forms a voltage divider circuit. One end of the resistor pair is hooked up to 5V and the other end is hooked up to ground. The 5 volts that the arduino provides gets divided up between the 2 resistors, depending on the value of the 2 resistors. The resistor which holds the greater resistance gets more of the voltage, according to ohm’s law formula, V=IR. The voltage that falls across a component is directly proportional to the amount of resistance it contains. Using this principle, we can set up a mathematical model to determine the resistance, based on the voltage division.
For more detail: How to Build an Ohmmeter Using an Arduino
- What is an ohmmeter?
An ohmmeter is a device that can measure resistance. - How does the circuit work?
The two resistors in series form a voltage divider circuit connected between 5V and ground. - Does the resistor with greater resistance get more voltage?
Yes, the resistor which holds the greater resistance gets more of the voltage according to Ohm's law. - What formula governs the voltage drop across a component?
V=IR determines that voltage is directly proportional to the amount of resistance. - Can this project measure capacitance or temperature?
No, for this specific circuit, we are only going to build an ohmmeter to measure resistance. - How do you determine the unknown resistance?
You set up a mathematical model to determine the resistance based on the voltage division. - Is the circuit complex?
No, the circuit is very basic as shown in the schematic. - What power source does the Arduino provide for this circuit?
The Arduino provides 5 volts that gets divided up between the two resistors.