
Summary of Build A Easy Home Surveillance Gadget Using Arduino
This article outlines a low-cost DIY home surveillance system to capture and timestamp photos of intruders or pets. Using Fwink software, a webcam, and PHP scripts on a hosting server, the system saves all images with time stamps rather than just the latest one, ensuring evidence is retained even if the local computer is stolen.
Parts used in DIY Home Surveillance System:
- Webcam
- Computer
- Internet access
- Domain name and hosting account (e.g., GoDaddy)
- PHP enabled server
- Fwink software
- Arduino or DIY-Duino (Optional for panning)
- Servo motor (Optional for panning)
- 9 Volt battery (Optional for panning)
- Duct tape (Optional for panning)
- Stand for webcam mounting (Optional)
Everyone wants to keep their home secure. If zombies have swarmed your house, you want to know it’s not safe to return, RIGHT?
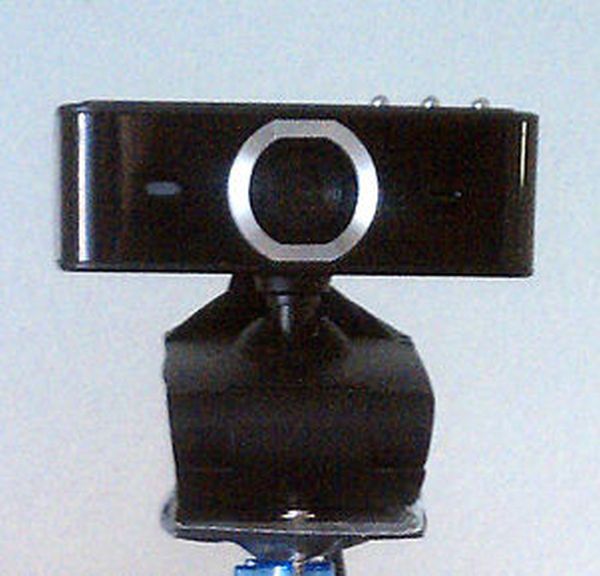
What better way to do this than to set up a surveillance system?
Now it’s easier than ever to have.
And, you don’t have to shell out hundreds of dollars to make sure the infected haven’t infested your home. OK, I’ll get back to reality… This instructable is good for catching thieves and mostly just keeping tabs on your pets throughout the day.
There are plenty of free websites where you can “subscribe” and they will host your web cam. But these sites often don’t store all the photos taken by your cam — at least the free ones don’t. Most often, these sites simply post the most recent photo and then refresh it — saving over the old one. In my book, that’s just not good enough.
What happens if some low-life robber breaks into your place and steals all of your stuff? In order for you to catch someone in the act, you’d have to sit in front of the computer all day long. Otherwise, you have any idea of who’s broken in.
In this instructable, I’ll show you how to set up an inexpensive, yet reliable system to capture photos, upload them to your website, and rename them with a time stamp. This way, ALL of the photos taken are saved on your server, and you can delete them at your convenience. Now, even if your computer is stolen, you’ll likely have the photo evidence to catch the low-life thief.
Step 1: Materials list
Major Components in Project
You will need:
• Webcam
• Computer
• Internet access
• Domain name and hosting account — I use GoDaddy, you can get a domain for 9.99 and three years of hosting for pretty cheap (Google search for hosting promocodes).
• Php enabled server — ask your provider if you don’t know if you have this.
• Some programming knowledge – though I will be providing you with the code you need, so you can really just copy and paste.
• FWink — a free webcam program you can download here: http://www.lundie.ca/fwink/
Files — I will give you the scripts for these:
index.php — a page to display the most recent photo
stamp.php — a page that renames the most recent photo with a date and time stamp (you’ll leave this page up and running when you leave your home)
all.php — a page to list all of the photos
Optional parts to make your cam pan from left to right:
• Arduino or, better yet, a DIY-Duino ; – )
• Servo motor
• 9 Volt battery
• Duct tape
• Some kind of stand to tape the webcam to, unless you are using your computer’s webcam.[/su_box]
Step 2: Set up the folders
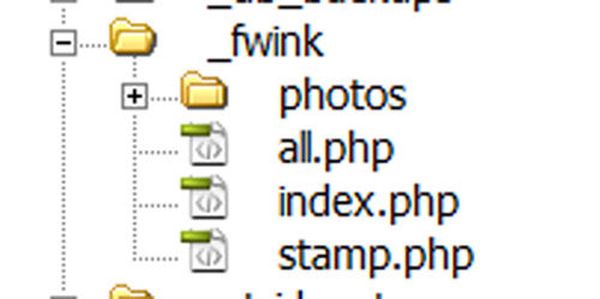
OK, lets start with setting up your site.
In the root directory of your site, create a folder named “_fwink” (note the underscore) .
Here is where you will save the three files:
index.php
stamp.php
all.php
You’ll create these files in the next three steps.
Inside the _fwink folder, create another folder called “photos“.
Here is where all of the photos will be uploaded.
You MUST name all of these files and folders EXACTLY like this, or the code will not work.
Step 3: Create the index.php file
The next three steps will contain the code you need for the three files.
The pages I created are pretty simple.
If you are keen on code, then you can customize them however you wish, adding colors and the like.
For this instructable, I kept the design at the bare minimum.
Open your coding program. I use Dreamweaver.
Note, you MUST have php enabled on your server for this instructable to work.
Contact your hosting provider to see if you have it enabled.
Create the index.php file, which will show you the most recent photo taken.
Here is the code for the index.php file:
<!DOCTYPE html PUBLIC “-//W3C//DTD XHTML 1.0 Transitional//EN” “http://www.w3.org/TR/xhtml1/DTD/xhtml1-transitional.dtd”>
<html xmlns=”http://www.w3.org/1999/xhtml”>
<head>
<meta http-equiv=”Content-Type” content=”text/html; charset=utf-8″ />
<title>Webcam</title>
<!– this line refreshes the page every 5 seconds –>
<META HTTP-EQUIV=”REFRESH” CONTENT=”5″>
</head>
<body>
<table width=”320″ border=”0″ cellspacing=”0″ cellpadding=”10″ align=’center’>
<!– this line gets the most recent uploaded photo, the rand() function allows for any cache that might show old photos –>
<tr><td><?php echo “<img src=’photos/recent.jpg?r=”.rand(9,9999999).”‘ width=’640′ height=’480′ border=’1′>”; ?></td></tr>
<tr><td align=”center”>
Image refreshes every 5 seconds.
</td></tr>
<tr><td align=”center”>
<!– this is a link to the page that will list all of the photos you have saved –>
<a href=’all.php’>Show all</a>
</td></tr>
</table>
</body>
</html>
<!– End of the Code –>
This part of the code:
<META HTTP-EQUIV=”REFRESH” CONTENT=”5″>
Refreshes the page every 5 seconds.
Save the file as index.php and upload it into the _fwink folder on your server.
The image attached is a sample of what you’d hope to see when you have the camera set up — a messy house, lazy animals and no zombies or robbers.
You’ll set up the camera later.
Step 4: Create the stamp.php file
The page stamp.php will need to stay up and running on your computer for everything to work.
If you close the window, the photo will NOT be copied and renamed, and you will only have the most recent photo.
What does this file/page do?
First, it looks to see if there is a new “webcam.jpg” file in the photo folder.
If there is a file, it copies the file and renaes it “recent.jpg”
Then, “recent.jpg” is renamed with the current date and time — this way, your photo is saved when the Fwink program writes over it with the next photo.
And this will be done every 5 seconds.
The page will tell you if it has found a new photo or not with a simple message:
“Time stamping most recent photo” or “No new photo” will show on the page.
Here is the code for the stamp.php file:
<!DOCTYPE html PUBLIC “-//W3C//DTD XHTML 1.0 Transitional//EN” “http://www.w3.org/TR/xhtml1/DTD/xhtml1-transitional.dtd”>
<html xmlns=”http://www.w3.org/1999/xhtml”>
<head>
<meta http-equiv=”Content-Type” content=”text/html; charset=utf-8″ />
<title>Time Stamp Photos</title>
<!– this line refreshes the page every 5 seconds so we can check for new photos and rename them–>
<META HTTP-EQUIV=”REFRESH” CONTENT=”5″>
</head>
<body>
<?php
if(file_exists(“photos/webcam.jpg”)){
echo “Time stamping most recent photo<br><br>”;
copy(“photos/webcam.jpg”,”photos/recent.jpg”);
$stamp=date(‘Y-m-d-_h-i-s’);
rename(“photos/webcam.jpg”,”photos/”.$stamp.”.jpg”);
}else{
echo “No new photo”;
}
?>
</body>
</html>
<!– end of code –>
Again,
<META HTTP-EQUIV=”REFRESH” CONTENT=”5″>
this refreses the page ever 5 seconds.
Thus, your file is being renamed every 5 seconds.
Step 5: Create the all.php file
The file all.php simply displays all of the photos that have been taken.
Here is the code for this file:
<!DOCTYPE html PUBLIC “-//W3C//DTD XHTML 1.0 Transitional//EN” “http://www.w3.org/TR/xhtml1/DTD/xhtml1-transitional.dtd”>
<html xmlns=”http://www.w3.org/1999/xhtml”>
<head>
<meta http-equiv=”Content-Type” content=”text/html; charset=utf-8″ />
<title>All Photos</title>
</head>
<body>
<?php
$dir = ‘photos/’;
$files = scandir($dir);
foreach($files as $ind_file){
if($ind_file==”.” || $ind_file==”..”){
// do nothing
}else{
echo “<img src=’photos/”.$ind_file.”‘>”;
echo “<br>”;
echo $ind_file;
echo “<br><br>”;
}
}
?>
</body>
</html>
Step 6: Downloading and setting up Fwink
The program you’ll use to capture and upload photos to your site is called Fwink.
You can download the program for free here: http://www.lundie.ca/fwink/
This program will upload a photo to your server named “webcam.jpg” — more details on this later.
Install the program and lets get started setting up the photo uploads.
Click the “Settings…” button to set up your uploads.
For more detail: Build A Easy Home Surveillance Gadget Using Arduino
-
What problem do free web cam hosting sites often have?
Most free sites only store the most recent photo and refresh it, overwriting old images. -
How can you ensure all photos are saved on your server?
By using this specific system where photos are renamed with a time stamp every 5 seconds. -
Why must the stamp.php file stay open on your computer?
If closed, the photo will not be copied and renamed, leaving only the most recent image. -
What folder name is required for the code to work correctly?
You must create a folder named _fwink including an underscore at the beginning. -
How often does the index.php page refresh automatically?
The page refreshes every 5 seconds to show the most recent uploaded photo. -
What happens if the stamp.php script finds no new photo?
The page displays the message No new photo. -
Can this system help catch a thief if your computer is stolen?
Yes, because all photo evidence is saved on your remote server, not just locally. -
What is the function of the all.php file?
This file lists and displays all the photos that have been taken and saved.
