While being a bit lengthy and requiring experience with Arduino, this contraption is bound to grant you infinite glory among your friends, toddlers and grownups alike!
Step 1: What You Need
Here’s a list of the materials and parts I used:
The Frame
* 5 x 4-feet long rectangular profile (0.5″ x 0.5″) pieces of wood, as solid as possible.
Although you could probably get away with plywood if you wanted to, I always like to go for something sturdier than what I actually need, to compensate for unexpected shortcomings.
* 12″ x 4″ x 0.5″ piece of wood for holding the fan and servo.
From now forth I’ll refer to it as the wooden shelf. Please excuse my English, I am Israeli.
* 2 hinges, mine were about 1.5″ in length.
* 4 Colorful plastic floats a.k.a “Wacky Noodles”, ~5 feet long.
these, for instance.
* 20 medium-size zip ties for securing the plastic floats to the wooden frame
alternatively, you could go with glue…
* 5 tiny-size zip ties for attaching the opening-closing arm to the servo
Make them colorful if you can, to go with the rest of the design!
* Some bolts, nuts, washers
I used 1/8″ diameter ones, various lengths. Sorry for being somewhat vague, it’d take quite a coincidence for you to get exactly the same parts, do your scavenging & adjustments
* 6 feet fishing line
This will be used to connect the motor to the arms, so better get a strong one
* 6 feet thick thread for making the bubbles, preferably made of cloth
Use a thread that is both absorbing and flexible – important for bubble making, as you’ll find out.
I actually used a mountaineering thread I had, about 5mm wide. The important features you want are: a. that it would be able to absorb the soap and b. that it would be flexible enough and not form knots. One of the reasons I like using distilled water, is that the thread will never hardens.
* 2 round wooden sticks, 2 feet long, 3mm in diameter
(Or zip-tie together two 1-feet sticks)
These will be used as the poles holding the threads that create the bubbles. One of them will be fixed to the piece of flat wood, and the other will be mounted to the servo – this means they need to be as light-weight as possible .
* 1 round wooden stick, 2 feet long, 5mm in diameter
(Or – zip-tie together two 1-feet sticks!)
This will be used as the lever allowing the motor to bring the arms up and down, using the fishing line. Therefore, it should be sturdier than the others.
* 10 1.5″ long wood screws, 3-4mm in diameter
* Plastic tub for the soap fluid
The Brains
* 3 feet of ordinary 1-lead wire
* A levered micro-switch, something like this one
.
* A Servo, preferably not the lamest one you can get.
I got mine for free in a time of blissful need from someone during geekcon2010, but it was roughly similar in size and torque to this one.
* 6V Geared motor
This one’s responsible for raising and lowering the arms that go into the soap bucket and spread open in the air, so it better be geared to take some load. I used a geared motor module I disassembled from a scanner/printer, but you can use anything, as long as it’s 6v, around 5-10 RPM
* A roller/pully, used to collect the wire
It should be attached to the motor’s shaft, so make sure you get parts that can play nicely together. I got mine by taking down all solder from my soldering kit’s roller (see photo). Not the best option, I’ll admit.
* 12V Tower-rack computer fan.
I used a 4.7″ X 4.7″ one. You can always slow down a fan by rapidly switching it (using PWM or otherwise), but not the other way around.
* 10 feet of 3-pin servo leads extension cables
I used these ones , which are hassle-free
* Circuit Prototyping board, I use something that looks like this
* 1 Arduino or an Arduino-clone.
I use this RBBB from ModernDevice, which is pretty cheap and easy to work with. Instead of the supplied transistor I install a 7805 regulator to take down my 12V input (mopad battery)
* 1 plastic kit-box for the electronic components. Mine was 5″ x 3″ x 2″.
* 12V battery / Power adapter
I use my mopad’s battery when outdoor or the adapter when in civilization.
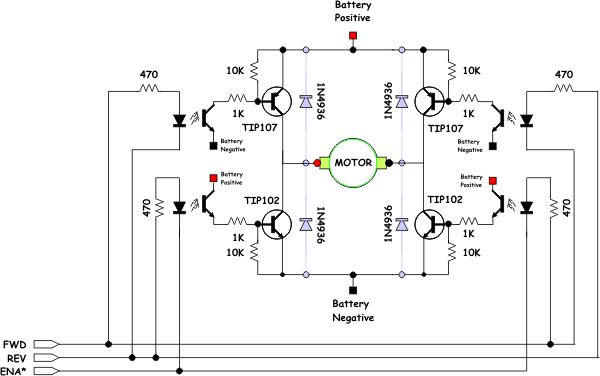
* H-Bridge components:
2 x TIP107 PNP Darlingtons
2 x TIP102 NPN Darlingtons
4 x 2N3904 transistors
4 x 1/4W 1K resistors
4 x 1/4W 10K resistors
I am grateful to Chuck McManis, who wrote this must-read piece on H-Bridges which I pretty much implemented as written. See schema in photos.
Soap Mixture
I used the instructions published by these guys , quantities multiplied by 4:
4 liter of distilled water
3.2 liters of a pre-made bubble mixture
1 deciliter of detergent (I used regular green Fairy with great success)
1 deciliter of glycerin
Tools
* Solder iron and solder
* Hot Glue Gun:
Although abominable when overused, there aren’t many engineering problems that cannot be solved with enough hot glue. Or design-related problems, coming to think of it. Hack, it’ll probably solve most kinds of domestic problems, too. Not that I preach for this kind of usage, but hey, I’m just sayin’. The hot glue gun is our weapon in the war against sophisticated (as boring) product assembly lines.
* Electric screwdriver/drill
We will drill some holes and screw some screws when building the frame
* 3mm and 5mm wood drills
* Wood Glue
* Hand Saw, Awesome!
Step 2: Building The Frame
there are 2 ways of starting up:
By Hand
1. Screw together two sticks into a V shape. Than do another pair
make sure they come out as similar as possible, for maximum stability .
Then,
2. Connect them with one another with a horizontal stick.
When sawing the horizontal piece of wood, you may want to leave some room for the Arduino box, to be attached to it, taking extra 5-6″ that will stick from the side.
you now supposed to get two triangles, connected by their vertexes.
See main image for an example of the outcome.
Premade
Just buy separately one table stand
it probably makes more sense unless you enjoy any kind of woodwork (like me).
Now,
Onto that horizontal stick, evenly attach hinges.
I am such a pretty bad carpenter, hinges are my all time nemesis. I hope you do better.
Attach their other end to the little shelf
yes, that’s the last piece of wood on the list –
keep in mind that you should be able to drill a 5mm hole in it’s width, so double check you chose a piece thick enough; this hole is going to be used for the round pole that is connected to the motor with a fishing line.
Onto the wooden shelf’s profile, drill holes for the needed peripherals
Facing backwards:
* 5mm hole for the stick mentioned above
Facing forwards:
* 3mm hole for the fixed bubble-making arm
* 2 holes for attaching the fan via screws.
* Depending on the servo’s size: Holes for attaching the servo or saw a socket for it, which is what I did (see image 4)
Step 3: Adding The Bubbling Subsystem (*)
(*) Includes: servo, arms and thread loop
Attach the servo to the wooden shelf
Either use the socket you sawed or drill it in.
At any case, servo should be leveled with the shelf so that when the shelf is facing down, pulled by gravity, the servo’s arm should also be on a plane almost perpendicular to the ground
Stick (and later glue) the 3mm round wooden stick in the hole you made for it
Attach the second 3mm stick to the servo using zip ties.
Servos are designed to control little RC airplanes, and their physical arrangement is somewhat awkward when it comes to things other than that, imho. Just do the best you can to get a stable, fixed-as-possible, arrangement.
Alternatively, if you’re up to it, you can make better fittings with a piece of tin and 0.5mm drill
Cut the 6 feet of string to 2-feet piece and 4-feet piece.
Minor size adjustments may be made later on, but these sizes should put you in the safe zone.
Tie each end of the string to each end of the wooden sticks
So, now when the arms are open, a loop is formed.
See last image, or this photo which sums it up nicely, except that your sticks will be attached to the wooden shelf and the servo
Tie a zip-tie on the long thread, creating a smaller, 8″ loop just below the bigger one
This will make sure that when the arms are down, dipping in the bucket of soap, the loop will not be partially covered with soap and not develop bubble. Also, it helps the loop go back into the bucket when the arms are brought down.
(In BubbaBot 1.0, the arms just dropped back into the soap bucket by gravity, movement it was much more abrupt. perhaps you don’t really need that last knot here)
and now, a message from our cheerleaders:
Voila! Forward arms are ready!
Now stick the 5mm round wooden stick in the hole facing backwards.
As said, later glue it in
Then, tie a fishing line to its end
you can grind a small crack that will keep the line in its place.
test manually how much power it takes to pull the shelf, arms and thread. It shouldn’t be too hard, if your hinges are right. If they are slightly crooked, try oiling them. If more than slightly, you’re up for some alignments.
Step 4: Fan
Attach the fan to the wooden shelf,
so that it blows air just below the spreading arms. You may need to adjust it later, so don’t drive the screws all the way in.
For the first version at Geekcon2010 , I used an ordinary household fan connected to AC that blew air continuously . Later I found a computer fan big enough to push enough air through the loop so that decent bubbles are created.
The mechanical motion of air is a pale imitation of the free flow of air that is created when you make bubbles manually with two sticks and a string, as in this Instructable, but it does the trick.
(Any improvements welcome, of course)
Take a break. Get a beer, you deserve it.
Watch this magnificent clip that made me build this bot at the first place.
For more detail: Bubblebot: Gigantic Bubble Generator